Monday, April 29, 2013

angel food cake cupcakes with strawberries & cream

Angel Food Cake Cupcakes with Sliced Strawberries & Whipped Cream via design. bake. run.

i'm loving the spring season at the moment. i can't complain about it, especially not here in san francisco. the last few weeks we've been so fortunate with mother nature giving us gorgeous sunshine and almost no-jacket/sweater weather. seriously, today was about 80 degrees in the city! i went out for my daily lunch walks earlier today not needing to bring a coat. you don't get this too often here in the city. but lately, it's been fabulous. i can't complain. i just hope this weather trend stays like this for several more days, weeks even! too bad it doesn't usually last very long. but in the mean time, i'll take it.

alright, so with spring comes all the amazing spring fruits such as strawberries. over the last few weeks i've been eating strawberries nonstop. i couldn't help it. it's everywhere in the grocery stores, farmer's market… wherever. so what better way to use up some of the strawberries than your classic angel food cake for a little of that delicious berries and cream combo?! oh boy, this strawberry angel food cake dessert is to die for. it is so perfect; nice and light with that fresh taste of strawberries and the sweetened freshly whipped cream. mmmm… delish!

so there's a backstory to this angel food cake dessert. you see i've never ever attempted to make angel food cake before. yes, like ever! a year or so back when i asked for requests from my coworkers as to what kind of baked goods to bring them, one of them asked if i could make an angel food cake. i told him, no way, not in a million years. i would have to like him a whole lot, like a lot LOT or somehow be bored out of my mind to make one. i'll make anything else but angel food cake. so yes, for some odd reason, i've just never cared or be bothered to make angel food cake. i guess you could say, and i will admit this here that i was a bit intimidated by all those egg whites! yes, there are so many egg whites you have to whip up just to make one angel food cake. even in this first attempt, i didn't even make the full recipe. actually, i didn't even use your typical angel food cake pan mold. i made mine as cupcakes instead. even mini ones! but yes, i was intimidated by the egg whites. looking at the recipe i'm thinking, "what?! i have to whip all those egg whites? what am i going to do with all the yolks. there are so many egg yolks!" -- hahaha, silly i know. but these days, i have ways to use up those egg yolks. yeah, i still have those yolks sitting in the fridge. they'll probably either (a) end up in the garbage, (b) turned into some delicious pastry cream for cream puffs or whatever, or (c) it's about time i make some lemon curd with all those lemons in our backyard (yes, we have an itty bitty meyer lemon tree out back that actually has some lemon on it! i know, it's pretty incredible considering how tiny it is and the fact that there's hardly ever any fruits in all the years we've had it!)

mmm… so there you have it. i'm not sure what happened, but i guess i did sort of make some form of angel food cake. yes, not the real thing, but close enough. you can say it was because of all the fresh strawberries and sunshine that inspired me to finally attempt to make this cake. will i make it again and am i intimidated by all those egg whites now that i've done it once? nah, no way. blah. easy peasy. i can do it in my sleep! hehe jk i'll probably make this cake batter again, and yes, one day in the proper form and all. the cake is lovely and turned out fantastic. yeah, it's the diet dessert -- actually, not! no dessert is a diet dessert. but i have to say, it is seriously super light (at least it tastes like it, minus the sugar?! haha) and delicious.

below's the recipe i used to make the cupcake form of angel food cake. feel free to make some and let me know what you think. so, what do you say? pretty good eh?! i'm in love with these and they taste absolutely amazing -- fresh and sweet just like the perfect spring weather we are enjoying right now! enjoy and happy baking! :)

we love SF -- instagram photo by mzrichee
the weather here in san francisco has really been that awesome. for sure beach-worthy.

angel food cake cupcake treat for sfkaos -- instagram photo by mzrichee
an instagram photo of this yummy treat a lucky few received one day at work last week.

Angel Food Cake Cupcakes with Fresh Strawberries & Cream via design. bake. run.
i am in love with this angel food cake cupcake. it is such a refreshing spring treat with the fresh strawberries!

angel food cake cupcakes with strawberries & cream
recipe adapted from the baker upstairs

ingredients:

cupcakes:
  • 1/2 cup + 2 tablespoons flour
  • 1/2 cup powdered sugar
  • 1/2 cup granulated sugar
  • 6 egg whites
  • 3/4 teaspoon cream of tartar
  • 1 teaspoon vanilla
  • 1/8 teaspoon salt

strawberries & cream filling:
  • 12 strawberries, washed (you can use more or less strawberries depending on your preference, i used a strawberry per cupcake)
  • 1 cup heavy whipping cream
  • 3 tablespoons granulated sugar

directions:
  1. preheat your oven to 350° F and prepare a cupcake pan (12-count) with paper liners.
  2. in a small bowl, combine the flour and sugars, set aside.
  3. in the bowl of your stand mixer whip the egg whites for one minute, until frothy. add the cream of tartar, vanilla and salt, and whip for 5-6 minutes until stiff peaks form.
  4. then sprinkle 1/4 cup of the flour mixture over the egg mixture and fold in gently, repeating until all the flour is incorporated.
  5. spoon the batter into the paper liners and bake for 15-17 minutes, until lightly golden and springy to the touch.
  6. remove from the oven and cool completely in the pans.
  7. while cupcakes are cooling, make the whipped cream and slice the berries.
  8. for the whipped cream: add the heavy whipping cream and sugar to a medium size bowl and whip for 3-4 minutes, until light and airy. refrigerate the whipped cream in the refrigerator while you slice the berries.
  9. to assemble the cupcakes: take the paper liners off the cupcakes very carefully. slice the cake in half and top the bottom half with a very good spoonful of whipped cream. then add the slices of fresh strawberries before topping it off with another spoonful of whipped cream. put the top half of the cake back on to finish. if the cupcake looks like it's falling apart you can use a toothpick to hold it in place. of course, remove the toothpick before consuming. serve immediately or keep refrigerated until ready to eat.

makes 12 cupcakes. enjoy and happy eating! :)

Tuesday, April 16, 2013

2013 boston marathon tragedy, 30-day exercise challenge update, new challenge

Mr. Rogers Quote -- Pray for Boston 2013

yesterday's tragic event at the boston marathon was just awful. it really hit close to home. we don't run big race events very often, but the boston marathon was definitely one race we'd hope to someday be able to run. i know it's one of those races where you'll have to qualify to get in or be a part of some kind of charity group. i figure if we can't qualify it ourselves, maybe we'd consider raising money for charity and running it that way. yes, all of this one day in the future as we tackle city marathons one at a time.

i heard about the bombings at this year's boston marathon 3 hours after the incidents. i know, a little late. but when i heard about it, my heart just dropped. i felt so bad for all those spectators, participants and event members near the explosion sites. just thinking about them how moments before they were cheering on all the runners (maybe even a loved one who was running the event) who were approaching the finish line or approaching and crossing the finish line themselves. oh, it's just awful. i think i went to bed thinking about it. i had to tell myself i needed to get to sleep because i had a 4 or 5 mile run this morning. i needed to keep up with my half marathon training as i will be running the sf marathon in june. i'm sure and hopeful that after yesterday's tragic event that security will be tighten around all marathons or big events. i heard the london marathon is this weekend and that the event will go on. the london marathon is also one event on our list we'd like to run in one day too. i told m we'd have to get an england address first before we can even apply to run. actually, he already has an england address, i just need to get one myself. or he'll just run it without me, and i can cheer him on. (you see? it's terrible right, just thinking about how it could be anyone, at any event.)

okay, moving onto other things more on a lighter note. how have i been doing in my 30-day exercise challenge? not bad actually. so far, i've passed the halfway mark and i am proud to say i have been going strong, still is and i hope to reach the finish line in top form. i did however modified what i had set out to do once i got going on the exercises though. instead of resting on the 7th day, i work out 5 days straight, then rest on the 6th day. after each rest day, i bump up my reps on the different exercises. i'm proud to say i can do 110 squats easy – yes, just like that. so far, so good. i think after this 30-day exercise challenge i'm going to do another one but with much tougher exercises such as lunges and arm strengthening moves. yeah, i'm not a big fan of lunges so that will be tough. we'll see how many lunges in a row i can do. ugh, i hate lunges, just thinking about it. hehe ;)

modified 30-day exercise challenge:
  • day 1-5: start with 50 squats on day 1, increase squat count by 5 (should be at 70 squats on day 5), 30-sec plank, 20 pushups, 15-sec side planks (each side), 20 dips
  • day 6: rest
  • day 7-11: start with 80 squats, increase squat count by 5 (should be at 100 squats on day 11), 45-sec plank, 30 pushups, 30-sec side planks (each side), 30 dips
  • day 12: rest
  • day 13-17: start with 110 squats, increase squat count by 10 (should be at 150 squats on day 17), 60-sec plank, 40 pushups, 30-sec side planks (each side), 30-sec plank, 40 dips
  • day 18: rest
  • day 19-23: start with 160 squats, increase squat count by 10 (should be at 200 on day 23), 75-sec plank, 50 pushups, 45-sec side planks (each side), 45-sec plank, 50 dips
  • day 24: rest
  • day 25-29: start with 210 squats, increase squat count by 5 (should be at 230 on day 29), 90-sec plank, 60 pushups, 60-sec side planks (each side), 60-sec plank, 60 dips
  • day 30: 250 squats, 2-min plank, 75 pushups, 75-sec side planks (each side), 90-sec plank, 75 dips

oh, i've joined a bunch of groups on fitbit to keep my motivation going. in one of the group forums, someone started an independence day (july 4th) challenge. it's for anyone who wants to lose or maintain weight or be able to do a certain set of exercise or whatever by july 4th. so my goal for that challenge is to lose those last 10 pounds! yes, it's so frustrating. 18 months later and i'm still not back to my pre-baby #2 weight. ugh, i know.

independence day challenge (as of 4/15/13):
  • starting/current weight: 106 lb
  • memorial day goal: 101 lb
  • independence day goal: 97 lb

i think if i really discipline myself, i can get there. i'm also trying to eat better, so hopefully that will help a bit? i don't know. i haven't been eating very good lately, even with all this exercising and half-marathon training. so today i've decided that if only i can get myself to eat very good (strict 1200-1400 cal diet) 2 days in a row, i can splurge a little bit on the third day. so eat good 2 days, splurge a little 1 day, and just keep repeating. when i mean splurge, i don't mean eat all the crap i want. it just mean if i want to have ice cream, i can have some. just not the entire carton! so yes, with that said, good luck to me! :)

alright, we'll see where i am come july 4th! i'm excited. now i say, if you want to set a goal for this independence day challenge, why not?! whether it's losing weight, maintaining weight or having the ability to do 50 or 100 pushups in a row or 250 squats, etc… you can certainly join in!

okay, stay tune for updates. :)

---------------------------

random stats i'm throwing out there (more for me, personally):
  • miles ran this year as of today (according to my data on garmin): 137.73 miles
  • lifetime steps with fitbit as of this morning (member since feb 24, 2013): 749,254 steps
  • weight lost since january 1 of this year: 3.2 lb
  • today's weight: 105 lb

Friday, April 12, 2013

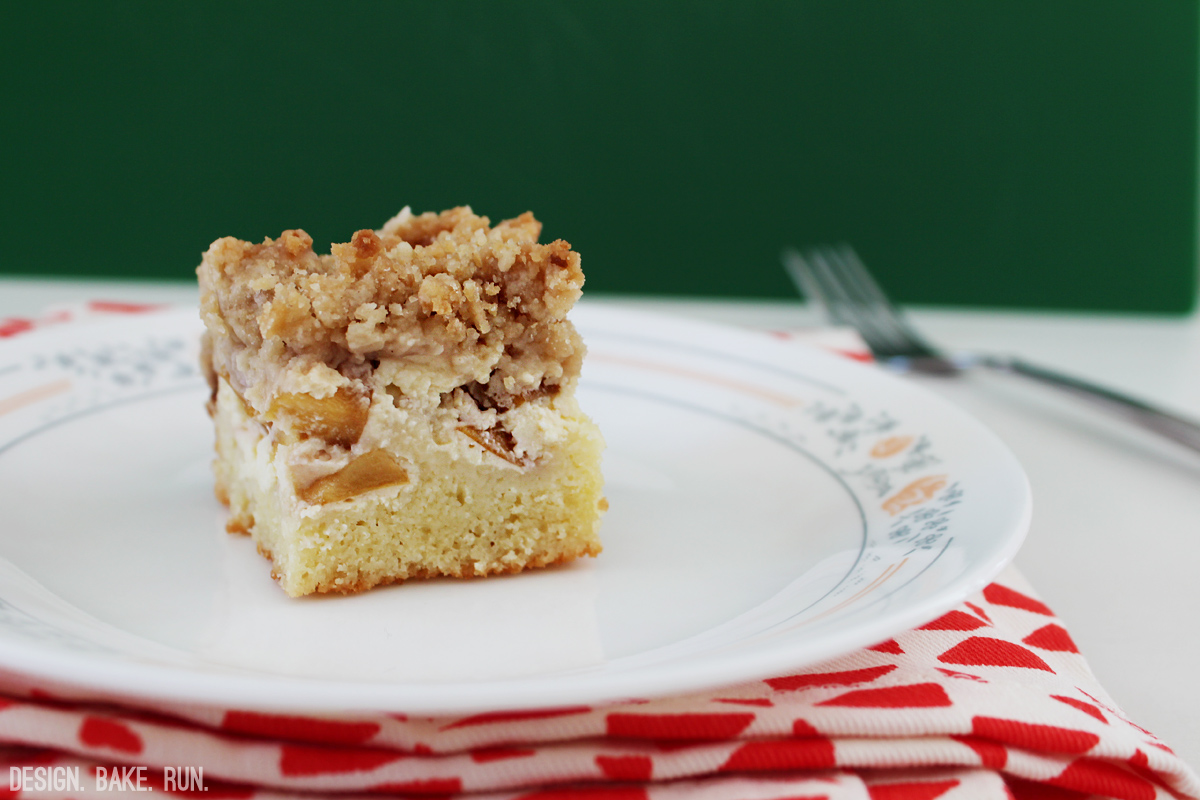
peach with cream cheese crumb bars

Peach Cream Cheese Crumb Bars via design. bake. run.

i haven't been baking the last few days or week… actually, i can't remember the last time i baked before making these peach cream cheese crumb bars here. i just know it has been a while in my book. that's because i can't seem to find any time to bake! or want to bake. i'm always exhausted at night (that's when i usually do my baking). anyway, somehow i managed to get myself to make these crumb bars. i wanted to try out a recipe i saw on interest but didn't have any strawberries on hand. plus, i needed to use up the rest of whatever fruit we had in the fridge before it all spoiled.

so, the results? ahhh, yeah, these peach cream cheese crumb bars. the recipe below is really just martha stewart's blackberry crumb bars recipe that i've made many times in the past, but i just added a new layer to it, the cream cheese. it turned out pretty good. i do love my cream cheese. i think the cream cheese definitely added another layer of yumminess to this crumb bar recipe.

below's the recipe should you want to try and make it yourself. trust me, if you make it, you won't be disappointed. all that crumb toppings with the peach and cream cheese filling in the middle, then the bottom cake layer all together… mmmm…. so good. enjoy and happy baking and eating! :)

Peach Crumb Bars with Cream Cheese Center via design. bake. run.
the crumb topping in this recipe is just delicious. i love how it adds a nice sweet crunch to the bars when you bite into it.

Peach with Cream Cheese Crumb Bars via design bake. run.
an overhead shot of the peach cream cheese crumb bars

peach with cream cheese crumb bars
recipe adapted from martha stewart

ingredients:
  • 6 tablespoons unsalted butter melted, and 1/2 cup (1 stick), room temperature, plus more for pan
  • 1-3/4 cups all-purpose flour (spooned and leveled), plus more for pan
  • 1/2 cup packed light-brown sugar
  • 1/4 cup granulated sugar
  • 1/2 teaspoon salt
  • 1/2 teaspoon baking powder
  • 1 cup confectioners' sugar
  • 1/2 teaspoon pure vanilla extract
  • 3 large eggs
  • 1 bar (8 oz) cream cheese, softened
  • 4 medium size peaches, cut up into tiny pieces (or you can slice them if you like – if you do that, maybe you might not need as many?!)

directions:
  1. preheat oven to 350°f. butter an 8-inch square baking pan. line bottom with parchment paper, leaving an overhang on two sides; butter and flour paper, tapping out excess.
  2. make topping: in a medium bowl, whisk together melted butter, brown sugar, and 1/4 teaspoon salt; add 1 cup flour, and mix with a fork until large moist crumbs form. refrigerate topping until ready to use.
  3. make cream cheese layer/filling: in a separate medium bowl, mix together the 1/4 cup granulated sugar and cream cheese together until blended. then add in one egg and mix until everything is incorporated. set aside.
  4. in another separate medium bowl, whisk together remaining 3/4 cup flour, baking powder, and remaining 1/4 teaspoon salt; set aside. in a large bowl, using an electric mixer, beat room-temperature butter, confectioners' sugar, and vanilla until light and fluffy; add the two eggs, one at a time, beating well after each addition. reduce speed to low; mix in flour mixture. spread batter evenly in pan; then pour in the cream cheese filling and spread evenly. once that's done, sprinkle with peach pieces, then chilled topping.
  5. bake until golden and a toothpick inserted in center comes out with moist crumbs attached, 40 to 45 minutes. cool completely in pan. using paper overhang, lift cake onto a work surface; cut into 16 squares.

note: while you prepare the cake, refrigerate the crumb topping. this will help give it a nubbly texture once baked. to store, keep in an airtight container at room temperature, up to 3 days.

Wednesday, April 10, 2013

udon noodles stir-fry

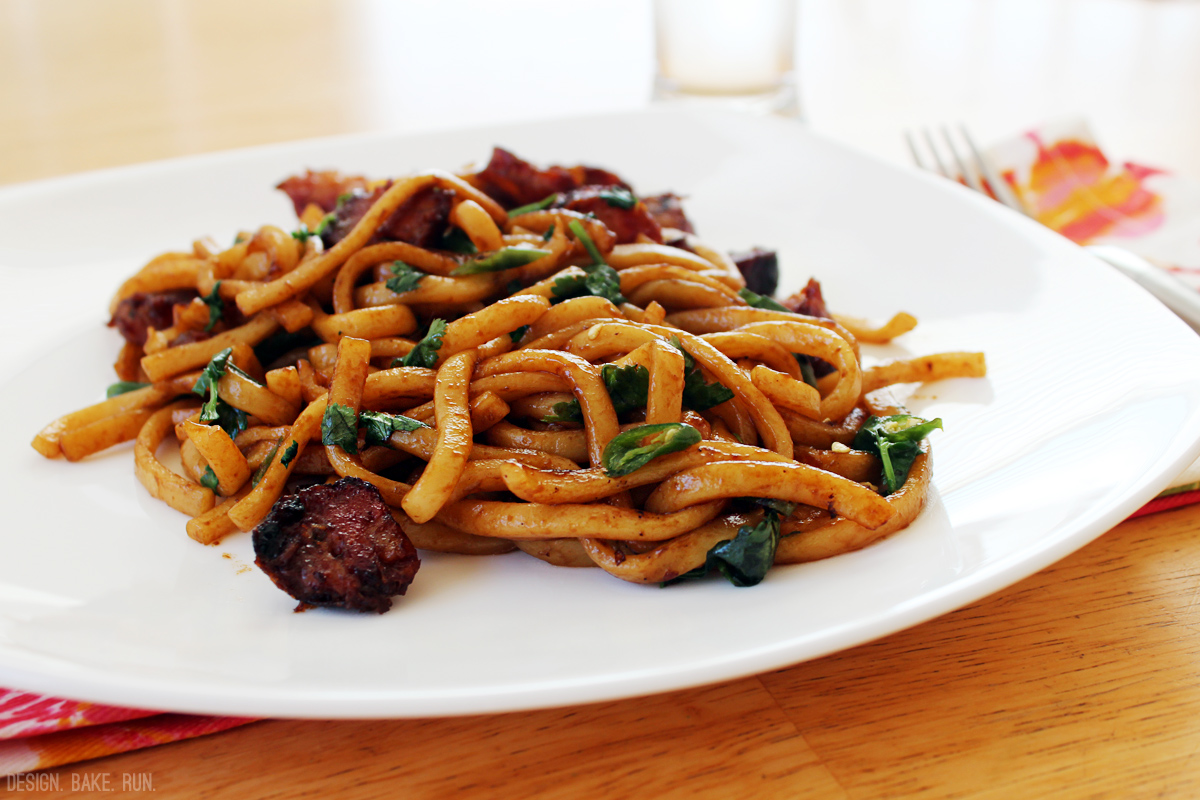
Udon Noodles Stir-Fry with Pork Sausage via design. bake. run.

i had the luxury of working from home this afternoon. actually, it was because i needed to pick c up from school as m couldn't do it today. when i got home around lunch time i had about 15 minutes to spare before it was time to pick up c. i had been craving some chow mein noodles these past few days but have yet to satisfy my cravings. with that 15 minutes i decided that i would somehow attempt to make some kind of noodle stir-fry dish. i had some udon noodles in a vacuum sealed-type pack that i picked up from the chinese supermarket many trips ago sitting in my pantry. those noodles are all ready to go. you just need to heat it in hot water for 3 minutes before adding it to your stir-fry or soup broth if you're making noodle soup. i also had some leftover pork sausage i made the other night sitting in the fridge. so i decided why not use those up in this noodle stir-fry.

okay, i suck at telling stories. to get to the point, i whipped up this udon noodles stir-fry dish with simple ingredients i had lying around the house in less than 10 minutes (5-7 minutes probably?!). it's so simple. literally a piece of cake. you can make it too. it's so easy and makes such a delicious meal in less than 10 minutes (for one or two, or more people)! so if you'd like to try, the recipe is below. just note that i only wrote it up for one serving as that's what i made today. you can double or triple it for more people. so go ahead and let me know what you think. oh, and just as a disclaimer, they don't taste like chow mein. the three sauces i used actually is a bit on the sweet side. so if you want to balance it out, i'm sure you can throw in a few drops of soy sauce or fish sauce. oh, and a squeeze of lime would be great too actually. ok, enjoy and happy cooking and eating! :)

Udon Noodles Stir-Fry with Pork Sausage via design. bake. run.
i can't believe how easy it was to make this noodle dish. so simple and quick, and it turned out great! just exactly what i was craving for.

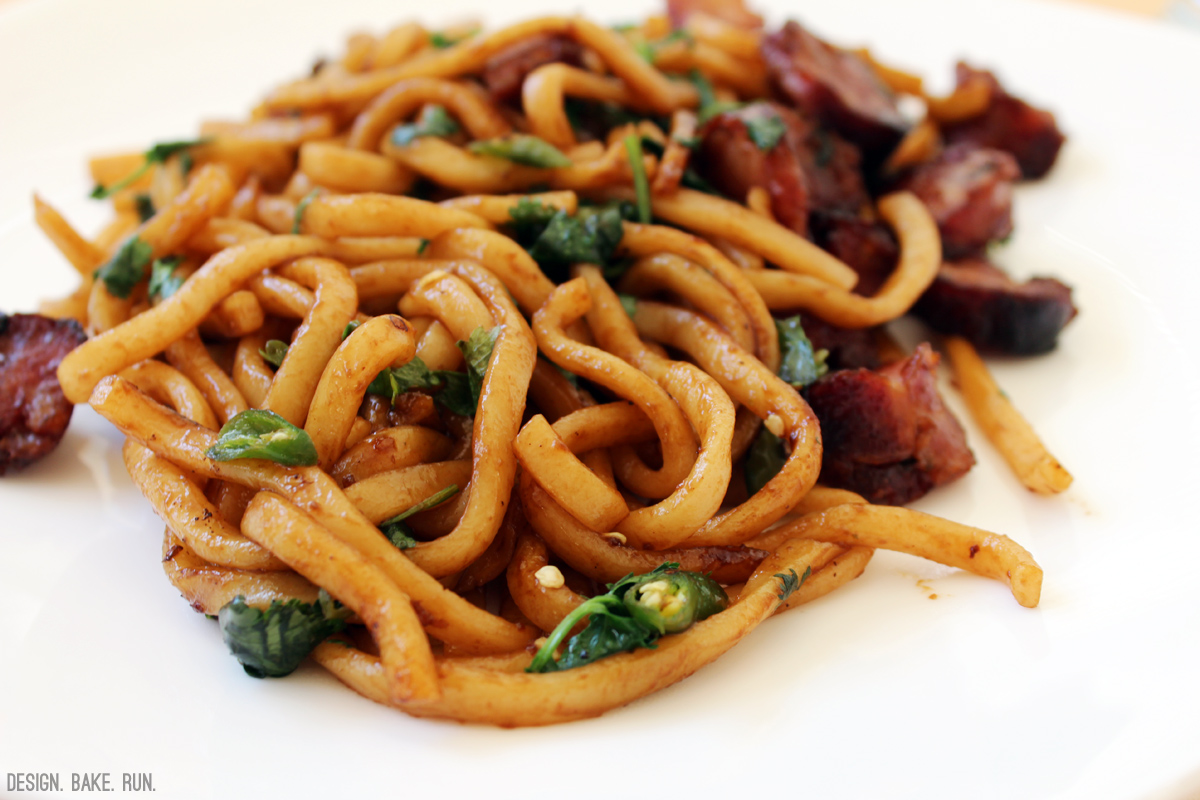
Udon Noodles Stir-Fry with Pork Sausage via design. bake. run.
a close-up shot of the udon noodles. so. good.

udon noodles stir-fry with pork sausage

ingredients:
  • 1 pack of udon noodles (similar to this)
  • 1 cooked pork sausage (or any sausage or meat, just not italian flavoring or whatever, unless you don't care about the different ethnic flavor combos)
  • 1-2 teaspoons of hoisin sauce, sweet sauce, and oyster sauce (you can find these at any asian supermarkets or in the asian/ethnic foods section of your local supermarket)
  • for garnish: a few sprigs of cilantro and 1-2 thai chili peppers (optional if you like a little heat)

directions:
  1. put noodles in a microwaveable bowl with enough water so that there isn't any noodles sticking up. heat it in the microwave for 3 minutes (or you can just follow the instructions on the package, that works too).
  2. while the noodles are heating, heat up a 10-inch skillet pan on the stovetop (medium temp). then cut up the sausage into pieces and toss it into the pan. stir-fry it for a few minutes or so.
  3. once noodles is done in the microwave, drain them and add them to the pan. also add in the teaspoons of sauces and mix until everything is combined. then let it cook for a minute or more until it looks like the noodles and sausage is caramelizing (or looks like the pictures above anyway). then turn off the heat and garnish with cilantro and thai chili peppers (optional).
makes 1 serving.

note: for 2 or more servings, you can just double or triple the ingredients. just be careful with the sauces and add them in slowly as everyone is different on their sauce preference (heavily sauced or just a touch).

Friday, April 5, 2013

sesame street illustration posters

Sesame Street Abby Cadabby Illustration Poster via design. bake. run.

Sesame Street Big Bird Illustration Poster via design. bake. run.

Sesame Street Cookie Monster Illustration Poster via design. bake. run.

Sesame Street Elmo Illustration Poster via design. bake. run.

Sesame Street Grover Illustration Poster via design. bake. run.

Sesame Street Oscar Illustration Poster via design. bake. run.

Sesame Street Zoe Illustration Poster via design. bake. run.

almost every kid in america grows up watching sesame street (hahaha, except me! for some reason i never did care for it. it was shows like reading rainbow or mr. rogers that i preferred). but i figured now that i've got two little ones and we do have a few collection of sesame street board books, why not?! little miss v loves her sesame street books. she knows just about all the characters. i don't think she's seen the show yet or if she has, possibly only a couple of times. it's so cute watching her go through her books and letting you know who's who.

so i guess it's only fitting that my second design post is of another series of illustration posters. i know i don't have all the characters from the show. i'm missing ernie and bert, as well as count dracula and mr. snuffleupagus, plus some others. but regardless, i've been wanting to make these sesame street posters ever since i did the mr. men series posters. next on my list are the little miss. i'm not sure if i will do them in the same style, simplified, etc... but i guess we'll find out sooner or later. i also know i want to add to my mr. men poster collection. c's got a few more favorite mr. men he'd love to see down in this style as well.

okay, that's all i have for now. we'll see what else i have in store the next time i post something design-related. :)

Wednesday, April 3, 2013

macarons make the best mini gifts

Guava French Macarons via design. bake. run.

i love making macarons. in addition to that lemony peach cake that i made last week to bring up to my mom, i also made these french macarons. i had some guava sitting in my fridge and decided i needed to use them up too. so i grabbed whatever was left (about 5-6 mini ones) and mashed them up. i didn't bother taking the seeds out. i figured it would add a nice unexpected crunch or whatever when you bite into the cookie. of course, should you decide to do this, you can certainly take out the seeds or leave them as is. i still have some leftover guava puree in the fridge so i may make these again. if i do, i think i'll remove the seeds from the puree. i'm sure people will appreciate that very much.

below's the recipe for the guava macarons. i also made a plain shell cocao-dusted macaron with chocolate ganache filling. i'm sure if you want to make those instead, you can modify the recipe to your liking. otherwise, maybe i'll make those again and write up a post for that in a future post. enjoy and happy baking! :)

Guava French Macarons via design. bake. run.
these macarons are scrumptious. they look so pretty in these homemade origami boxes.

Guava French Macarons via design. bake. run.
i say go ahead and make some macarons and give them away!

french macarons with guava buttercream filling

ingredients:

macaron batter:
1 cup powdered sugar
3/4 cup almond meal
2 large egg whites, at room temperature
5 tablespoons granulated sugar
1/4 teaspoon pink gel food coloring (or any gel food coloring of your choice, or none at all)

guava buttercream filling:
4 tablespoons butter, room temperature
2-1/2 to 3 cups powdered sugar
2 tablespoons guava puree
cream or milk, if needed

directions:

to make the macaron batter/shells:
  1. line two baking sheets with parchment paper and have a pastry bag with a plain tip (about 1/2-inch, 2 cm) ready.
  2. sift together the powdered sugar and almond meal so there are no lumps. set aside.
  3. in the bowl of a standing electric mixer (or if you prefer, you can use a bowl and hand mixer), beat the egg whites until they begin to rise and hold their shape. while whipping, beat in the brown sugar until very stiff and firm, about 2 minutes.
  4. add in the gel food coloring. then carefully fold in the dry ingredients, in two batches, into the beaten egg whites with a flexible rubber spatula. when the mixture is just smooth and there are no streaks of egg white and the food coloring looks like it's fully incorporated, stop folding and scrape the batter into the pastry bag (standing the bag in a tall glass helps if you’re alone). note: it's very important to not overmix/fold here. it's better to go under than over because if it's too runny, you may have ruined the batter. and you can't go back. if it's too stiff, at least you can fold it a few more times.
  5. pipe the batter on the parchment-lined baking sheets in 1.35-inch circles evenly spaced one-inch apart.
  6. rap the baking sheet a few times firmly on the counter top to flatten the macarons. then let it sit for at least 30-60 minutes depending on humidity before baking them in the oven. about 10-15 minutes before baking, preheat oven to 350 degrees F. bake for 15 minutes.
  7. once macaron shells are out of the oven, let them sit for 30-60 seconds before removing the hot baking sheet underneath. let the macarons cool completely before removing them from the parchment paper.
for the guava buttercream filling:
  1. in a medium size bowl, using either a handmixer (i usually just go with a fork) mix the butter, powdered sugar and guava on low speed together until they're incorporated.
  2. then turn the speed to medium and mix for 2-3 more minutes until everything is blended and you've reached the right consistency for buttercream. add in a little milk or cream if the buttercream is too thick or more powdered sugar if it's too thin. once everything looks good it should be ready to use.
to assemble the macaron cookies:
  1. before assembling these cookies, make sure to pair up all the cookie shells so they are as close as possible in size.
  2. using a knife, spread a good amount of the guava buttercream on the inside of the macarons then sandwich them together.
  3. let them stand at least one day (keep them refrigerated) before serving (serve at room temperature), to meld the flavors.

store in airtight container for up to 5 days. makes 20-24 macarons. happy eating because these are really, really, good! :)

if the above recipe isn't for you, but you'd still like to try and make some other kind of macarons, you can certainly check out these recipes:

Tuesday, April 2, 2013

30-day exercise challenge

kara goucher and shalane fannigan @ olympics 2012 in london, uk
these two ladies are quite the inspiration. i have this picture up on my mini calendar right now. every day after i've done my exercises, i can cross it off the calendar and see this picture. it's a little reminder and inspiration as to why i'm doing this.

i feel like i'm always restarting. and yet again, i'm starting something new. okay, maybe it's not really new, but it's a new start. here's what i'm thinking. wait, actually, before i start, let's reflect on the last month or so. where am i now and what have i done?

okay, so it's been over a month since i got started (feb. 26) on the fitbit one device. as of sunday (because i haven't synced today or yesterday's data yet), i have about 507,304 total lifetime steps, climbed 1,218 floors and walked 209.8 miles. that's a lot of steps, floors and miles since i've started wearing the device. i average about 15.8k steps over the last 32 days. yes, these steps include my running steps as well. that's more than the recommended 10k steps a day. so pretty good right? well, i don't know. i feel like it doesn't say a whole lot because with all those steps in, i still can't seem to drop a pound! actually, i did lose about a couple, then gained it all back, so that doesn't really count.

here was what i had hope i would do every day. and did i do it? umm... i did, some.

go get it, girl!
  • walk at least 20 minutes during lunch (monday-friday)
  • accumulate at least 10,000 steps every day (the more, the better!)
  • have at least one 20,000 steps day in a week -- for the most part, i've been very good and met this goal, except last week because i was just too busy
  • run 4x a week, 2-5 miles -- okay, almost. i think i skipped a run or two in the last 2 weeks
  • strength training exercises, 3x a week (no time limit required… just need to do some!) -- alright, i haven't really done this
  • be watchful and careful of what i eat. eat more fruits as snacks. and remember to drink more milk or have a piece of cheese for that calcium requirement! -- ahh... still working on this one

okay, so here's something new i'm throwing into the mix. yes, in addition to my 4x a week running (i actually really need to get going on my half-marathon training), and better eating habits. a 30-day exercise challenge. actually, more like mini strength training exercises. i'm thinking of something like squats, planks, pushups, and dips. nothing too fancy but not terribly easy. here's the low-down.

30-day exercise challenge
  • day 1: 50 squats, 30-sec plank, 20 pushups, 15-sec side planks (each side), 20 dips
  • day 2: 55 squats, 30-sec plank, 25 pushups, 15-sec side planks, 25 dips
  • day 3: 60 squats, 30-sec plank, 25 pushups, 15-sec side planks, 25 dips
  • day 4: 65 squats, 30-sec plank, 25 pushups, 15-sec side planks, 25 dips
  • day 5: 70 squats, 30-sec plank, 25 pushups, 15-sec side planks, 25 dips
  • day 6: 75 squats, 30-sec plank, 25 pushups, 15-sec side planks, 25 dips
  • day 7: rest
  • day 8: 80 squats, 45-sec plank, 30 pushups, 30-sec side planks, 30 dips
  • day 9: 85 squats, 45-sec plank, 30 pushups, 30-sec side planks, 30 dips
  • day 10: 90 squats, 45-sec plank, 30 pushups, 30-sec side planks, 30 dips
  • day 11: 95 squats, 45-sec plank, 30 pushups, 30-sec side planks, 30 dips
  • day 12: 100 squats, 45-sec plank, 30 pushups, 30-sec side planks, 30 dips
  • day 13: 105 squats, 45-sec plank, 30 pushups, 30-sec side planks, 30 dips
  • day 14: rest
  • day 15: 110 squats, 60-sec plank, 35 pushups, 45-sec side planks, 35 dips
  • day 16: 120 squats, 60-sec plank, 35 pushups, 45-sec side planks, 35 dips
  • day 17: 130 squats, 60-sec plank, 35 pushups, 45-sec side planks, 35 dips
  • day 18: 140 squats, 60-sec plank, 35 pushups, 45-sec side planks, 35 dips
  • day 19: 150 squats, 60-sec plank, 35 pushups, 45-sec side planks, 35 dips
  • day 20: 160 squats, 60-sec plank, 35 pushups, 45-sec side planks, 35 dips
  • day 21: rest
  • day 22: 170 squats, 75-sec plank, 40 pushups, 60-sec side planks, 40 dips
  • day 23: 180 squats, 75-sec plank, 40 pushups, 60-sec side planks, 40 dips
  • day 24: 190 squats, 75-sec plank, 40 pushups, 60-sec side planks, 40 dips
  • day 25: 200 squats, 75-sec plank, 40 pushups, 60-sec side planks, 40 dips
  • day 26: 210 squats, 75-sec plank, 40 pushups, 60-sec side planks, 40 dips
  • day 27: 220 squats, 75-sec plank, 40 pushups, 60-sec side planks, 40 dips
  • day 28: rest
  • day 29: 230 squats, 90-sec plank, 50 pushups, 60-sec side planks, 50 dips
  • day 30: 250 squats, 90-sec plank, 60 pushups, 75-sec side planks, 60 dips
okay, that's it! good luck to me! yesterday was day one and i did all of that. now, let's hope day 2 and beyond goes well. :D

Monday, April 1, 2013

donna hay's lemony peach cake

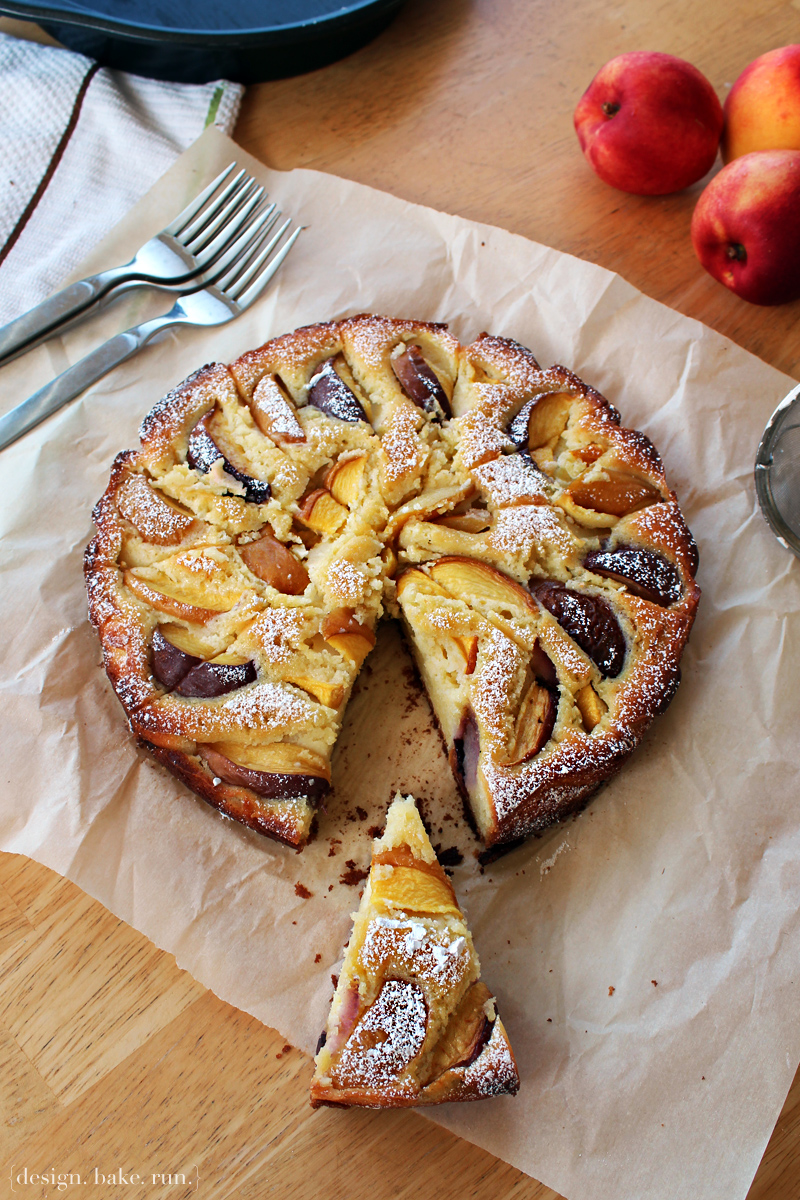
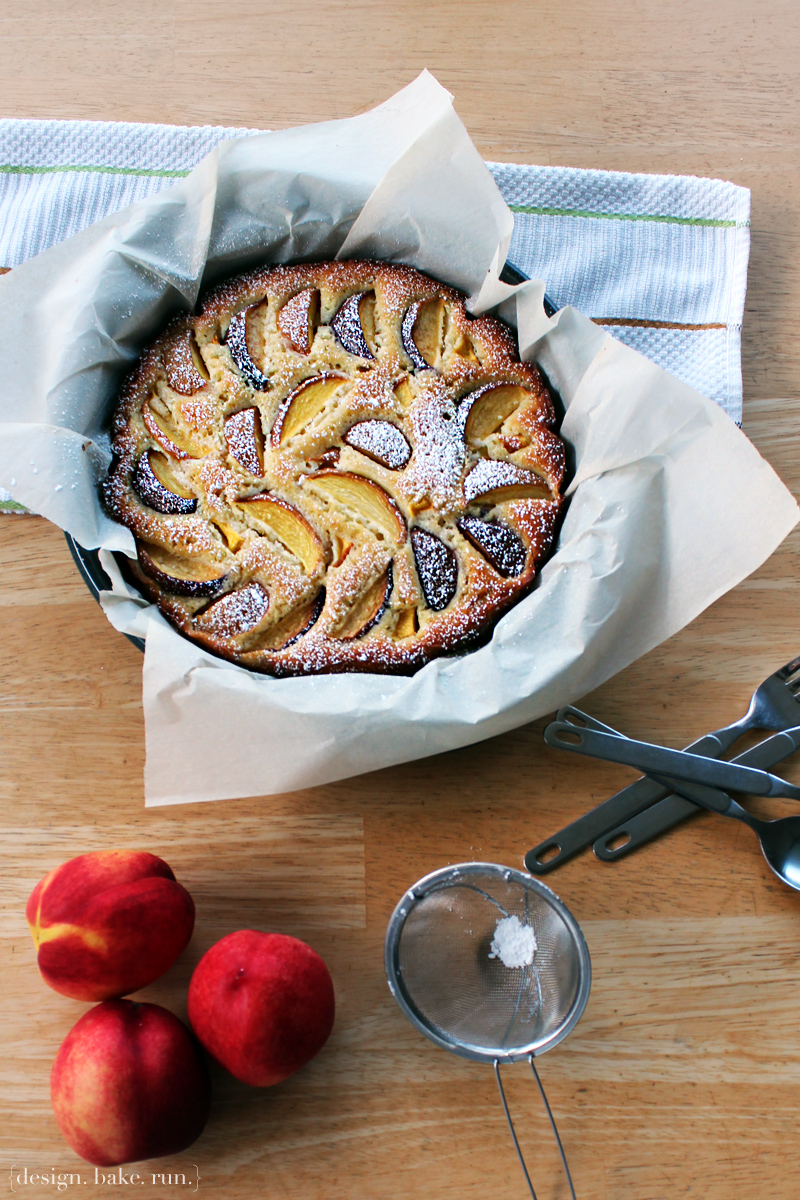
Donna Hay's Lemony Peach Cake via design. bake. run.

this past weekend was easter weekend. c and i made a quick trip to visit my mom and came back before easter sunday. before we went up i knew i wanted to bake some goodies and bring it to them. actually, my family isn't very big on sweets or any baked goods. must be a cultural thing. i never grew up craving candy, desserts or delicious baked goods. we never had afters (dessert) after a meal or afternoon tea with pastry (unlike m's because he grew up very english with tea time, afters and all). it wasn't until i met m and had c that i eventually acquired or grew to like all these delicious baked goodies. now, i'm a big fan of very well made pastry and sweets. it's a big deal in our house these days.

okay, so back to what i was saying. yes, my mom doesn't really care for very sweet things so i decided to bake her this peach cake (okay, more like nectarines because that was all i had in the fridge and needed to use them up before they went bad). i still had 6-7 nectarines lying around in the fridge that i had bought a week or so back. they were really firm when i got them (that's how i like my peaches and nectarines). they were still firm, but i knew they would be going if i didn't eat them or use them up somehow. upon a quick search on pinterest, i saw a recipe for a peach cake. the recipe and ingredients looked simple enough so i decided to go ahead and made it.

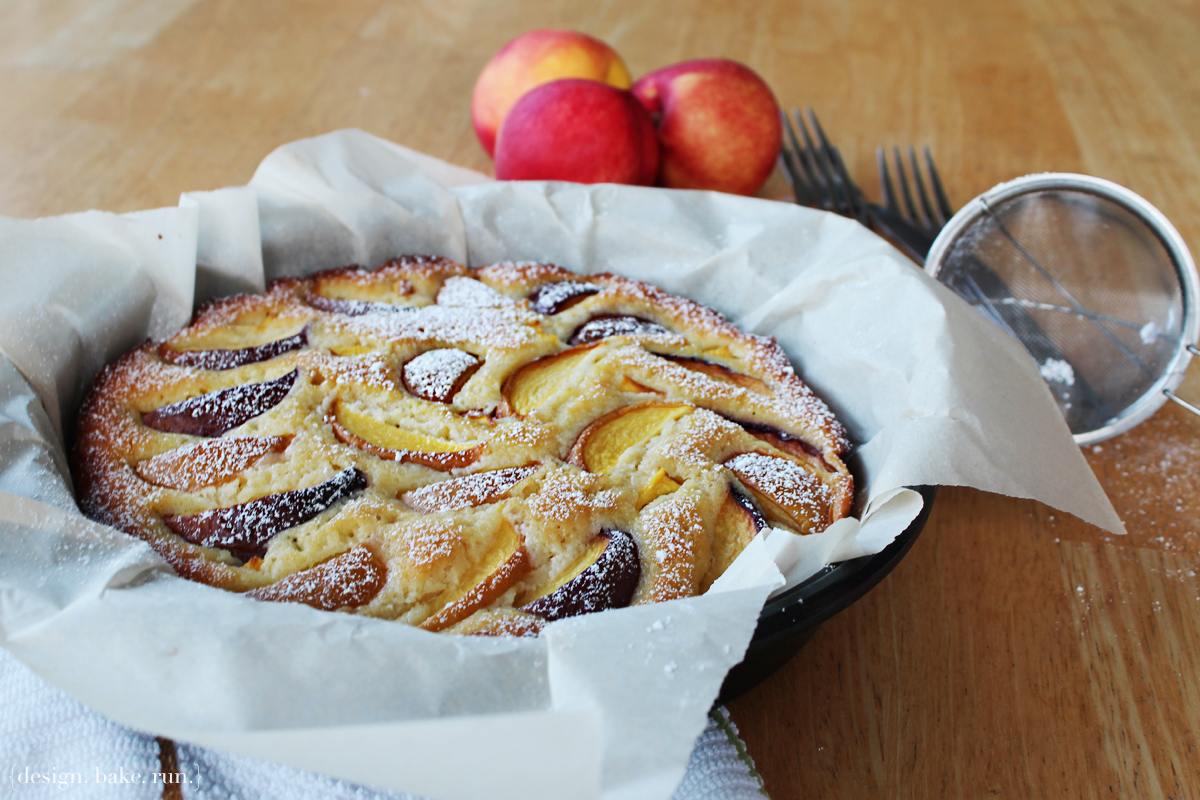
so, how was it? pretty good. if you're not a sweets fan, i say you'll like this cake. actually, even if you are, it's good to change it up. the texture of the cake is just perfect and i love the added bite of the fruit. i like how the nectarine slices kept the cake nice and moist. the dusting of the powdered sugar on top adds an extra bit of sweetness and finishes the cake really well. my mom loved it – and i'm really shocked because she almost always never eat any baked goods. and she ate like three slices! that says a lot. hehehe ;)

below's the recipe should you want to try it. let me know what you think. enjoy and happy baking!

Donna Hay's Peach Cake via design. bake. run.
my mom loved this peach cake. the simple confectioners' sugar dusting at the end adds a nice touch of sweetness to this simple, yet very elegant looking cake.

Peach Cake via design. bake. run.
i say this peach cake would go very well with any afternoon tea or brunch. or any occasion, or no occasion at all! hehe

lemony peach cake
recipe from donna hay

ingredients:
1-1/2 stick (175g) butter, softened and chopped
3/4 cup (165g) caster (superfine) sugar
2 tablespoons finely grated lemon rind
3 eggs
1 cup (150g) plain (all-purpose) flour, sifted
1 teaspoon baking powder, sifted
3/4 cup (70g) natural yoghurt
3 peaches, sliced
powdered (confectioner’s) sugar, for dusting
double (thick) cream, to serve

directions:
  1. preheat oven to 325°F (160°C). place the butter, sugar and lemon rind in the bowl of an electric mixer and beat for 6–8 minutes or until light and creamy.
  2. gradually add the eggs, beating well after each addition. add the flour, baking powder and yoghurt and beat until just combined.
  3. spoon into a lightly greased 9-inch (25cm) round cake tin lined with non-stick baking paper. top with the peaches and bake for 1 hour or until cooked when tested with a skewer. allow to cool for 10 minutes in the tin, then turn out onto a wire rack to cool. dust with powdered sugar and serve with cream.
serves 6. enjoy and happy eating! :)

Related Posts Plugin for WordPress, Blogger...