Showing posts with label pies. Show all posts

Thursday, December 18, 2014

mini pecan tarts

Mini Pecan Tarts via design. bake. run.

it’s been a while, i know. months and months. well, i'm sort of back, at least for one post. it's the happiest most wonderful time of the year again! and i love it. and i’ve been baking like crazy (but too lazy to post them here). well... here’s one i'll share because i actually have a photo for it. this has become one of my favorite holiday treat and will for sure be a regular come this time of the year. it is so good and that's probably because i’m a pecan pie fan.

so if you're up to some baking this weekend, feel free to make these. you never know, these may become one of your favorites too, if not already! enjoy and happy baking! :)

mini pecan tarts
recipe adapted from better homes & garden

ingredients:

cream cheese pastry:
  • 1/2 (1 stick) unsalted butter, at room temperature
  • 3 oz cream cheese, at room temperature
  • 1 cup all-purpose flour


pecan filling:
  • 1 large egg
  • 3/4 cup brown sugar
  • 2 tbsp corn syrup
  • 1 tbsp butter, melted
  • pinch of salt
  • 2/3 cup coarsely chopped pecans


directions:

  1. preheat oven to 325 degrees F. for pastry, in a mixing bowl beat the 1/2 cup butter and cream cheese until combined. stir in the flour. press a rounded teaspoon of pastry evenly into the bottom and up the sides of 24 ungreased 1 3/4-inch muffin cups.
  2. for pecan filling, in a bowl beat egg, brown sugar, corn syrup, and the 1 tablespoon melted butter until combined. stir in pecans. spoon about 1 heaping teaspoon of filling into each pastry-lined muffin cup. bake for 25 to 30 minutes or until pastry is golden and filling is puffed. cool slightly in pan. carefully transfer to a wire rack and let cool.


makes 24 cookies.

Tuesday, February 25, 2014

mini apple crumbles

Mini Apple Crumbles via design. bake. run.

i was going through my stacks and stacks of magazines sometime last week and ran across a recipe for mini apple crumbles. yes, i've got piles of shape, marie claire, better homes & gardens, 7x7 and ca home & design magazines just to name some that i've left it piled on (and some i have yet to go through them). i guess i'm still one of the few left who appreciates actual printed materials over those ebooks or e-zines. okay, going off topic here. yes, as i was going through one of my shape magazines from a few months back, i noticed a recipe for mini apple crumbles. i think it must have been shape's november 2013 issue. leafing through the pages and seeing that, a lightbulb went in my head. well, hello… we've got a bunch of oatmeal lying around, i could actually put some to use with this recipe! so off i went with it.

okay, i've actually adapted the recipe a bit because i didn't have any maple syrup on hand or couldn't be bothered with the spices that were in it. but overall, the recipe was pretty straight forward. so go ahead and bake some. these make for perfect little one-bite treats and are great for parties or any occasions. :)

One-Bite Mini Apple Crumbles via design. bake. run.
these one-bite mini apple crumbles make for the perfect little party treats and has only 95 calories.

Mini Apple Crumbles via design. bake. run.
this recipe is super simple to make. i love how you get many different kinds of texture, crunch and flavors from just one tiny bite.

mini apple crumbles
recipe from shape magazine's november 2013 issue

crumble topping:
cooking spray
1/2 cup rolled oats
1/2 cup whole-wheat flour
1 teaspoon ground cinnamon
pinch kosher salt
1/3 c maple syrup
2 tablespoons cold, unsalted butter, cut into small pieces

apple filling:
2 firm apples, peeled, cored and diced
2 tablespoons maple syrup

directions:
preheat over to 350°F. lightly coat a 12-cup mini muffing pan with cooking spray and set aside.

to make the crumble topping, combine oats, flour, cinnamon, and salt in medium bowl. stir in maple syrup until well coated. use a fork to smash the butter pieces into the oat mixture until crumbly. Set aside.

to make the apple filling, add apples, maple syrup, and 1/2 cup water to a small saucepan. cook over medium heat, stirring occasionally, for 5 minutes. remove from heat and let cool slightly.

meanwhile, place 1 teaspoon of the oat mixture into the bottom of each muffin cup. see your fingers to gently press down to form  a solid crust. Place 1 tablespoon of the apple  mixture over each and top with remaining crumble distributing evenly among all muffin cups.

bake for 10 to 15 minutes or until golden brown. remove from oven, let cool to room temperature, then use an offset spatula or a butter knife to gently remove from pan. serve at room temperature.

makes 12 mini apple crumbles. enjoy!

nutrition facts: 95 calories; 3 g fat; 18 g carbs; 1 g protein; 1 g fiber; 22 mg sodium; 20 mg calcium

Friday, December 27, 2013

12 days of christmas baking - day 12: berries pie

12 Days of Christmas Baking - Day 12: Four-Berries Pie via design. bake. run.

i'm way slow in posting this final recipe for my 12 days of christmas baking. the last few days with christmas eve, shopping and everything else has been pretty busy and hectic here. well, here is the recipe, finally. yes, a four different kinds of berries pie. every thanksgiving and christmas i make a berry pie. sometimes just your usual raspberry or blackberry. but for this christmas, i decided to throw in all the berries. you know, the usual – strawberry, blackberry, blueberry and raspberry. the end result? hahaha, a very berry delicious pie it was. we're not big apple pie people at my house, so anything other than apple pie is always a bonus. we've become quite the pecan pie lover and i made that recipe as well this christmas. you really can't go wrong with having too much sweet stuff around the house this holiday season (or any time of year really).

below's the recipe. i've done it with just one kind of berry, or all kinds of berries. so feel free to give it a try if you like. it's pretty simple and straight forward. oh, it's even easier too if you use a store-bought pie dough, already rolled out and ready to go. yeah, that would save you some time. otherwise, you can make your own. enjoy!

12 Days of Christmas Baking - Day 12: Four-Berries Pie via design. bake. run.
we love berry pies at our house. this recipe is so easy to make, especially with already made pie dough.

12 Days of Christmas Baking - Day 12: Four-Berries Pie via design. bake. run.
here's the pie all brushed with eggwash and ready for the oven.

12 Days of Christmas Baking - Day 12: Four-Berries Pie via design. bake. run.
the pie out of the oven, cooling.

12 Days of Christmas Baking - Day 12: Four-Berries Pie via design. bake. run.
nothing finishes a nice slice of berry pie like ice cream. yummy!

four-berries pie

ingredients:
  • 1 bag (16 oz) of frozen berries (any will do) or 4-5 cups fresh or frozen berries
  • 1 cup sugar
  • 3 tablespoons cornstarch
  • 1 tablespoon of lemon juice
  • 1 tablespoon butter
  • 2 store-bought pie dough (or make your own)

directions:
  1. preheat oven to 375°F.
  2. prepare pie dough according to pie dough directions if you're making your own. or take the store-bought dough out of the refrigerator and let it get to room temperature, about 15 minutes. then transfer the dough to pie plate; trim even with edge.
  3. in a medium bowl, combine the berries, sugar, cornstarch, and lemon juice. stir to combine all the ingredients. then add in the berries filling; and dot with butter (i usally cut the 1 tbsp butter up into tiny chunks).
  4. cover the filled pie with the second rolled out pie dough. note: if you want a lattice look, you can cut the rolled dough into long pieces and thread them to make it look like a lattice. i can't be bother with this so i just do the easy and simple way, cover it up.
  5. once the pie is all assembled, you can brush it with milk and sprinkle some sugar on top. or, if you prefer, you can brush it with a little egg wash. bake at 375°F for 50-55 minutes. if you want to stop the browning of the pie edges, you can first cover it up with foil, then remove the foil after 25 minutes.

makes one 9-inch pie. enjoy! :)

last year's day 12 recipe: holiday biscottis

Wednesday, September 11, 2013

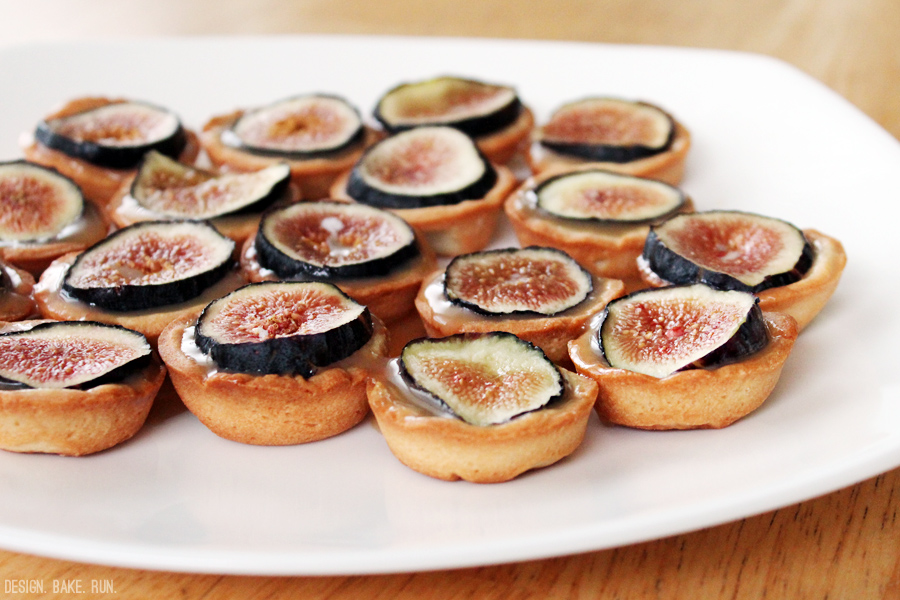
salted caramel & fig mini tarts

Salted Caramel & Fig Mini Tarts via design. bake. run.

if you haven't noticed already, in my last few posts i mentioned about having extra heavy whipping cream in the fridge that needed upswing up. i used some of it and made a salted caramel sauce. the recipe made about 1-1/2 cup of caramel sauce and was just sitting in the fridge because i couldn't think of what to use it for. actually, i did end up using some of it as a drizzle for some cream puffs i made. those were so good. you really cannot go wrong with delicious cream puffs with whipped cream filling topped with salted caramel sauce. those were a big hit when i brought them into work to share with everyone. i know i ate 3 of them right off the bat after i assembled them the night before. yes, it's delicious and you can make some yourself if you like. the recipe is here.

so what do you do when you still have about a cup or more of the salted caramel sauce left? ummmm... make some mini tarts with leftover cookie dough. yeah, you can grab any sugar cookie dough and cut them into circles, then stick them in your mini cupcake pans to make your mini tart crust. that's what i did with the one leftover tartine lemon cream tart crust recipe. i still have one left (sitting in the freezer) and finally decided it was about time i put it to use.

and here you have it. these good-looking and very tasty mini salted caramel with fig topping mini tarts. so good. it's like sweetness on top of sweetness on top of sweetness. you can't complain about that. a little sugar overload? sure?! but the caramel gives you just the right amount and hint of salt to make this a truly delicious and sweet bite. i love it!

Salted Caramel & Fig Mini Tarts via design. bake. run.
the sweet tart dough makes the perfect crust for these mini tarts. perfectly sweet and buttery and tastes delicious with everything as a whole.

Salted Caramel & Fresh Fig Mini Tarts via design. bake. run.
you can never go wrong with salted caramel. i love how the salt from the caramel really balanced out all that sugar.

salted caramel & fig mini tarts

ingredients:

directions:
  1. prepare the salted caramel sauce and sweet tart dough mini crusts according to their recipes.
  2. once the salted caramel and mini crusts are ready, you're ready to assemble. pour about a teaspoon of the sauce into each cooled mini tart crust. if you need more caramel, add more caramel until it's close to the top. then top it off with a slice of fresh figs. you can even add a dollop of freshly whipped cream too if you like.
  3. that's it. enjoy and happy eating!

makes 24 mini tarts. :)

Wednesday, March 27, 2013

the best baked apple tart ever!

Dalloyou's Baked Apple Tart via design. bake. run.

a while back one of my coworkers brought in this delicious apple tart. it is definitely one of the best if not the best apple tart i've ever had. so good that i had to make one myself so m and my MIL can confirm it with me. and since i had made that lemon cream tart recipe from tartine and had 3 extra pie/tart dough leftover, why not?! the sweet tart dough would be perfect for this apple tart recipe.

this recipe was adapated from dalloyau, a very well known and popular pastry company in paris and comes from dorie greenspan's paris sweets book. of course, i missed out on tasting all the goodies from dalloyau the last time i was there. one, let's just say i wasn't aware of them as i am now and two, i'd been eating paris sweets literally every day we were in paris. i know, i was too spoiled. i remembered we even walked pass dalloyau's pastry stands inside galeries lafayette (the giant shopping mall in paris). they had so many opera cakes, macarons and every pastry you can possibly imagine! but at the time i remembered all i wanted was real food (no more sweets, at least at the time anyway) and opted for some thai food. i know, thai food in paris (kind of disappointing huh?). but this place is for sure on my to-eat-list the next time i'm in paris. i can't wait to go back and try everything (okay, maybe not everything, but almost?!) on their menu.

so, what's sooooo good about it? let's just say not only do you get these nicely sauteed caramel-y sliced apples, but the added almond cream with the apple is just delish. it's really THAT good! i've never had a tart with almond cream before and i have to say, the almond cream makes a giant difference. it's a nice added sweetness to the tartiness of the apples. ever since i've made the almond cream in this tart recipe, i've been making the almond cream and putting it on everything! it's super simple that you can whisk up in a few short minutes. one of my personal favorites i like to put the almond cream on is french toast. it's sort of like a take on those delicious bostocks i had at b. patisserie a while back, but homemade and just as good. i'll have to put up a post on these later at some point, but for now… let's enjoy this delicious apple tart.

oh, so what did m and my MIL say? they loved it. like absolutely loved it! m said it's the best he's ever had and the only kind of apple tart or pie he'll ever eat! we're for sure adding this to the list of many baked goodies we make during the holidays. he loves the sweet dough tart with the apples. it's like a nice shortbread crust that compliments the apples and almond cream nicely. i told him i could also make it with puff pastry sheets as the pie crust but he said no. the sweet dough tart is perfect and loves the apple tart exactly the way i had made it. so i guess i'll stick with what i have.

below's the recipe if you'd like to make it. seriously, it's the best apple tart ever! :)
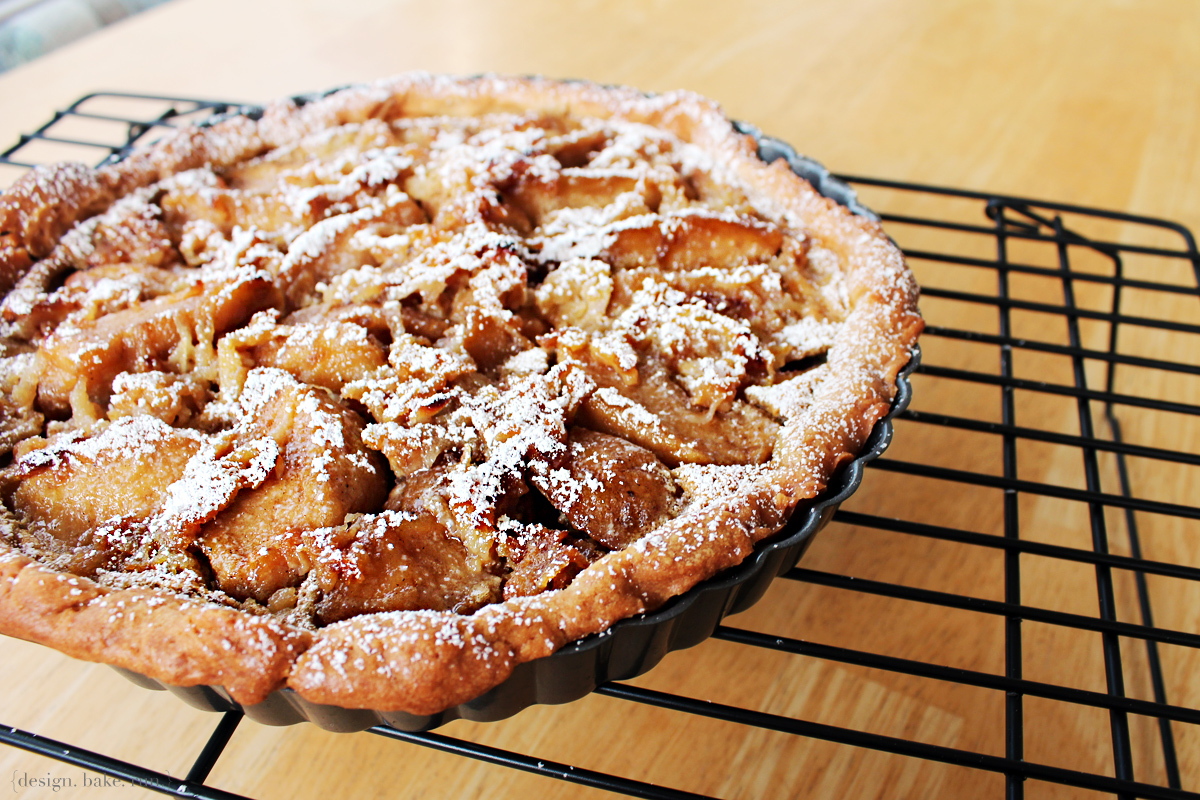
Dalloyou's Baked Apple Tart via design. bake. run.
this is really the best apple tart ever. even if you don't like apple pies or tarts, i say you should still give this a try. the almond cream will make you fall in love with it. really.

THE BEST Baked Apple Tart EVER! via design. bake. run.
a close-up shot of a tart slice. seriously, so good. i can't wait until we go to paris again so i can really hit up dalloyau and have an actual slice made from the recipe maker themselves!

Baked Apple Tart via design. bake. run.
as i was taking a shot of this slice, little miss v couldn't help it. she wanted to get a piece (or this piece) of this delicious apple tart!

tarte aux pommes au four
dalloyau's baked apple tart recipe from sabrina ko's blog

ingredients:

the almond cream:
1-1/2 tablespoons (3/4 ounce; 20 grams) unsalted butter, at room temperature
1 tablespoon sugar
1/4 cup (30 grams) ground almonds
1 large egg, preferably at room temperature
2 tablespoons (30 grams) heavy cream
1 tablespoon calvados or apple brandy (or 1 tablespoon pure vanilla extract)

the apples:
6 large apples (2-1/4 pounds; 1 kilo), preferably Fuji or Granny Smith, peeled and cored (note: if you want to skip the grated apples part, you can use 4-5 apples instead)
7 tablespoons (3-1/2 ounces; 100 grams) unsalted butter (note: this can also be reduced without much sacrifice to the taste. i actually halved the butter here and it still came out delicious!)
1/2 cup sugar (75 grams)
2 tablespoons calvados or apple brandy (or 1-1/2 tablespoons pure vanilla extract)

the crust:
1 unbaked 9-inch (24-cm) tart shell made from sweet tart dough (recipe here) or you can use puff pastry (homemade or store-bought)
confectioners’ sugar for dusting

directions:

the apples:
  1. center a rack in the oven and preheat the oven to 350°F (180°c).
  2. cut 4 of the apples in half and slice each half into thirds. grate the remaining 2 apples on the coarse side of a box grater (you can skip the grating if you like – i didn't though).
  3. melt 1 tablespoon of the butter and 1 tablespoon of the sugar in a large skillet over high heat. add the grated apples and cook, stirring, until they are golden brown, about 3 minutes. using a slotted spoon, transfer the apples to a plate (if you skipped the grating, you can skip this step). add the remaining 6 tablespoons (85 grams) butter and the rest of the sugar to the pan and, when the butter is bubbling, toss in the apple slices. cook the apples, stirring frequently, until they are lightly caramelized, 5 to 7 minutes. pour in the calvados, turn off the heat, and carefully touch a match to the liquid. when the flames die down, pull the pan from the stove. (note: if you don't have the calvados, you can just add in the vanilla extract after turning off the heat. no need for lighting up a match or anything like that.)
  4. transfer the apple slices to a baking pan (or keep them in the skillet if it is ovenproof) and bake for 20 minutes, or until they are almost cooked through. cool for 30 minutes.
  5. while the apples are baking, make the almond cream. working in a medium bowl with a whisk, beat the butter and sugar together for a minute or so, until the sugar dissolves and the butter whitens a little. whisk in the almonds, then the egg, beating until the mixture is blended. finally, whisk in the cream and calvados (or vanilla extract). cover the bowl and refrigerate until needed. (the cream can be kept covered in the refrigerator for up to 3 days.)

to assemble the tart:
  1. position a rack in the lower third of the oven and preheat the oven to 350°F (180°C). line a rimmed baking sheet with parchment paper and put the tart shell on the sheet.
  2. spoon the almond cream evenly into the crust. top with the baked apples, arranging them attractively in a single layer. check the grated apples—if they are wet, press them either between your palms or between paper towels. fluff up the grated apples with your fingers or a fork and arrange them over the apple slices, leaving a bare border of an inch (2.5 cm) or so.
  3. bake the tart for 40 to 50 minutes, or until the almond cream has puffed and the apples are beautifully browned. cool the tart on a rack; unmold and serve it when it is either just warm or at room temperature. dust the tart generously with confectioners’ sugar right before bringing it to the table.

notes:
while all of the elements can be prepared ahead, once the tart is assembled, it should be baked immediately, and once it is baked, it should be served soon thereafter.

this tart is perfect on its own or if you prefer, is also delicious with either a bit of crème fraîche or vanilla crème anglaise. but in our household (being the very english people we are! hehe) we have it with evaporated milk and it's delish! of course, a giant scoop of good ol' vanilla ice cream is yummy as well. i do love my vanilla ice cream. :)

makes 8 servings. enjoy!

Tuesday, March 5, 2013

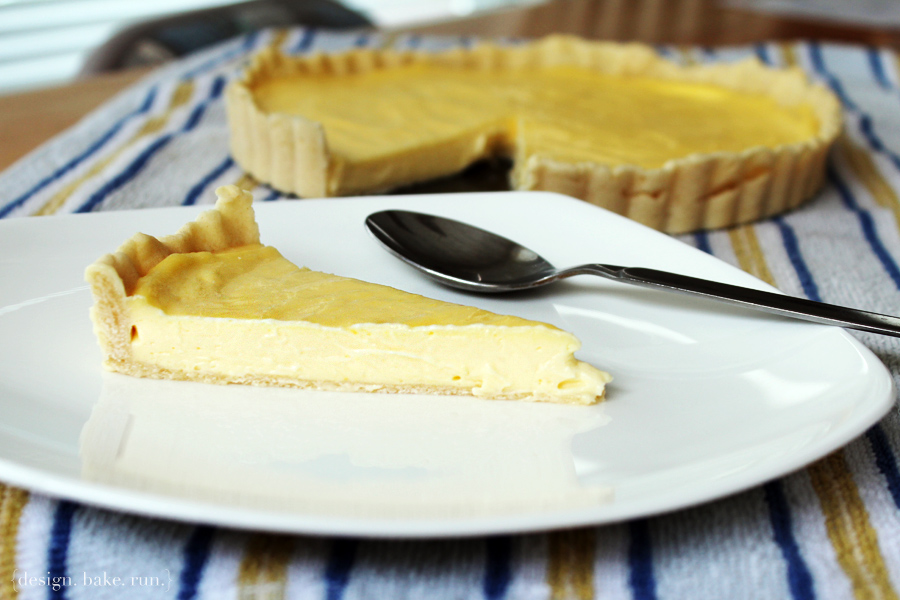
tartine's lemon cream tart

Tartine's Lemon Cream Tart via design. bake. run.

it seems like lemons are popping up everywhere these days. it is definitely lemon season you can say! a couple of weeks ago a friend gave me some meyer lemons from her garden. i knew exactly what i wanted to make with it. for sure some lemon curd and maybe some lemon cake or something lemony anyway. upon researching different lemon curd recipes i discovered tartine's lemon cream tart. i've gone to tartine multiple times, but i've yet to try their lemon tart. i don't know… must be because it's always so crowded there (the lines are ridiculous no matter what time of day – this place is hugely popular here in sf) that i feel a bit overwhelm sometimes even when i know exactly what i want to get (usually a morning bun and/or almond croissant).

okay, so after reading what it would take to make tartine's delicious lemon tart (as attested by many who've tried it and have made it themselves), i decided i too would attempt to make this yummy piece of goodness. so… how did it turn out? absolutely delicious! it is so lemony, creamy… and just so, so, good. even if you're not a fan, i say you fall in love it (and become a fan!?! =/). and if you are, you've got to make this! i love how the sweet dough for the tart gives that perfect amount of sweetness to offset the tartness from the lemon cream. everything just works well together in one scrumptious bite.

below is the recipe should you want to try and make this. it's super easy to make. usually i don't care for pie/tart dough because it's such a pain sometimes, but this one is a piece of cake. and the lemon cream is nothing if you've done plenty of double boiler stuff before. actually, even if you haven't, just follow the recipe and everything will turn out fabulous.

good luck and let me know how yours turn out! happy baking and eating, as always.

Tartine's Lemon Cream Tart via design. bake. run.

Tartine's Lemon Tart via design. bake. run.

sweet tart dough
by tartine (makes 4 9-inch tart shells or twelve 4-inch tartlet shells)

1 cup + 2 tbsp (9 oz/255 grams) unsalted butter, at room temperature
1 cup (7 oz/200 grams) sugar
1/4 tsp salt
2 large eggs, at room temperature
3 1/2 cups (17 1/2 oz/500 grams) all-purpose flour

directions:
  1. using a stand mixer fitted with the paddle attachment, combine the butter, sugar and salt and mix on medium speed until smooth.
  2. mix in 1 egg. add the remaining egg and mix until smooth. stop the mixer and scrape down the sides of the bowl with a rubber spatula.
  3. add the flour all at once and mix on low speed just until incorporated.
  4. on a lightly floured work surface, divide the dough into 4 equal balls and shape each ball into a disk 1/2 inch thick. wrap well in plastic wrap and chill for at least 2 hours or overnight or freeze 3 for future use (this dough will keep for up to 3 weeks).
  5. to line a tart pan, place a dough disk on a lightly floured surface and roll out 1/8 inch thick, rolling from the center toward the edge in all directions. lift and rotate the dough a quarter turn after every few strokes, dusting underneath as necessary to discourage sticking, and work quickly to prevent the dough from becoming warm. cut out a circle 2 inches larger than the pan. if the dough is still cool, carefully transfer the circle to the pan, easing it into the bottom and sides and then pressing gently into place. if the dough has become too soft to work with, put it in the refrigerator for a few minutes to firm up before transferring it to the pan. if the dough develops any tears, just patch with a little extra dough, pressing firmly to adhere. trim the dough level with the top of the pan with a sharp knife. place the pastry shell in the refrigerator or freezer until it is firm, about 15 minutes.
  6. if you are making tartlet shells, roll out the dough in the same way, cut out circles according to the size of your pans, and line the pans. the rest of the dough, including the scraps, can be frozen for future use.
  7. preheat the oven to 325 degrees fahrenheit.
  8. dock (make small holes in) the bottom of the tart shell or tartlet shells with a fork or the tip of a knife, making tiny holes 2 inches apart. place in the oven and bake for 7 to 10 minutes for a partially baked large shell or 5 to 7 minutes for tartlet shells. the pastry should be lightly coloured and look dry and opaque.
  9. let cool completely on wire racks. the pastry shells will keep, well wrapped, in the refrigerator for up to 1 week or in the freezer for up to 2 weeks.

lemon cream
by tartine (about 2.5 cups /625 ml)

1/2 cup + 2 tbsp (5 oz/155 ml) lemon juice
3 large eggs
1 large egg yolk
3/4 cup (6 oz/170 g) sugar
pinch of salt
1 cup (8 oz/225 g) unsalted butter

directions:
  1. pour water to a depth of about 2 inches into a saucepan, place over medium heat, and bring to a simmer.
  2. combine lemon juice, whole eggs, yolk, sugar and salt in a stainless steel bowl on top of double boiler. whisk ingredients constantly for 10-12 minutes until the mixture becomes very thick and registers 180°F on a thermometer.
  3. emote the bowl from over the water and stirring from time to time to release the heat.
  4. meanwhile, cut butter into 1 tbsp-pieces. when the cream is ready, using either a regular blender, or an immersion blender, add 1 piece of butter at a time to lemon mixture, blending after each addition of butter. the cream will be pale opaque yellow, and quite thick.
  5. you can use the cream immediately, or pour it into a storage container with a tight-fitting lid and refrigerate for up to 5 days.

to assemble the tart

have the tart shell ready for filling. pour the lemon cream directly into the cooled tart shell. shake the tart pan gently to smooth out the top of the filling. chill the tart until firm, about 2 hours before serving.

that's it, enjoy!

Thursday, December 27, 2012

old-fashioned pecan pie

Old-Fashioned Pecan Pie via design. bake. run.

i absolutely love the holiday season and this pie here is one of those reasons as to why. i never thought i'd be a pie lover, but somehow over the years i've acquired the taste for these sweet treats. now, savory pie? ummm... let's not go there, because i'm nowhere near any of that (at least not yet). i've yet to try the ever so popular chicken pot pie or while in england, their famous pork pies. yeah, it's just not for me.

okay, now let's get back on track to sweet pies. yes, this pecan pie recipe is so good. i've tried many pecan pie recipes in the past and i think this one is my favorite by far. it has just the right amount of sugar/sweetness. it's not terribly sweet and for sure, nothing short of not enough sugar. it is sweet, but not one of those sugar overload kind of sweet. i think i prefer the dark corn syrup over the white as well. for some reason, it just makes a better looking pie. plus, the recipe is so easy and simple, i feel like i can really do it in my sleep. i love how it calls for vanilla extract, but i've made it many times in the past and omitted it by mistake and it still came out okay.

below's the recipe for this delicious holiday pie should you want to make it. yes, i know the big holiday rush is over, but who's to say you still can't make one? why not have a pecan pie to ring in the new year. every new year's eve we make a yule log to ring in the new year. that's because there's too much going on before and during christmas time that we figure we'll save one sweet treat til after christmas. it's definitely something sweet to look forward to. if i get a chance to take pics, i'll be sure to post the recipe for that sometime next week. for now, enjoy the recipe below! :)

Old-Fashioned Pecan Pie via design. bake. run.
this pecan pie recipe makes the perfect pie, every time! it is my favorite pie recipe by far.

old-fashioned pecan pie
recipe from good housekeeping

ingredients:

for pie filling:
3/4 cup(s) dark corn syrup
1/2 cup(s) dark brown sugar
3 tablespoon(s) butter or margarine, melted
1 teaspoon(s) vanilla extract
1 pinch(s) salt
3 large eggs
1 1/2 cup(s) pecan halves, toasted
1 9-inch baked pie shell (recipe below)

directions:
  1. Prepare 9-Inch Baked Pie Shell as recipe directs. Cool pie shell on wire rack at least 10 minutes. Reset oven control to 350 degrees.
  2. In large bowl, with wire whisk, mix corn syrup, sugar, butter, vanilla, salt, and eggs until blended. With spoon, stir in pecans.
  3. Pour filling into pie shell. Bake 43 to 45 minutes or until filling is set around edge but center jiggles slightly. Cool on wire rack at least 3 hours for easier slicing. Refrigerate leftovers up to 1 week.

9-inch baked pie shell
recipe from good housekeeping

ingredients:
1 1/3 cup(s) all-purpose flour
1/4 teaspoon(s) salt
5 tablespoon(s) cold butter or margarine, cut up
3 tablespoon(s) vegetable shortening
5 tablespoon(s) ice water

directions:
  1. In food processor with knife blade attached, blend flour and salt. Add butter and shortening, and pulse until mixture resembles coarse crumbs. Sprinkle in ice water, 1 tablespoon at a time, pulsing after each addition, until large moist crumbs just begin to form.
  2. Shape dough into disk; wrap in plastic wrap and refrigerate 30 minutes or overnight. (If chilled overnight, let dough stand 30 minutes at room temperature before rolling.)
  3. Preheat oven to 425 degrees. On lightly floured surface, with floured rolling pin, roll dough into 12-inch round. Ease dough round into 9-inch glass or ceramic pie plate. Gently press dough against bottom and up sides of plate without stretching. Trim dough edge, leaving 1-inch overhang. Fold overhang under; pinch to form stand-up edge, then make decorative edge. Freeze pie shell 15 minutes.
  4. Line pie shell with foil or parchment, and fill with pie weights, dried beans, or uncooked rice. Bake 10 to 12 minutes or until beginning to set. Remove foil with weights, and bake 13 to 15 minutes longer or until golden. If shell puffs up during baking, gently press it down with back of spoon. Cool on wire rack until ready to fill.
  5. To make Deep-Dish Baked Pie Shell: Prepare 9-Inch Baked Pie Shell as above, but increase all-purpose flour to 1 1/2 cups and vegetable shortening to 1/4 cup. Ease dough into 9 1/2-inch deep-dish pie plate.


Related Posts Plugin for WordPress, Blogger...