Showing posts with label chocolate. Show all posts

Friday, April 25, 2014

martha stewart's outrageous chocolate cookies

Martha Stewart's Outrageous Chocolate Cookies via design. bake. run.

i'm always a fan of a good cookie (recipe). this one here is for sure a keeper. plus, it comes from good old martha, which is a major plus. and on top of that, it's chocolate! what i love most about this recipe though is the fact that i don't need any fancy ingredients. everything you see here are items you pretty should have in stock already (assuming you are the occasional baker). or even if you don't, you can get these items easily with a quick trip to the grocery store.

these chocolate cookies are great. i love how soft and chewy they are. it's almost like eating a brownie, but in a cookie form. they make for great gifts as well. i actually made these for a girls night in event and we all loved it. well, i know i did. ;)

so if you're craving for some chocolates, or (chocolate) cookies.. why not give this a try? you won't be disappointed. :)

Martha Stewart's Outrageous Chocolate Cookies via design. bake. run.

Martha Stewart's Outrageous Chocolate Cookies via design. bake. run.

martha stewart's outrageous chocolate cookies
recipe from here

ingredients:
  • 8 ounces semisweet chocolate, roughly chopped
  • 4 tablespoons unsalted butter
  • 2/3 cup all-purpose flour
  • 1/2 teaspoon baking powder
  • 1/2 teaspoon salt
  • 2 large eggs
  • 3/4 cup packed light-brown sugar
  • 1 teaspoon pure vanilla extract
  • 1 package (12 ounces) semisweet chocolate chunks

directions:
  1. preheat the oven to 350 degrees.
  2. heat chopped chocolate and butter in a microwave-safe bowl in 20-second increments, stirring between each, until almost melted; do not overheat.
  3. in another bowl, whisk together flour, baking powder, and salt.
  4. in a mixing bowl, beat eggs, brown sugar, and vanilla on high speed until light and fluffy. reduce speed to low; beat in melted chocolate. mix in flour mixture until just combined. stir in chocolate chunks.
  5. drop heaping tablespoons of dough 2 to 3 inches apart onto baking sheets.
  6. bake, rotating sheets halfway through, until cookies are shiny and crackly yet soft in centers, 12 to 15 minutes. cool on baking sheets 10 minutes; transfer to a wire rack to cool completely. or if you prefer (which is what i do) you can eat them after they've cooled a little bit. typically that's a few minutes out of the oven. they taste best warm, i think.

note: don't worry if the batter seems thin. it should look more like a brownie batter than a cookie dough. oh, and do not bake the cookies to a crisp; they are meant to be soft and chewy.

Tuesday, February 11, 2014

chocolate-cinnamon cupcakes with mocha buttercream frosting

Mini Chocolate-Cinnamon Cupcakes with Mocha Buttercream Frosting via design. bake. run.

is it february already? and valentine's day is around the corner?!! alright, i haven't baked cupcakes in like forever. it's only fitting i make some (mini) chocolate cupcakes again, just in time for valentine's day. yes, i made some last year as well, in addition to the super popular (on pinterest) mini creme brulee cupcakes. those are pretty awesome as well.

to change it up a bit, i decided to add a little cinnamon to the usual (eggless) chocolate cupcake recipe. according to m, the cinnamon didn't come through a whole lot. i guess you could sort of tell it's there, but not really because once it's baked the chocolate and coffee flavors overpower the cinnamon? i don't know. so if you really like cinnamon, i say add in another teaspoon or so. otherwise, the recipe the way it is below will do just fine. and if you're a coffee fan, the mocha frosting is perfection. chocolate and coffee? done.

alright, below's the recipe if you'd like to bake some for this upcoming valentine's day or any day. i say it works for any occasion. so go ahead. they're super simple to make and the end results are always stunning... delish! enjoy and as always, happy baking!

The Perfect Valentine's Day Sweet! Chocolate-Cinnamon Cupcakes with Mocha Buttercream Frosting via design. bake. run.
who doesn't want to get some mini chocolate cupcakes this valentine's day? these are the perfect little gifts. we gave some away to c's teacher as an early valentine's day gift.

Chocolate-Cinnamon Cupcakes with Mocha Buttercream Frosting via design. bake. run.
i love how festive and valentine-y the added heart sprinkles are in these mini cupcakes.

chocolate-cinnamon cupcakes with mocha buttercream frosting

chocolate cupcakes:
1-1/2 cups flour
1 cup granulated sugar
1 tsp baking soda
1 tsp salt
1/3 cup cocoa powder
1 tsp instant coffee
2 tsp ground cinnamon
1/2 cup oil
1 cup water
1 tsp vanilla extract
1 tbsp vinegar

mocha buttercream frosting:
1/2 cup (1 stick) butter, room temperature
3 cups powdered sugar
2 tbsp instant coffee
2 tbsp cocoa powder
1/4 cup milk

directions:
for the cake: mix all ingredients together until moist and well blended. put in mini cupcake cups (1/2 full) and bake for 17-18 minutes at 350 degrees F.

for the mocha buttercream frosting: using a handmixer or in a stand mixer, mix all ingredients together until you've reached the right consistency for buttercream. if it's too thick, add in a little bit more milk. if it's too thin, you can add more powdered sugar. once everything looks good, pipe/frost and enjoy!

chocolate cake recipe makes about 16 regular cupcakes (or 45-50 mini cupcakes). buttercream frosting should make enough to frost all cupcakes (well, at least when i did it).

Thursday, December 19, 2013

12 days of christmas baking - day 7: caramel-filled chocolate cookies

12 Days of Christmas Baking - Day 7: Caramel-Filled Chocolate Cookies via design. bake. run.

i have been wanting to bake some chocolate cookies with caramel filling after stumbling upon some crazy good-looking photos of these cookies on pinterest. so, finally, here is my take on it! i didn't have any soft caramels lying around the house and didn't feel up to making my own from scratch so i used some kraft caramel bits and heated it in the microwave with a little bit of water to water it down so that it would be soft enough for a filling (but not too liquify like a sauce). the end result? some tasty chocolate cookies, for sure.

so below's the recipe should you want to bake a batch yourself. these cookies are best eaten warm. you definitely cannot pass up warm baked cookies this time of year, especially when they're filled with oozing caramel. yummmm-y! :)

12 Days of Christmas Baking - Day 7: Caramel-Filled Chocolate Cookies via design. bake. run.
these chocolate cookies with caramel filling are best enjoy warm. make sure you only cool the cookies slightly so that the caramel is still oozing out of them when you break into it.

12 Days of Christmas Baking - Day 7: Caramel-Filled Chocolate Cookies via design. bake. run.
soft caramels produce the best results in these caramel-filled chocolate chip cookies.

12 Days of Christmas Baking - Day 7: Caramel-Filled Chocolate Cookies via design. bake. run.
any chocolate and caramel lover would not be able to resist this tasty treat. so go ahead and bake a bunch and give it away as a mini gift this holiday season!

chocolate cookies with caramel filing

ingredients:
  • 1 cup all-purpose flour
  • 1/3 cup cocoa powder
  • 3/4 cup sugar
  • 1/4 cup brown sugar
  • 1/2 tsp baking powder
  • a pinch of salt
  • 1 egg
  • 1/4 cup (1/2 stick) butter, room temperature
  • 12 soft caramels
  • some sea salt (for sprinkling, optional)

directions:
  1. preheat oven to 350°f. line a baking sheet with parchment paper or a silicone mat.
  2. sift the flour, cocoa powder, and baking powder into a medium bowl.
  3. in the bowl of a stand mixer fitted with the paddle attachment (or you can use a medium-size bowl with a handmixer like i do), beat the butter on low speed until smooth, 1 to 2 minutes. add the sugar and mix on low speed until well combined. then mix on medium speed until the mixture gets lighter in color and texture becomes fluffier, about 5 minutes.
  4. with the mixer on medium speed, add the egg and mix until well-incorporated and very smooth, about 30 seconds. then mix on medium speed for 30 more seconds. feel free to scrape down the sides to get all the mixture in.
  5. then add the flour mixture. mix on low speed just until uniform in texture. mix on low until everything is combined.
  6. using a cookie scoop (about 1 tablespoon in size), scoop out 1-1/2 tablespoons and form into a ball. place them on the baking sheet, spacing them at least 2 inches apart. then using your finger or thumb, make an indentation in the center and put in your soft caramel (or you can just lightly squash in the caramel). at this point, you can sprinkle a little bit of sea salt on top of the caramel if you like and cover it up with a little bit of dough to seal it. make sure the caramel isn't visible so that when it bakes it will be contained until you break into it.
  7. bake for 10-12 minutes, until the cookies are slightly firm to the touch and the surface is no longer glossy, rotating the pan halfway through the baking time.
  8. let the cookies cool on the pan for a few minutes before removing. then eat and enjoy! best enjoy warm. of course, you can store them in an airtight container at room temperature for 3 days. or if you don't want to use all the dough at once, the dough can be stored in an airtight container in the refrigerator for up to 5 days.
makes a dozen 3-inch cookies.

check out last year's day 7 recipe: peppermint and coffee nutella french macarons

Monday, December 2, 2013

12 days of christmas baking - day 1: soft chocolate chip cookies

12 Days of Christmas Baking - Day 1: Soft Chocolate Chip Cookies via design. bake. run.

happy december! is it really december, already?! well, that's okay... because this is THE best time of the year. i do love the holidays; it's the perfect excuse of all that baking. ;)

last december i decided i would chronicle my 12 days of christmas baking. i've done it the the past, just never wrote about it. last year's was quite a success in my eyes because i had plenty of eaters to gobble up all the goodies. but not just that, i actually baked all those days in a row, or close to it anyway. this year, i'm not so sure. but regardless, i will go ahead and do my 12 days of christmas baking again. i have new recipes i'd like to try this year. this first one here was one i stumbled upon on pinterest. i have to say the cream cheese as the secret ingredient in this chocolate chip cookies recipe was a surprising but pleasant and effective ingredient. it actually yields softer cookies. and they're not as sweet so if you aren't the so-sweet kind of person, then this is the one for you. i love how soft these cookies stayed even a day or two later. it's unlike any of the chocolate chip cookies i've tried in the past. now, is it the best ever chocolate chip cookies i've baked or eaten? ummm... that's a toughy. i wouldn't say it's the best ever, but it's one that i'd probably make again when i feel like it and have cream cheese lying around.

below's the recipe should you like to make some. it's pretty easy, so why not?! chocolate chip cookies are a classic and they do make for the perfect gift this holiday season. :)

Soft Chocolate Chip Cookies via design. bake. run.
cream cheese is the secret ingredient in these chocolate chip cookies. it produces a less sweeter cookie, soft and delicious in every bite.

12 Days of Christmas Baking - Day 1: Secret Ingredient Chocolate Chip Cookies via design. bake. run.
i love how these cookies stay soft even days later. just make sure you keep it in an airtight container.

secret ingredient chocolate chip cookies
recipe from just a taste

ingredients:
  • 2 1/4 cups all-purpose flour
  • 1 teaspoon baking soda
  • 1 teaspoon salt
  • 3/4 cup (1 1/2 sticks) unsalted butter, at room temp
  • 1/4 cup cream cheese, at room temp
  • 1/2 cup sugar
  • 1 cup packed light brown sugar
  • 1 1/4 teaspoons vanilla extract
  • 2 large eggs
  • 2 cups semi-sweet chocolate chips

directions:
  1. in a medium bowl, whisk together the flour, baking soda and salt.
  2. n the bowl of a stand mixer fitted with the paddle attachment, cream together the butter, cream cheese, sugar, light brown sugar and vanilla extract until light and fluffy, about 2 minutes, scraping down the sides as needed. add the eggs, one at a time, beating well after each addition. add the flour mixture, beating to combine, then stir in the chocolate chips.
  3. cover the bowl with plastic wrap and refrigerate the dough for a minimum of 2 hours and up to 3 days.
  4. when ready to bake, preheat the oven to 375°F and line two baking sheets with parchment paper or silpats.
  5. drop 2- to 3-tablespoon mounds of dough onto the baking sheets, spacing the mounds at least 2 inches apart.
  6. bake the cookies for 9 to 11 minutes, or until golden brown. cool the cookies on the baking sheets for 2 minutes then transfer them to a wire rack to cool completely.

makes a good amount depending on how big your dough mounds are. mine were about a tablespoon or two and i got about 3-4 dozen (2-3 inches) cookies. enjoy and happy baking and eating!

notes: measure 1/4 cup cream cheese by spooning/scraping it into a dry measuring cup and leveling it off.

Wednesday, February 27, 2013

caramel-filled mini cupcakes inspired by rolo chocolate

Rolo Chocolate-Inspired Cupcakes via design. bake. run.

a while back i had some rolo chocolates for the first time ever. i know, right? i have to say, they were quite good and it gave me this idea to make some mini cupcakes with caramel filling. i figure since i do have some caramel bits lying around and the chocolate cupcake recipe i've been making lately is super simple to make, why not. i have to say these cupcakes turned out great! the melted caramel in the middle makes the cake extra moist and that much better, as if it wasn't good on its own already.

below's the recipe should you want to try making some yourself. enjoy and happy eating! :)

Rolo Chocolate-Inspired Cupcakes via design. bake. run.
i absolutely love the caramel filling in these mini cupcakes. it makes for one delicious bite!

Rolo Chocolate-Inspired Mini Cupcakes via design. bake. run.
these are so so good. the cake is nice and moist with the caramel filling. it's a must try if you're a chocolate or caramel (or none of the two even) lover! ;)

rolo chocolate-inspired mini cupcakes

ingredients:

chocolate cupcakes:
1-1/2 cups flour
1 cup granulated sugar
1 tsp baking soda
1 tsp salt
1/3 cup cocoa powder
1/2 cup oil
1 cup water
1 tsp vanilla extract
1 tbsp vinegar

caramel filling:
1/2 bag of kraft caramel bits
2 tablespoons of water

chocolate ganache:
12 oz chocolate, chopped into small pieces
1 cup heavy cream

directions:

for the cake: mix all ingredients together until moist and well blended. put in mini cupcake cups and bake for 15 minutes at 350 degrees F. let cupcakes cool completely before coring the center for the caramel. please core first before pouring in caramel filling.

for the caramel: place the caramel bits with 2 tablespoons of water in a microwaveable bowl and heat it in the microwave for 30-60 seconds at medium power. you can heat it longer if the bits are quite melted after 60 seconds. once it looks like they are melted, stir the caramel quickly until smooth. use immediately. if at any point the caramel looks like it's thickening up, you can reheat it in the microwave for a few seconds to soften it again.

for the ganache: place chocolate pieces in a large bowl. heat heavy cream on medium high until it comes to a boil. remove from heat and immediately pour cream over chocolate and stir until completely mixed and glossy. allow ganache to completely cool and set up. when you are able to spoon the ganache and it can hold its texture, it is ready for piping. pipe/frost and enjoy!

to assemble: pour a generous portion of the caramel filling into the cored cupcakes. top with chocolate ganache frosting. that's it! happy eating! :)

chocolate cake recipe makes 50 mini cupcakes (or 16 regular ones). ganache recipe makes 1-1/2 cups. you can half all of these if you want to make less. i've done it many times halving the recipe.

Thursday, February 21, 2013

chocolate profiteroles with chocolate passionfruit cream

Chocolate Profiteroles with Chocolate Passionfruit Pastry Cream via design. bake. run.

a few weeks ago one of my coworkers gave me a quart (or carton?!) of passionfruit juice she brought back from berkeley bowl. she remembered me looking for some passionfruit whether it was in the form of the fruit itself or in juices, pulps, anything! anyway, since have this juice i figure i try and make something yummy out of it. and here you have it, these delicious chocolate profiteroles (the french's fancy way of saying cream puffs) with chocolate passionfruit pastry cream. :)

so, how did they turn out? pretty good i say. the passionfruit and chocolate definitely go together. only one unfortunate thing is that the passionfruit juice isn't passionfruity-enough in that it gets a little lost with the chocolate. unfortunately chocolate is one of those very powerful flavors. in this case it overpowered the passionfruit. although, i do feel that had i had actual passionfruit pulp or juices from the fruit itself (100% passionfruit) maybe you'd taste the fruit flavor a little more, even with the chocolate? all in all these cream puffs or profiteroles still turned out fantastic!

below's the recipe for these delicious chocolate profiteroles should you like to try them out yourself. enjoy!

Chocolate Profiteroles with Chocolate Passionfruit Pastry Cream via design. bake. run.
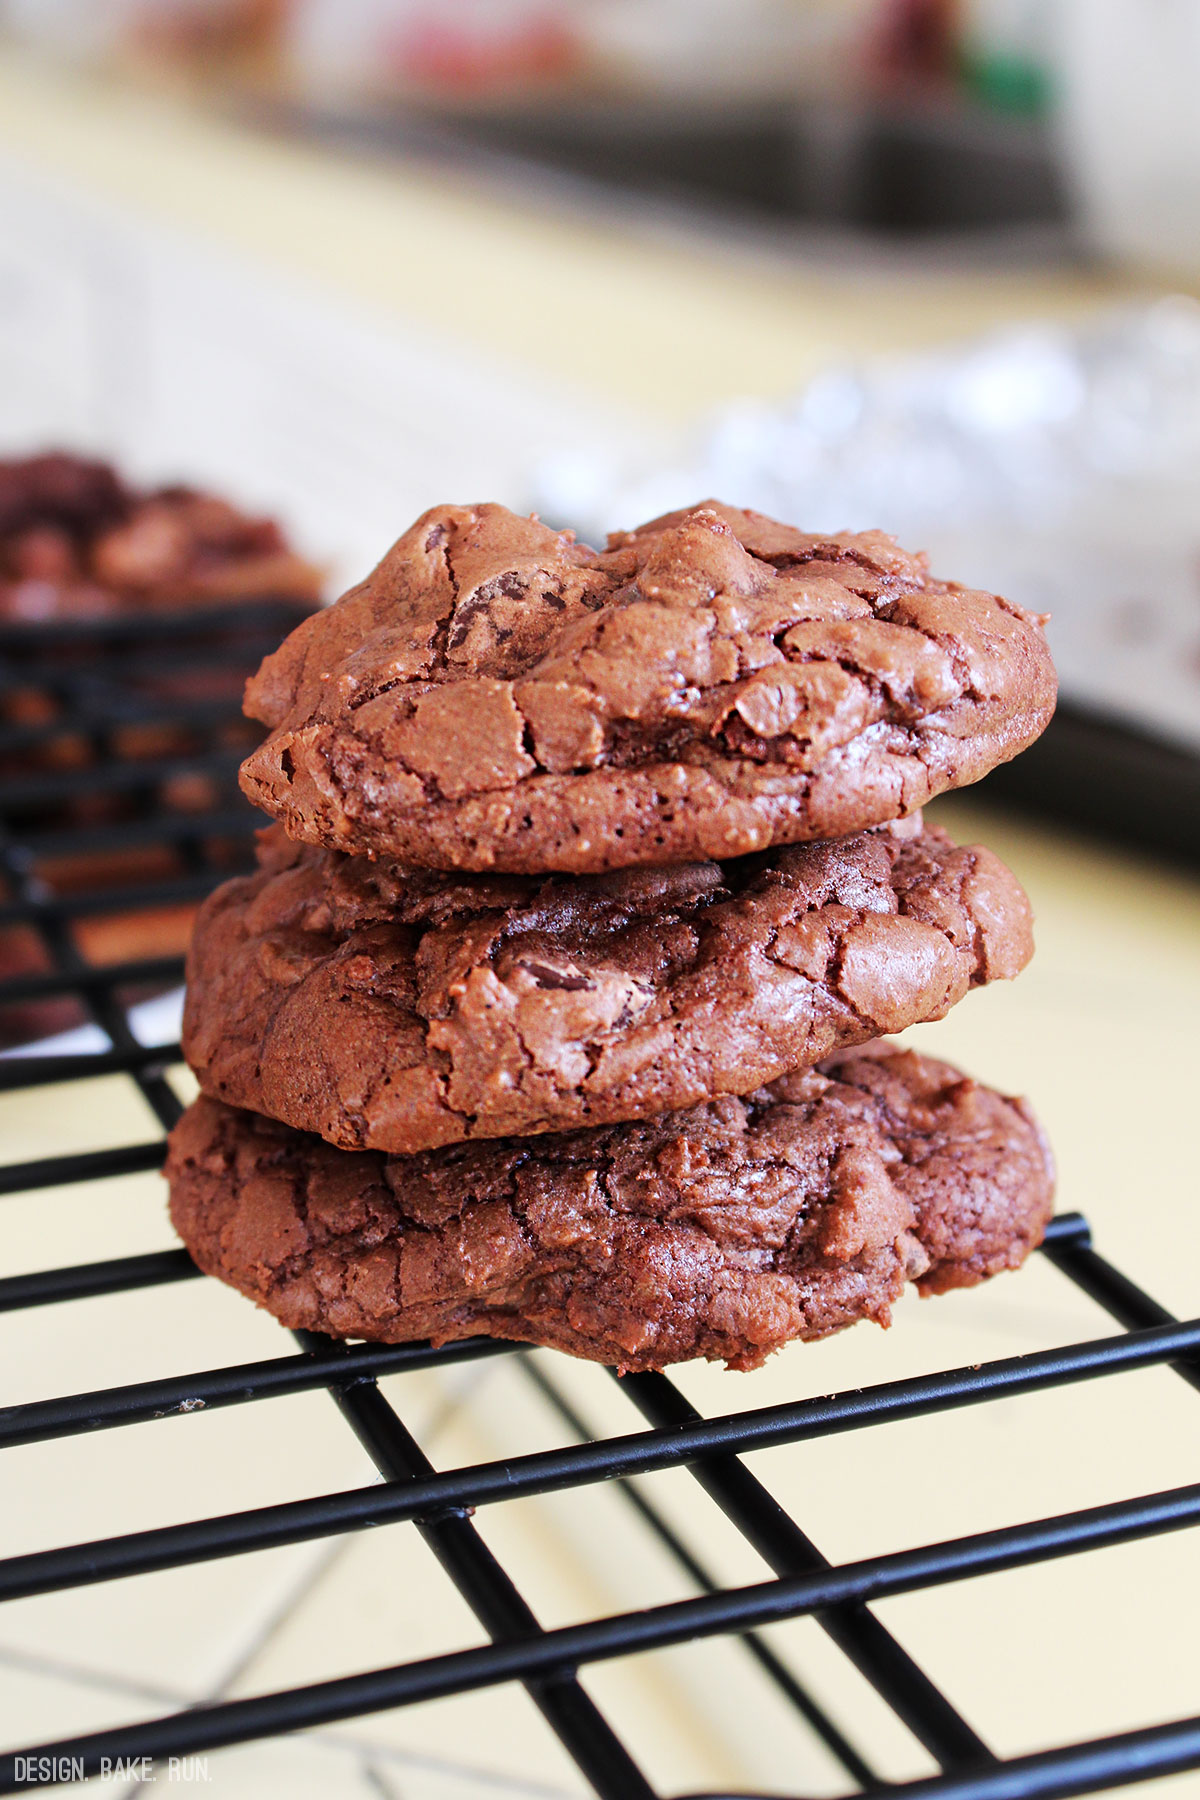
these chocolate cream puffs are so good. usually i prefer my simple vanilla pastry cream or whipped cream filling, but the chocolate in this -- delish!

Chocolate Profiteroles with Chocolate Passionfruit Cream via design. bake. run.
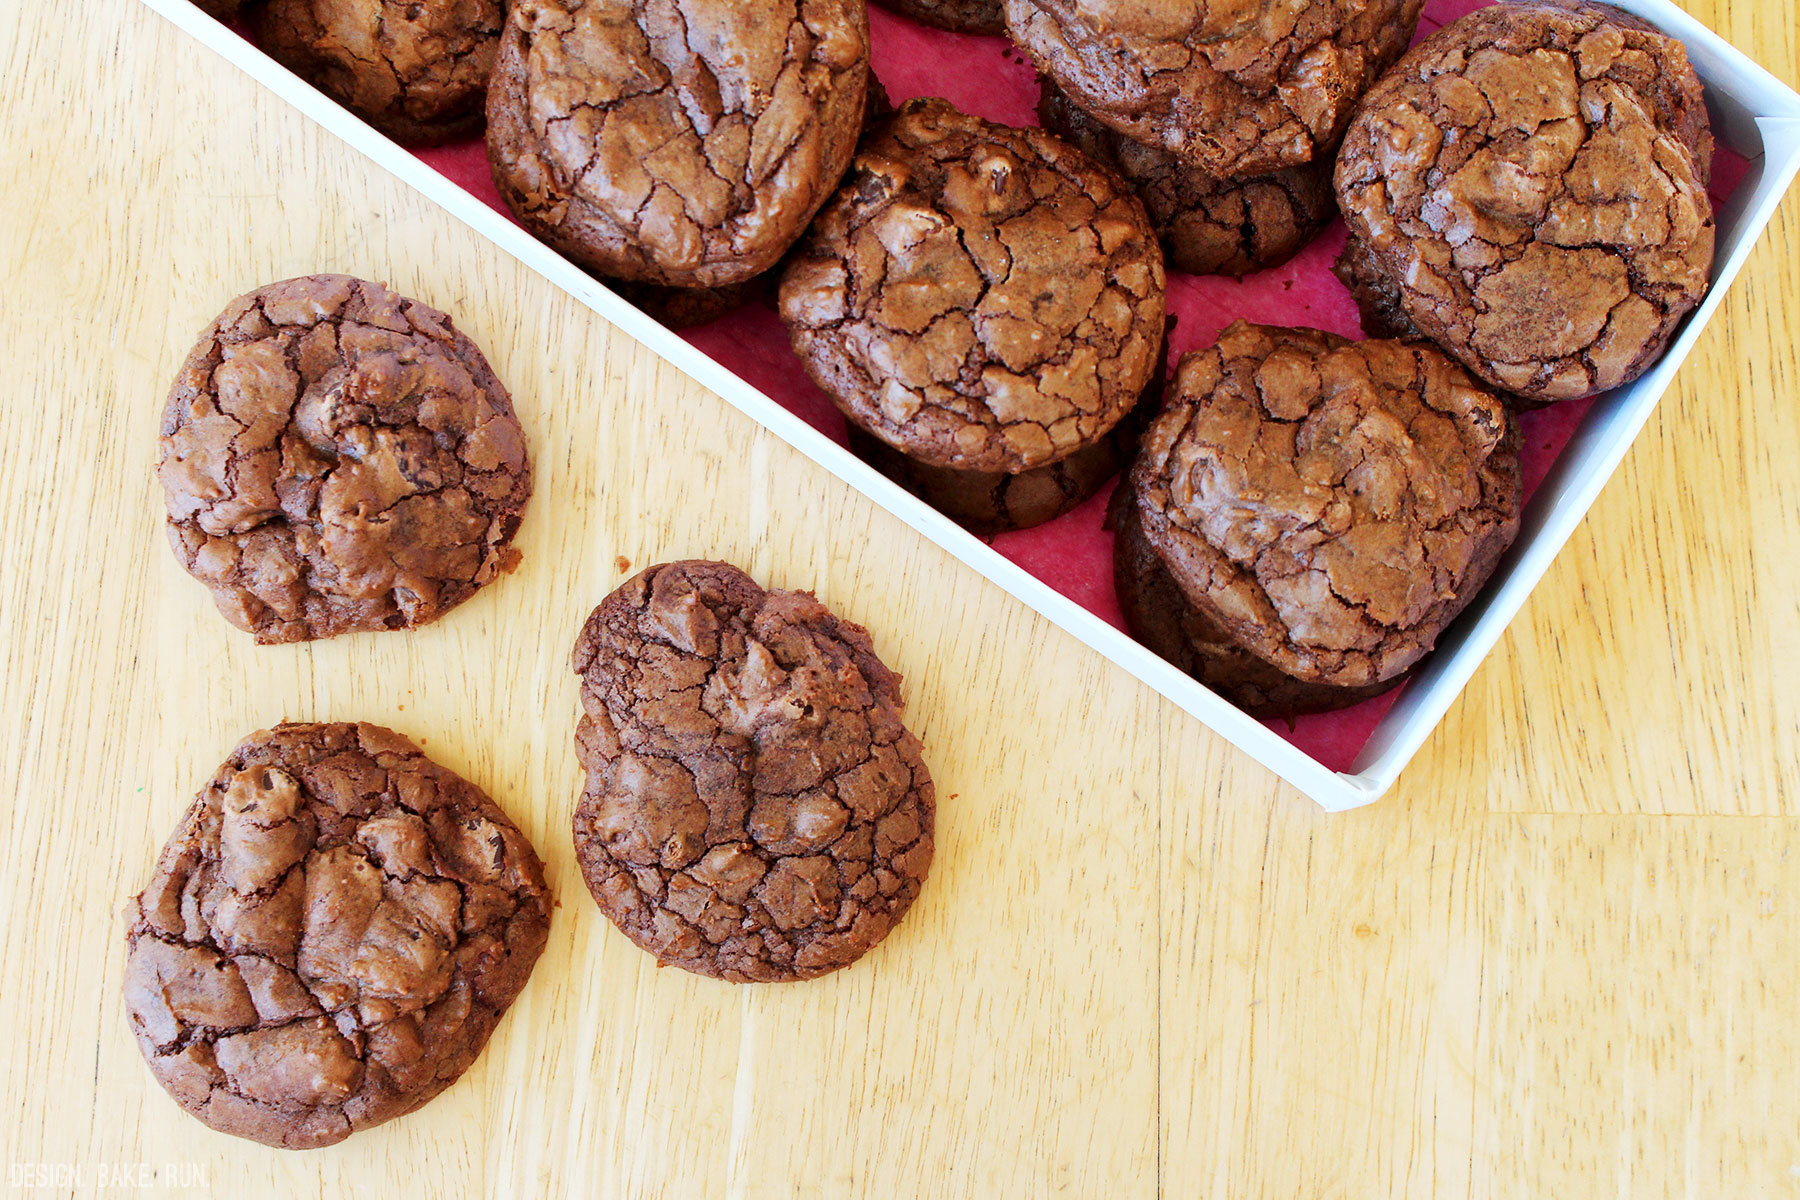
yup, that's a lot of chocolate profiteroles! :)

chocolate profiteroles with chocolate passionfruit pastry cream

ingredients

for the pastry cream:
1 cup half-and-half
1 cup whole milk
1/2 cup sugar
Pinch salt
6 large egg yolks
3 tablespoons cornstarch
1/2 cup passionfruit juice
6 oz dark chocolate chips
1/4 cup cream

for the pâte à choux:
1 cup all purpose flour
2 tablespoons unsweetened cocoa powder
1 teaspoon sugar
1/4 teaspoon salt
1/2 cup (1 stick) unsalted butter, cut into pieces
1 cup water
4 large eggs, lightly beaten

for the chocolate ganache glaze:
4 oz chocolate, chopped into small pieces
1/3 cup heavy cream

directions

to make the pastry cream: heat the half-and-half and milk, 6 tablespoons of the sugar, and the salt in a saucepan over medium-high heat until simmering, stirring occasionally to dissolve the sugar. meanwhile, combine the egg yolks and remaining 2 tablespoons sugar in a medium bowl and whisk until the sugar has begun to dissolve and the mixture is creamy, about 15 seconds. whisk in the cornstarch until combined and the mixture is pale yellow and thick, about 30 seconds.

also, while waiting for the milk mixture to simmer, heat the 1/4 cup cream in the microwave for 30-45 seconds until it comes to a boil (really, you want it hot enough to melt the chocolate). then pour it over the chocolate chips in a decent size bowl. mix the chocolate and cream together until the ganache is form. set the chocolate aside.

now, when the half-and-half and milk mixture has reached a simmer, slowly add it to the egg yolk mixture to temper, whisking constantly. return the mixture to the saucepan, scraping the bowl with a rubber spatula. return the mixture to a simmer over medium heat, whisking constantly, until a few bubbles burst on the surface and the mixture is thickened and glossy, about 30 seconds. off the heat, whisk in the melted chocolate and passionfruit juice. mix until everything is incorporated. strain the pastry cream through a fine mesh sieve set over a medium bowl. press plastic wrap directly on the surface to prevent a skin from forming and refrigerate until cold and set, at least 3 hours and up to 2 days.

to make the choux pastry: preheat oven to 400°F (200°C) and place rack in center of oven. line a baking sheet with parchment paper or lightly butter or spray the pan with a nonstick vegetable spray.

in a bowl sift or whisk together the flour, sugar and salt.

place the butter and water in a heavy saucepan over medium high heat and bring to a boil. (make sure that the butter melts before the water boils to reduce the amount of evaporation.) remove from heat and, with a wooden spoon, add the flour mixture, all at once, and stir until combined. return saucepan to the heat and stir constantly until the dough comes away from the sides of the pan and forms a thick smooth ball (about 1-2 minutes). transfer the dough to your electric mixer, or use a hand mixer, and beat on low speed to release the steam from the dough (about a minute) &ndash actually, i just do everything in the saucepan, beat the dough, adding the eggs, etc. once the dough is lukewarm start adding the lightly beaten eggs (dough will separate and then come together) and continue to mix until you have a smooth thick paste (dough will fall from a spoon in a thick ribbon). spoon or pipe small mounds of dough onto the baking sheet, spacing about 2 inches (5 cm) apart. optional: you can gently brush the tops of the dough with a lightly beaten egg if you like. i usually don't.

bake for 15 minutes and then reduce the oven temperature to 350°F (180°C). continue to bake for a further 30 minutes or until the shells are a nice amber color and when split, are almost dry inside. turn the oven off, poke a couple of holes in each puff and, with the oven door slightly ajar, let the shells completely cool (and dry out).

to fill the puffs: use the tip of a paring knife to make a small cut perpendicular to the first, creating an X in the side of each puff. fill a pastry bag fitted with a 1/4-inch plain tip with the pastry cream. pipe some of the pastry cream through the X into the side of each puff until it starts to ooze back out. repeat to fill all the puffs.

to make the chocolate ganache glaze: place chocolate and cream in a microwave-safe bowl, cover with plastic wrap, and microwave for 20 seconds at a time, until the mixture just begins to steam. whisk together thoroughly until completely mixed and glossy. allow ganache to cool slightly before dipping the tops of the cream puffs. set the puffs on a rack to let the chocolate glaze set completely. if you don't care for the chocolate ganache glaze, you can sprinkle confectioner's sugar on top of the filled cream puffs. i personally prefer dipping them in the ganache because it tastes yummier that way. serve within a few hours.

makes 40 decent size profiteroles. happy eating! :)

Thursday, February 14, 2013

happy valentine's day!

Valentine's Day Mini Cupcakes via design. bake. run.

Valentine's Day Sweet Treats via design. bake. run.

i've never really been a fan of valentine's day, but for some odd reason over the last few years i've slowly grown into maybe recognizing it. not a whole lot, just a teeny tiny bit. my thing is, i don't need any fancy flowers or box(es) of chocolates. just say happy valentine's day and that you love me and cannot picture your life without me because i am so awesome and things just wouldn't be as awesome if i wasn't part of it. hahahahaha.. yeah, sure, something like that.

so did my person recognize today's over-commercialized holiday? yup! he got me a nice box of see's candies (i've grown to liking them bit by bit these days as i'm usually the one giving those out during holidays) and some yummy peppered jerky. yes, i love my beef jerky. i say this year's v-day is so far, so good. no complaints here.

well, it's not too late if you haven't done anything today. the day is still young! hey, you can even bake these yummy mini cupcakes and give them away as little gifts or have them at your dinner (party or not) tonight (or any other time is fine too). you can find the recipe for these mini chocolate cupcakes with ganache here. i just topped them off with the ever-so-festive valentine sprinkles. :)

recipe: mini chocolate cupcakes with chocolate ganache frosting

Monday, February 11, 2013

white chocolate chip chocolate cookies inspired by blue bottle coffee

White Chocolate Chip Chocolate Cookies via design. bake. run.

i have to admit i am a sucker for baked goods these days. who knew i'd love cookies, cakes and pastry so much? chocolate chip cookies are for sure one of my favorite cookies. double or triple chocolate is even better!

this recipe here calls for two kinds of chocolate. actually, you can even throw in more if you prefer, but i wanted to keep it simple so i just went with the two (chocolate cocoa and white chocolate). these were inspired by the ever so popular and san francisco-famous blue bottle coffee double chocolate chip cookies. their double chocolate chip cookies are just delish! if you're ever in san francisco, you must stop by for a cup of their famous drip coffee and double chocolate chip cookies. it is for sure the perfect anytime snack/indulgence.

below is the recipe for these delicious (white) chocolate chip cookies inspired by blue bottle coffee. i absolutely love how you get both the sweetness of the chocolate and hint of the sea salt in one bite. when making these i had forgotten to put in the sea salt with the sugar during the step where you mix the butter and sugar together. so i threw it in at the very end with the white chocolate. i have to say i'm so glad i did that by mistake because i think the hit of the sea salt with the chocolate and sugar is absolutely wonderful! feel free to make some yourself and let me know how you like it. oh, and did i mention, these also make for the perfect homemade gifts as well?! happy baking and eating (and giving)! ;)

White Chocolate Chip Chocolate Cookies via design. bake. run.
these blue bottle coffee-inspired chocolate chip cookies are just divine. they melt in your mouth and is so, so, good.

white chocolate chip chocolate cookies
inspired by blue bottle coffee

ingredients:
1 cup all-purpose flour
1/3 cup cocoa powder
1/2 teaspoon baking soda
5 tablespoons unsalted butter, at room temperature
1 cup sugar
1 teaspoon sea salt
1 egg
1/2 tablespoon vanilla extract
4 ounces white chocolate chips (or chopped white chocolate)

directions:
  1. preheat oven to 350° f. line a baking sheet with parchment paper or a silicone mat.
  2. sift the flour, cocoa powder, and baking soda into a medium bowl.
  3. in the bowl of a stand mixer fitted with the paddle attachment (or you can use a medium-size bowl with a handmixer), beat the butter on low speed until smooth, 1 to 2 minutes. add the sugar and mix on low speed until well combined. then mix on medium speed until the mixture gets lighter in color and texture becomes fluffier, about 5 minutes.
  4. in a separate bowl, combine the egg and vanilla extract and whisk vigorously until well blended.
  5. with the mixer on medium speed, add the egg mixture very slowly, in a steady stream, and mix until well-incorporated and very smooth, about 30 seconds. then mix on medium speed for 30 more seconds. feel free to scrape down the sides to get all the mixture in.
  6. then add the flour mixture. mix on low speed just until uniform in texture. scrape down the sides of the bowl, then add in the white chocolate chips and sea salt. mix on low until everything is combined.
  7. using a cookie scoop (about 1 tablespoon in size), scoop out 2 tablespoons and form into a ball. place them on the baking sheet, spacing them at least 2 inches apart.
  8. bake for 8 minutes, until the cookies are slightly firm to the touch and the surface is no longer glossy, rotating the pan halfway through the baking time.
  9. let the cookies cool on the pan for 10 minutes before removing. then eat and enjoy! best enjoy warm. of course, you can store them in an airtight container at room temperature for 3 days. or if you don't want to use all the dough at once, the dough can be stored in an airtight container in the refrigerator for up to 5 days.
makes 15-16 3-inch cookies. enjoy, because these cookies are really, really good! :)

note: you can let the dough sit in the refrigerator for 30 minutes to 3 hours if you like before baking (i think blue bottle says you should put it in the fridge for at least 3 hours?!). i believe they're supposed to come out even better. personally, i cannot wait that long and i don't like it when the dough is a little tough to handle so i just bake my dough right away. the cookies still come out delicious regardless.

Tuesday, February 5, 2013

the perfect homemade gift -- brown butter chocolate chip cookies

Brown Butter Chocolate Chip Cookies via design. bake. run.

a while ago one of my co-workers gave me some old thomas the tank engine toys (trains/tracks/etc) that his daughter had outgrown. he asked me if i thought we would want them for c and i said sure. anyway, as a thank you gift, c and i made these yummy smelling and oh so tasty brown butter chocolate chip cookies for them. sure it was 2-3 weeks after the fact, but yes, we eventually got around to thanking them. c loves thomas, and so does little miss v. so it's not like one can never have too many tracks or trains. i don't think he'll really ever outgrow thomas or trains. he's your typical little boy.

below's the recipe for these yummy cookies should you be interested in making some yourself. it's similar to other recipes, but not quite. i have to say browning the butter really makes a difference. i love how they crinkle once they come out of the oven. they give you that perfect chocolate chip cookie look, and taste just as good as they look too!

Brown Butter Chocolate Chip Cookies via design. bake. run.
chocolate chip cookies are one of our favorites! this brown butter recipe is so easy and simple, we'll be making it again soon. :)

brown butter chocolate chip cookies

ingredients:

1/2 cup (1 stick) butter
1-3/4 cups + 2 tablespoons all purpose flour
1 cup brown sugar
1/2 cup granulated sugar
1/2 tsp baking powder
1/2 tsp baking soda
1/4 tsp salt
2 large eggs
1 to 1-1/2 cups semi-sweet chocolate chips (you can use milk or dark if you prefer)

directions:
  1. preheat oven to 350° f.
  2. sift the flour, baking powder, baking soda and salt together in a bowl and set it aside.
  3. in a small saucepan, melt the butter and let it sit until it browns. you'll know it when you see a golden color and your kitchen smells wonderfully sweet!
  4. pour the browned butter into a mixer bowl (if you're using a mixer) or into a medium bowl (if using a hand mixer or fork -- that's my prefer method, easy cleanup!). add in the brown sugar and granulated sugar. mix butter and sugars until thoroughly blended. then mix in the 2 eggs. add the dry ingredients and mix until just combined. then stir in the chocolate chips.
  5. form scant 1/4 cup dough into ball. holding dough ball using fingertips of both hands, pull into two equal halves. rotate halves ninety degrees and, with jagged surfaces exposed, join halves together at their base, again forming a single cookie, being careful not to smooth dough’s uneven surface. place formed dough onto a silpat or parchment-lined cookie sheet, about 6 dough balls per sheet.
  6. bake for 10 minutes or until golden brown. you can rotate the sheet halfway through baking to ensure even baking if you like. i do it sometimes, other times i just skip it.
  7. let the cookies cool on the baking sheet for a few minutes before putting them on a rack to cool completely. serve warm with a glass of milk if you like. delicious!

makes 16 (3-1/2") large cookies. enjoy and happy eating! :)

Friday, January 11, 2013

gluten-free chocolate chip cookies

Gluten-Free Chocolate Chip Cookies via design. bake. run.

i never bothered baking any gluten-free goodies until a few years ago. one of my former coworkers can't have any gluten so everything she consumes must be gluten-free. that was when i started testing out random recipes. every time i brought in goodies, i made sure i had a GF version as well. typically, i'd just take the regular recipes and alter them GF. most of the time i had to play around with random flour combinations. i have to say, i don't care for some of those flours. what i've found is that brown rice flour or white rice isn't that bad and can somewhat holds its ground. this chocolate chip cookies recipe here is an example of that. it uses only brown rice flour as the flour and the outcome is actually very good. it's quite simple really, and the cookies turn out great. of course i've had incidences where some of them can turn out too crunchy or just a horrible mess (but that the fun of testing random flour combos). i guess you just have to play around with it until you find the right combination of ingredients.

below's the recipe for these delicious gluten-free cookies should you want to try them out yourself. i love how the brown rice flour gives the cookie that crumbly texture once it hits your mouth. these really are good whether you're GF or not! oh, for half the cookies i turned them into sandwich cookies and added in some salted caramel filling leftover from my brown sugar salted caramel macarons. i say those were quite a treat. it's a giant load of sugary sweetness, but oh man, they were good.

okay, as usual, let me know how yours turn out if you do make these. happy baking and eating! :)

Gluten-Free Chocolate Chip Cookies via design. bake. run.
the salted caramel filling with these gluten-free chocolate chip cookies just made them even better!

Gluten-Free Chocolate Chip Cookies via design. bake. run.
this easy GF cookie recipe is seriously so simple to make and used only brown rice flour!

gluten-free chocolate chip cookies

ingredients:

1/2 stick (4 oz) butter, softened or melted
1/4 cup sugar
1/2 cup brown sugar
1 egg
1/4 teaspoon baking soda
1/4 teaspoon baking powder
pinch of salt
1 cup + 2 tablespoons brown rice flour
3/4 cup semi-sweet chocolate chips

directions:

preheat oven to 350°F. line baking sheet with parchment paper or silicone sheet.

cream softened butter (or melt butter in microwave safe bowl) and sugar together. then add in the egg. once mixed, add in the baking soda, baking powder, salt and flour. mix until incorporated, then add in the chocolate chips.

scoop out a tablespoon portion (ball-like) onto the baking sheet. make sure to spread out them at least 2-inches apart. bake for 9-10 minutes until golden but still soft in the center (baking time varies depending on how chewy or crunchy you like your cookies). transfer hot cookies with a spatula to a rack to cool. after a few minutes, they're ready to eat! enjoy. :)

makes 18-20 cookies or 9-10 sandwich cookies. store cookies in a tightly sealed container for up to 5 days.

Tuesday, January 8, 2013

chocolate banana macarons

Chocolate Macarons with Banana Buttercream via design. bake. run.

we had a bunch of bananas that were ripening so i decided to make something with them besides the typical banana bread. of course i barely used a whole banana but at least it used part or some of it! plus, the overall result was quite pleasing and very satisfying to my tastebuds (and many others). i actually made something that's not quite ordinary. i mean, how often do you have banana buttercream?

so what goes with banana? how about some chocolate! i say the pairing goes very well together. who doesn't love chocolate? and that banana sweetness is just perfect with the chocolate, especially if you give it the appropriate time for the cookie to age. it's really that good. both flavors really enhances each other.

below's the recipe should you be interested. feel free to let me know how yours turn out. happy baking (and eating)! :)

Chocolate Macarons with Banana Buttercream via design. bake. run.
wait a day until all the flavors are melded and oh my -- they are so good! it's like biting into a little bit of that banana chocolatey heaven goodness. yum!

chocolate macarons with banana buttercream

ingredients:

macaron batter:
1 cup powdered sugar
3/4 cup almond meal
2 tablespoons unsweetened cocoa powder
2 large egg whites, at room temperature
1/4 cup granulated sugar

banana buttercream filling:
1/2 of a medium size ripped banana
1/4 cup butter, softened
2 cups powdered sugar

directions:

to make the macaron batter/shells:
  1. line two baking sheets with parchment paper and have a pastry bag with a plain tip (about 1/2-inch, 2 cm) ready.
  2. sift together the powdered sugar, almond meal and 3 tablespoons of cocoa powder so there are no lumps. set aside.
  3. in the bowl of a standing electric mixer (or if you prefer, you can use a bowl and hand mixer), beat the egg whites until they begin to rise and hold their shape. while whipping, beat in the granulated sugar until very stiff and firm, about 2 minutes.
  4. carefully fold the dry ingredients, in two batches, into the beaten egg whites with a flexible rubber spatula. when the mixture is just smooth and there are no streaks of egg white, stop folding and scrape the batter into the pastry bag (standing the bag in a tall glass helps if you’re alone).
  5. pipe the batter on the parchment-lined baking sheets in 1.35-inch circles evenly spaced one-inch apart.
  6. rap the baking sheet a few times firmly on the counter top to flatten the macarons. then let it sit for at least 30-60 minutes depending on humidity before baking them in the oven. about 10-15 minutes before baking, preheat oven to 350 degrees F. bake for 15 minutes.
  7. once macaron shells are out of the oven, let them sit for 30-60 seconds before removing the hot baking sheet underneath. let the macarons cool completely before removing them from the parchment paper.

for the banana buttercream filling:
  1. beat the banana and butter in a medium size bowl using a hand mixer until combined.
  2. then add in the powdered sugar and keep beating/mixing until fully incorporated and at the right consistency. if it's too thin, add in a little more powdered sugar. otherwise, if it's too stiff, thin it a tad with a little bit of milk, a teaspoon at a time.

to assemble the macaron cookies:
  1. before assembling these cookies, make sure to pair up all the cookie shells so they are as close as possible in size.
  2. using a knife, spread a good amount of the banana buttercream on the inside of the macarons then sandwich them together.
  3. let them stand at least one day (keep them refrigerated) before serving (serve at room temperature), to meld the flavors.

store in airtight container for up to 5 days. makes 20-24 macarons. happy eating! :)

Thursday, January 3, 2013

chocolate macarons with chili pepper chocolate ganache

Chocolate Macarons with Chili Pepper Chocolate Ganache via design. bake. run.

as a last minute entry, i came up with this recipe for the chocolate adventure contest sponsored by scharffen berger chocolate maker and tuttifoodie. for 2012, i believe they are looking for a delicious phenomenal chocolate sandwich cookie, using scharffen berger chocolates and one or more of the 12 adventurous ingredients. the adventurous ingredients i chose were the chili pepper and coconut milk.

below's the recipe i came up with. it's pretty simple but i think the chili pepper chocolate ganache definitely adds a kick to your typical chocolate ganache and for sure, this macaron cookie is not your usual chocolate sandwich cookie.

so if you're adventurous enough too, please feel free to try this recipe out yourself and let me know what you think! happy baking and eating! :)

Chocolate Macarons with Chili Pepper Chocolate Ganache via design. bake. run.
the chili pepper powder adds that unexpected but very tasteful kick to your typical chocolate ganache for this macaron filling.

chocolate macarons with chili pepper chocolate ganache

ingredients:

macaron batter:
1 cup powdered sugar
3/4 cup almond meal
3 tablespoons Scharffen Berger unsweetened natural cocoa powder (any brand cocoa powder will do too if you don't have this kind)
more cocoa powder for macaron shell topping (optional)
2 large egg whites, at room temperature

1/4 cup granulated sugar

reduced coconut milk:
1/2 cup coconut milk

chili pepper ganache filling:
3/4 teaspoon chili powder
1 (9.7 oz) Scharffen Berger 62% cacao semisweet chocolate baking bar, cut into pieces (any chocolate baking bar or chips will work too)
1/4 cup reduced coconut milk* (see above)

directions:

to make the macaron batter/shells:
  1. line two baking sheets with parchment paper and have a pastry bag with a plain tip (about 1/2-inch, 2 cm) ready.
  2. sift together the powdered sugar, almond meal and 3 tablespoons of cocoa powder so there are no lumps. set aside.
  3. in the bowl of a standing electric mixer (or if you prefer, you can use a bowl and hand mixer), beat the egg whites until they begin to rise and hold their shape. while whipping, beat in the granulated sugar until very stiff and firm, about 2 minutes.
  4. carefully fold the dry ingredients, in two batches, into the beaten egg whites with a flexible rubber spatula. when the mixture is just smooth and there are no streaks of egg white, stop folding and scrape the batter into the pastry bag (standing the bag in a tall glass helps if you’re alone).
  5. pipe the batter on the parchment-lined baking sheets in 1.35-inch circles evenly spaced one-inch apart. quickly after it's piped, if you wish, sprinkle some cocoa powder over each shell using a small sifter.
  6. rap the baking sheet a few times firmly on the counter top to flatten the macarons. then let it sit for at least 30-60 minutes depending on humidity before baking them in the oven. about 10-15 minutes before baking, preheat oven to 350 degrees F. bake for 15 minutes.
  7. once macaron shells are out of the oven, let them sit for 30-60 seconds before removing the hot baking sheet underneath. let the macarons cool completely before removing them from the parchment paper.

for reduced coconut milk:
  1. bring coconut milk to boil in small saucepan over medium-high heat.
  2. reduce heat to medium-low; boil until reduced to 1/4 cup, stirring occasionally, about 5-7 minutes.
  3. remove from heat. transfer to small bowl.

for the chili pepper chocolate ganache filling:
  1. using microwave-safe bowl, place chocolate in microwave oven at medium power (50% power) for 1 to 1-1/2 minutes. remove and stir. if chocolate is not melted, return to microwave and repeat heating step, stirring every 20 seconds to avoid scorching. when small lumps remain, remove and continue to stir to complete melting.
  2. heat the reduced coconut milk in the microwave for 30 seconds. then add it to the melted chocolate. stir until combine.
  3. add in the 3/4 teaspoon of chili powder. mix until incorporated.
  4. let ganache cool completely before using. you can put it in the refrigerator to speed up the cooling process a bit if you like. i do it all the time. or if ganache looks like it's spreadable and not too thin (like in drizzle form) you can go ahead and use it to assemble the cookies.

to assemble the macaron cookies:
  1. before assembling these cookies, make sure to pair up all the cookie shells so they are as close as possible in size.
  2. using a knife, spread a good amount of the chili pepper chocolate ganache on the inside of the macarons then sandwich them together.
  3. let them stand at least one day (keep them refrigerated) before serving (serve at room temperature), to meld the flavors.

store in airtight container for up to 5 days. makes 20-24 macarons. happy eating! :)

Monday, December 17, 2012

12 days of christmas baking - day 11: peppermint bark

Milk Chocolate and White Chocolate Peppermint Bark via design. bake. run.

i was short on time this morning so for the 11th day of my christmas baking, i went with a no-bake holiday classic. yes, the ever so popular peppermint bark. typically you could just use white chocolate but today i decided that i'd do some milk chocolate version as well. i guess i could have combined both all in one so you get a little bit of each, but instead i did them separately. these are so good especially if you're a chocolate lover. the peppermint adds that nice christmas-y and festive feel to these chocolates. they really are delish! plus, it's so easy to make, you cannot pass up making these this holiday season.

below's the recipe should you be interested. i say go ahead and make some yourself! enjoy. :)

Black & White Peppermint Bark via design. bake. run.
we love peppermint bark. this classic christmas candy is perfect for any day of the week or gift-giving... and they're so easy to make too!

Chocolate & White Chocolate Peppermint Bark via design. bake. run.
here's another shot of these delicious peppermint bark :)

black & white peppermint bark
recipe adapted from all recipes

ingredients:
8 ounces high-quality semisweet chocolate, broken into pieces
2 teaspoons canola oil, divided
1/2 teaspoon peppermint extract, divided
8 ounces high-quality white chocolate, broken into pieces
25 peppermint candies or 6 candy canes, crushed

directions:
  1. Lightly grease a 2 9x9 inch pan and line with waxed paper, smoothing out wrinkles; set aside.
  2. Place the semisweet chocolate and 1 teaspoon of the canola oil in the top of a double boiler over just barely simmering water, stirring frequently and scraping down the sides with a rubber spatula to avoid scorching. When the chocolate is melted, stir in 1/4 teaspoon of the peppermint extract. Pour the melted chocolate into the prepared pan, and spread evenly over the bottom of the pan. Sprinkle half of the crushed peppermints over the chocolate layer. Refrigerate until completely hardened, about 1 hour.
  3. Repeat the steps above for the white chocolate portion.

note: if you want to make them all in the same pan (similar to ghirardelli's), then instead of prepping 2 pans, use just one and pour the white chocolate mixture on top of the semisweet one (just make sure you cool the semisweet mixture completely first). then wait until they're set before breaking them. enjoy! :)

Friday, December 14, 2012

12 days of christmas baking - day 10: chocolate chip cookies with nutella & sea salt

Chocolate Chip Cookies with Nutella & Sea Salt via design. bake. run.

last night we went and watched the nutcracker ballet. it's a traditional annual christmas thing with us. since we got home late and i didn't have time to make something time-consuming or intricate, i decided on your classic chocolate chip cookies, but with a slight twist. instead of the typical, i added in a dab of nutella inside the cookies and sprinkled sea salt on top before putting them in the oven. i have to say the added ingredients add a nice touch to the classic cookie. below's my favorite (so far!) chocolate chip recipe, with the two new ingredients added. feel free to try and make some yourself and let me know how they turn out! happy baking. :)

Chocolate Chip Cookies with Nutella & Sea Salt via design. bake. run.
i love the added nutella and sea salt in these chocolate chip cookies. so good!

Chocolate Chip Cookies with Nutella & Sea Salt via design. bake. run.
mmmm... yum. these cookies with a nice glass of milk is just perfect!

chocolate chip cookies with nutella & sea salt
recipe adapted from cook's illustrated

ingredients:
2-1/8 cups bleached all-purpose flour (about 10 1/2 ounces)
1/2 tsp table salt
1/2 tsp baking soda
12 tbsp unsalted butter (1 1/2 sticks), melted and cooled slightly
1 cup brown sugar (light or dark), 7 ounces
1/2 cup granulated sugar (3 1/2 ounces)
1 large egg
1 large egg yolk
2 tsp vanilla extract
1-2 cups chocolate chips or chunks (semi or bittersweet)
1 jar of nutella (you won't need the whole jar, just some)
sea salt

directions:
  1. Heat oven to 325 degrees. Adjust oven racks to upper- and lower-middle positions. Mix flour, salt, and baking soda together in medium bowl; set aside.
  2. Either by hand or with electric mixer, mix butter and sugars until thoroughly blended. Mix in egg, yolk, and vanilla. Add dry ingredients; mix until just combined. Stir in chips.
  3. Form scant 1/4 cup dough into ball. Using finger or thumb, make an indentation and scoop 1/2 tsp of Nutella and put it in. Then close up the dough (roll it back into a ball again). Place formed dough onto one of two parchment paper-lined 20-by-14-inch lipless cookie sheets, about nine dough balls per sheet. Lightly press down on the cookie dough and sprinkle sea salt over it. Smaller cookie sheets can be used, but fewer cookies can be baked at one time and baking time may need to be adjusted.
  4. Bake, reversing cookie sheets’ positions halfway through baking, until cookies are light golden brown and outer edges start to harden yet centers are still soft and puffy, 15 to 18 minutes (start checking at 13 minutes). Cool cookies on cookie sheets. Serve or store in airtight container.
Makes 18-20 large (3-inch) cookies. Enjoy!

Note: To ensure a chewy texture, leave the cookies on the cookie sheet to cool.

Wednesday, December 12, 2012

12 days of christmas baking - day 8: salted caramel chocolate pecan bars

Salted Caramel Chocolate Pecan Bars via design. bake. run.

i have to say these are one of the best and easiest pecan bars i've ever made! actually, it's my first ever pecan bars i've ever made. ;) but that's besides the point. the point here is, these are so good, you must make some yourself! the salted caramel is just delish! and that added chocolate on top? yummy! everything about this bar is simply tummy-satisfying good. plus, it's so easy and simple to make with such few ingredients, why not?! so i say go ahead and make some today.

below's the recipe. do say you'll make some and let me know if you agree or disagree? i found this recipe on pinterest, and i'm so glad i did, because it is officially now a christmas/holiday keeper! actually, i may just make some throughout the year too. we'll see! enjoy. :)

Salted Caramel Chocolate Pecan Bars via design. bake. run.
these salted caramel chocolate pecan bars really hit the spot. so. good.

Salted Caramel Chocolate Pecan Bars via design. bake. run.
another shot of these delicious bars

Salted Caramel Chocolate Pecan Bars via design. bake. run.
i think i may have to make another batch of these before christmas!

salted caramel chocolate pecan bars
recipe adapted from southern living

ingredients:
1 cup chopped pecans
12 whole graham crackers
1 cup firmly packed brown sugar
1/2 cup butter
2 tablespoons whipping cream
1 teaspoon vanilla extract
1/4 teaspoon kosher salt
1 cup chocolate chips

directions:
  1. Preheat oven to 350°. Bake pecans in a single layer in a shallow pan 10 to 12 minutes or until toasted and fragrant, stirring halfway through.
  2. Line a 15- x 10-inch jelly-roll pan with aluminum foil; lightly grease foil. Arrange graham crackers in a single layer in prepared pan, slightly overlapping edges.
  3. Combine sugar, butter, and cream in a medium-size heavy saucepan; bring to a boil over medium heat, stirring occasionally. Remove from heat, and stir in vanilla and pecans. Pour butter mixture over crackers, spreading to coat.
  4. Bake at 350° for 10 to 11 minutes or until lightly browned and bubbly.
  5. Immediately top warm bars with the chocolate chips. Let stand 3 minutes, and spread chocolate over bars. Then sprinkle with salt, and slide foil from pan onto a wire rack. Cool completely (about 30 minutes). Then chill for 20 minutes before breaking into bars and serving.

makes 4 dozen. happy eating. :)

Monday, December 10, 2012

12 days of christmas baking - day 6: chocolate cream cheese cupcakes

Chocolate Cream Cheese Cupcakes with Chocolate Frosting via design. bake. run.

for this 6th day of christmas baking i decided to bake those delicious chocolate cream cheese cupcakes i made a while back (click through for the recipe). these are really good! unfortunately, this time around i missed one step or didn't do it quite right. instead of filling the center of the cake with the cream cheese filling, i spoon it on top. i didn't realize how they'd look until after they were all baked. instead of getting these yummy filled looking cream cheese cupcakes, i got spotted dalmatian-like cupcakes. oops. but hey! they still taste delicious, with or without frosting added. i chose to frost these instead. to go with the whole christmas theme, i frosted half of them with peppermint frosting and the other with good old chocolate frosting. you really cannot beat chocolate on chocolate.

okay, that's all for now. enjoy the photos. should you be interested, check out the recipe from the link above for the cupcakes. oh, the peppermint frosting recipe is below. enjoy! :)

Chocolate Cream Cheese Cupcakes via design. bake. run.

Chocolate Cream Cheese Cupcakes via design. bake. run.

Chocolate Cream Cheese Cupcakes with Peppermint Frosting via design. bake. run.

peppermint buttercream frosting

ingredients:
2 sticks of butter, softened
3-4 cups powdered sugar
1 tbsp peppermint extract
up to 4 tbsp heavy cream or milk
red food coloring (optional)*

directions:
beat butter for a few minutes with a mixer with the paddle attachment on medium speed (or you can use a hand mixer). add in the powdered sugar and turn your mixer on the lowest speed (so the sugar doesn’t blow everywhere) until the sugar has been incorporated with the butter. increase mixer speed to medium and add peppermint extract, and 2 tablespoon of milk/cream and beat for 3 minutes. if your frosting needs a more stiff consistency, add a little more sugar. if your frosting needs to be thinned out, add remaining tablespoons of milk, a little at a time until you've reached the right consistency. makes 2-1/2 cups. :)

*note: if you want to pipe the frosting with that decorative red strips as seen in the pictures above, just be sure to use a paint brush and paint some red lines in your piping bag. make sure they're spread out (3-4 lines) before filling your bag with the frosting. you'll see the swirls as you pipe out the frosting.

Friday, December 7, 2012

12 days of christmas baking - day 5: mrs. jew's crispy cookies

Mrs. Jew's Crispy Cookies via design. bake. run.

for this fifth day of christmas baking i decided to try out a new recipe. i had pinned this from earlier in the week onto my holidays pinterest board. i'm just surprised i made it. actually, i'm very happy i made it because these are really good. no wonder it's one of brandon jew, chef of bar agricole (in sf)'s favorite holiday cookie recipe. of course, the name of the cookie sounds familiar (a family recipe maybe?!). but anyway, that's besides the point. the point here is, you should definitely make these cookies. the recipe's simple enough and the added Kellogg's Rice Krispies cereal adds a delicious unexpected in a good way crunch when you bit into it. i love it! below's the recipe should you want to make some tonight or any time! really, it's a little different from you typical chocolate chip cookie, but in a very good way. i made mine without the raisins because i don't care for raisins a whole lot. you can do the same or make the recipe as is. enjoy!

Mrs. Jew's Crispy Cookies via design. bake. run.

Mrs. Jew's Crispy Cookies via design. bake. run.

mrs. jew's crispy cookies
by brandon jew, chef, bar agricole
recipe from refinery29 sf

ingredients:
1 1/4 cup flour
1/2 tsp baking soda
1/4 tsp salt
1/2 cup softened butter
1 cup sugar
1 egg
1 tsp vanilla extract
2 cups Kellogg's Rice Krispies
1 cup raisins
6 oz package of semi-sweet chocolate morsels (optional)

directions:
  1. Preheat oven to 350 degrees. In a small bowl, combine the flour, baking soda, and salt. Set aside.
  2. In large bowl, combine the butter and sugar and beat until creamy. Add the egg and vanilla extract and mix well.
  3. Blend in the flour mixture.
  4. Stir in the Rice Krispies, chocolate chips, and raisins.
  5. Drop level tablespoons full of mixture onto cookie sheet. Bake at 350 degrees for 12 to 15 minutes.

makes 3-1/2 dozen cookies. enjoy!

note: i baked my cookies for only 9 minutes. but of course, you know your oven best. still, i say you should side on baking them at the lesser time amount (12 mins) than the full 15 mins and checking to make sure the cookies are done, rather than over baking these cookies. :)

Tuesday, December 4, 2012

12 days of christmas baking - day 2: chocolate snowcap cookies

Chocolate Snowcap Cookies via design. bake. run.

who doesn't love chocolate crackle cookies? these snowcap cookies are so good! they're nice and moist and absolutely so sweet. now, i only make these around this time of the year. not sure why, but maybe it has something to do with the fact that they are so festive looking. you gotta say, the powdered sugar does give it quite the snowy look. plus, it's just one of those cookies you'd expect to have this time of year.

well, below's the recipe should you want to make some yourself. these are great for holiday cookie swaps, dessert tables or just because. now, stay tune to see what we have in store for day 3 of my annual 12 days of christmas baking. :)

Martha Stewart's Chocolate Crackle Cookies via design. bake. run.

chocolate snowcap cookies
recipe from martha stewart

ingredients:
8 ounces bittersweet chocolate, melted and cooled
1 1/4 cups all-purpose flour
1/2 cup Dutch cocoa powder
2 teaspoons baking powder
1/4 teaspoon salt
8 tablespoons (1 stick) unsalted butter, room temperature
1 1/3 cups light-brown sugar, firmly packed
2 large eggs
1 teaspoon pure vanilla extract
1/3 cup milk
1 cup confectioners' sugar, plus more for rolling

directions:
Heat oven to 350 degrees. Chop bittersweet chocolate into small bits, and melt over medium heat in a heat-proof bowl or the top of a double boiler set over a pan of simmering water. Set aside to cool. Sift together flour, cocoa, baking powder, and salt.

In the bowl of a heavy-duty electric mixer fitted with the paddle attachment, beat butter and light-brown sugar until light and fluffy. Add eggs and vanilla, and beat until well combined. Add melted chocolate. With mixer on low speed, alternate adding dry ingredients and milk until just combined. Divide the dough into quarters, wrap with plastic wrap, and chill in the refrigerator until firm, about 2 hours.

On a clean countertop, roll each portion of dough into a log approximately 16 inches long and 1 inch in diameter, using confectioners’ sugar to prevent sticking. Wrap logs in plastic wrap, and transfer to a baking sheet. Chill for 30 minutes. Cut each log into 1-inch pieces, and toss in confectioners’ sugar, a few at a time. Using your hands, roll the pieces into a ball shape. If any of the cocoa-colored dough is visible, roll dough in confectioners’ sugar again to coat completely. Place the cookies 2 inches apart on a Silpat-lined baking sheet. Bake until cookies have flattened and the sugar splits, 12 to15 minutes.

Transfer from oven to a wire rack to let cool completely. Store in an airtight container for up to 1 week.

note: instead of rolling them into logs once they were chilled, i used a small cookie scooper and scooped them into balls, then tossed them into the powdered sugar. this step saves a bunch of time. you can try it this way, or follow the recipe as is. both works fine, i say.

makes 4 dozen cookies. enjoy! :)
Related Posts Plugin for WordPress, Blogger...