Showing posts with label salted caramel. Show all posts

Monday, January 20, 2014

salted caramel chocolate chip cookies

Bourbon Sea Salt Caramel-Filled Chocolate Chip Cookies via design. bake. run.

happy new year! yes, it took a whole 20 days after the new year for this post. i've been busy and lazy (yes, both at the same time) therefore that's why i haven't posted any new recipes or any entries here. plus, i haven't been baking a whole lot. haven't had the effort or energy to since the holidays. and also the fact that i've been trying to cut down on my sweets intake. decided that if i didn't bake, i wouldn't have any around. the only things i've made so far are some macaron cookie samples (testing out shell colors for a baby shower – post and recipe to come later) and your classic, chocolate chip cookies. i made some a few weeks ago. anyway, i've made some again, except for this time i decided i would try to use up those bourbon-sea salt caramels i made during the holidays. yeah, we didn't really eat all that caramel. it was a lot. plus, they didn't quite hold at room temperature. maybe i took them off the heat too quickly or who knows what. but anyway, i still got some pretty tasty caramels out of it.

alright, below's the recipe for these delicious-looking chocolate chip cookies. i made these goodies over the weekend for m's birthday party. and yes, it was a hit with all the cookie and non-cookie lovers. i've been limiting my sweets intake and i couldn't help it. i ate at least 1-1/2 cookies in one sitting. i had to stop myself. so if you're up to baking some cookies or changing up that good ol' chocolate chip cookie recipe a bit, add in some of these bourbon-sea salt caramels (or any soft caramels) to that recipe for a brand new cookie!

Salted Caramel Chocolate Chip Cookies via design. bake. run.
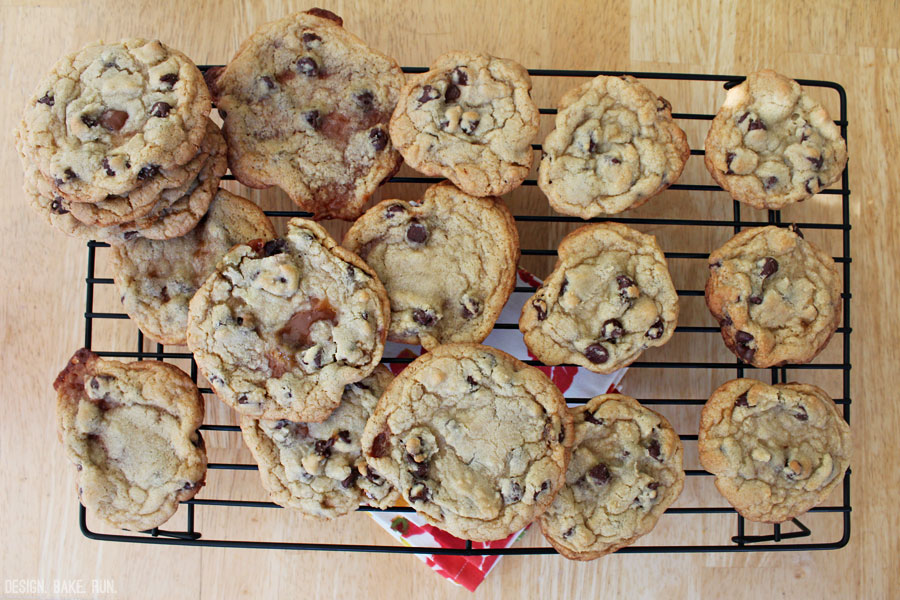
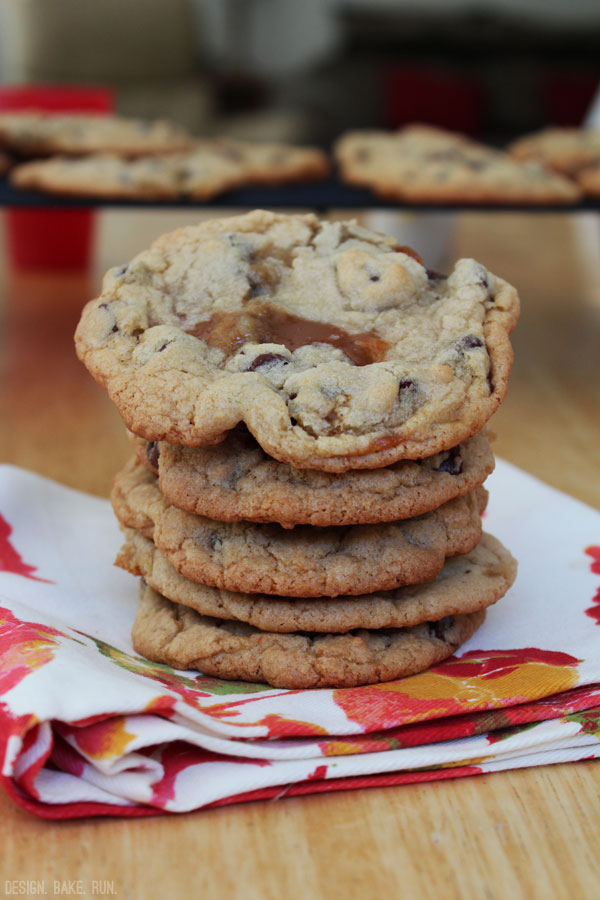
how can you not dig in and eat at least one, if not two, or three or four of these deliciously caramel filled cookies in one sitting? they are ooey gooey good, especially right out of the oven and cooled slightly.

Salted Caramel Chocolate Chip Cookies via design. bake. run.
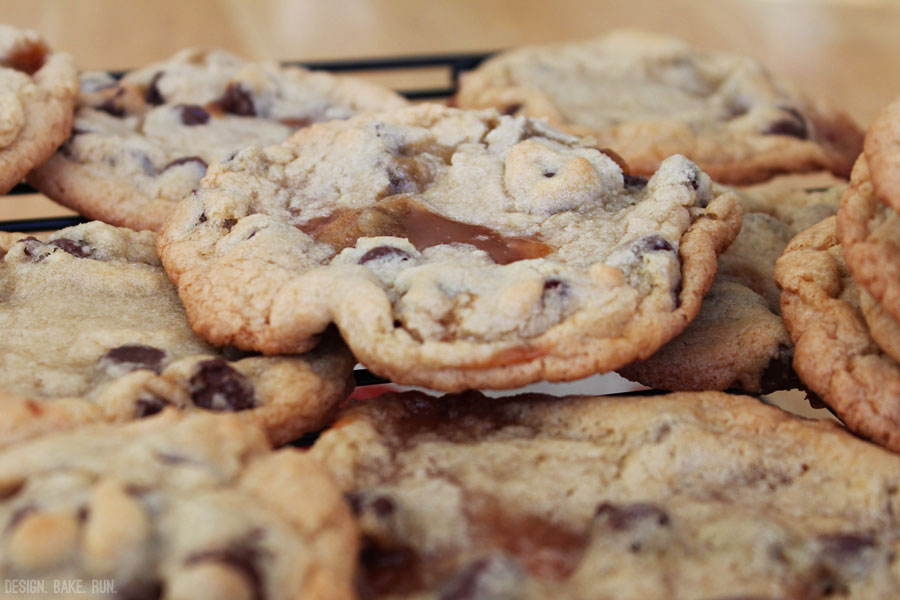
i love how the caramel makes an appearance once they're baked. depending on how you cover up the caramel with the cookie dough, you'll get some like this and some all covered up. you won't see the caramel until you break into it, a really nice surprise.

bourbon-sea salt caramel-filled chocolate chip cookies

ingredients:
  • 1 stick of butter, softened
  • 1 egg
  • 1 egg yolk
  • 1-3/4 cup flour
  • 3/4 cup sugar
  • 3/4 cup brown sugar
  • 1/2 tsp baking powder
  • 1/2 tsp baking soda
  • pinch of salt
  • 12 oz (or 1 bag) chocolate chips, any kind is fine
  • 18-24 pieces of bourbon-sea salt caramel or any soft caramel of your choice

directions:
  1. preheat oven to 350°F. line baking sheet with parchment paper or silicone sheet.
  2. cream softened butter (or melt butter in microwave safe bowl) and sugar together. then add in the egg. once mixed, add in the baking soda, baking powder, salt and flour. mix until incorporated, then add in the chocolate chips.
  3. scoop out a tablespoon portion (ball-like) and make an indent in the middle and place (or push in) the soft caramel. then spoon out a little bit more dough and cover the caramel. shape the cookie dough into a ball and place it onto the baking sheet. make sure to spread them out at least 2 to 3 inches apart. these cookies will spread so you may just want to put 9 cookies on a sheet versus say a typical 12.
  4. bake for 10-12 minutes until golden but still soft in the center (baking time varies depending on how chewy or crunchy you like your cookies). let the cookies cool down a little bit on the cookie sheet before transfering them onto a cooling rack. after a few minutes, they're ready to eat! best eaten warm when the caramel is still gooey. yum. enjoy. :)

makes 18-24 large cookies. enjoy! :)

Monday, November 4, 2013

salted caramel french macarons

Salted Caramel French Macarons via design. bake. run.

happy november. we're in november already?!! well, that's a-okay with me. we are getting closer and closer to THE. BEST. TIME. OF. THE. YEAR. you know what that is! christmas. actually, no. thanksgiving and christmas. best holidays ever. or two of the best. ;)

okay, so i had my second wedding baking gig last month and these salted caramel french macarons were one of the four flavors requested. i have to say it was quite the yummy request because these turned out great. the salted caramel buttercream was light and almost fluffy-like. so airy and just perfect with the right amount of salty and sweetness combo. i don't think i've made a better salted caramel buttercream than this one.

below's the recipe for these good-looking french macarons should you want to make some. i say why not?! salted caramel is quite the hit these days. you cannot go wrong with it. and especially with the holidays coming up, these would make for a great holiday gift to anyone and everyone. i know i plan to bake some goodies and give them away this holiday season. you can too! :)

French Macarons with Salted Caramel Buttercream via design. bake. run.
i think i've found the perfect salted caramel buttercream recipe. these cute little french macaron cookies are so good and tastes even better as you age them longer. i say at least 3 full days.

french macarons with salted caramel buttercream

for the macaron shells:
1 cup (100g) powdered sugar
3/4 cup (60g) almond meal
2 large egg whites (60g), at room temperature
5 tablespoons (65g) granulated sugar
1/4 tsp golden yellow or any gel food coloring of your choice
salted caramel buttercream (recipe below)

for the salted caramel buttercream:
1/4 cup salted caramel sauce (recipe here)
1 stick (8 oz) butter, room temperature
1/2 tsp vanilla extract
1 cup powdered sugar

directions:

to make the macaron batter/shells:
  1. line two baking sheets with parchment paper and have a pastry bag with a plain tip (about 1/2-inch, 2 cm) ready.
  2. sift together the powdered sugar and almond meal so there are no lumps. set aside.
  3. in the bowl of a standing electric mixer (or if you prefer, you can use a bowl and hand mixer), beat the egg whites until they begin to rise and hold their shape. while whipping, beat in the sugar until very stiff and firm, about 2 minutes.
  4. add in the gel food coloring. then carefully fold the dry ingredients, in two batches, into the beaten egg whites with a flexible rubber spatula. when the mixture is just smooth and there are no streaks of egg white, stop folding and scrape the batter into the pastry bag (standing the bag in a tall glass helps if you’re alone).
  5. pipe the batter on the parchment-lined baking sheets in 1.35-inch circles evenly spaced one-inch apart.
  6. rap the baking sheet a few times firmly on the counter top to flatten the macarons. then let it sit for at least 30-60 minutes depending on humidity before baking them in the oven (okay, if you can't wait 30-60 minutes, i say at least 15 minutes to let them settle a little. just make sure the humidity isn't ridiculously high or your macarons won't turn out so pretty). about 10-15 minutes before baking, preheat oven to 350°F. bake for 15 minutes.
  7. once the macaron shells are out of the oven, let them sit for 30-60 seconds before removing the hot baking sheet underneath. let the macarons cool completely before removing them from the parchment paper.

to make the salted caramel buttercream:
  1. make the salted caramel sauce according to the recipe and cool to room temperature.
  2. in an electric mixer, beat the butter on medium high, speed until light and fluffy, about 3 minutes. then gradually add in the 1/4 cup salted caramel sauce.
  3. put the mixer on low and add the powdered sugar and vanilla. then increase the speed to medium and beat until fully incorporated.
  4. your buttercream should be good and ready for use!

to assemble the macaron cookies:
  1. before assembling these cookies, make sure to pair up all the cookie shells so they are as close as possible in size.
  2. using a knife, spread a good amount of the salted caramel buttercream on the inside of the macarons then sandwich them together. you can also put the buttercream in a piping bag and pipe the filling onto the cookie if you like. i do that sometimes, but most time i just spread it on.
  3. let them stand at least one day (keep them refrigerated) before serving (serve at room temperature), to meld the flavors. note: i say 3 days is the magic number. they taste so good after 3 days.

store in airtight container for up to 5 days. makes 20-24 macarons. happy eating because these are really, really, good! :)

Wednesday, September 11, 2013

salted caramel & fig mini tarts

Salted Caramel & Fig Mini Tarts via design. bake. run.

if you haven't noticed already, in my last few posts i mentioned about having extra heavy whipping cream in the fridge that needed upswing up. i used some of it and made a salted caramel sauce. the recipe made about 1-1/2 cup of caramel sauce and was just sitting in the fridge because i couldn't think of what to use it for. actually, i did end up using some of it as a drizzle for some cream puffs i made. those were so good. you really cannot go wrong with delicious cream puffs with whipped cream filling topped with salted caramel sauce. those were a big hit when i brought them into work to share with everyone. i know i ate 3 of them right off the bat after i assembled them the night before. yes, it's delicious and you can make some yourself if you like. the recipe is here.

so what do you do when you still have about a cup or more of the salted caramel sauce left? ummmm... make some mini tarts with leftover cookie dough. yeah, you can grab any sugar cookie dough and cut them into circles, then stick them in your mini cupcake pans to make your mini tart crust. that's what i did with the one leftover tartine lemon cream tart crust recipe. i still have one left (sitting in the freezer) and finally decided it was about time i put it to use.

and here you have it. these good-looking and very tasty mini salted caramel with fig topping mini tarts. so good. it's like sweetness on top of sweetness on top of sweetness. you can't complain about that. a little sugar overload? sure?! but the caramel gives you just the right amount and hint of salt to make this a truly delicious and sweet bite. i love it!

Salted Caramel & Fig Mini Tarts via design. bake. run.
the sweet tart dough makes the perfect crust for these mini tarts. perfectly sweet and buttery and tastes delicious with everything as a whole.

Salted Caramel & Fresh Fig Mini Tarts via design. bake. run.
you can never go wrong with salted caramel. i love how the salt from the caramel really balanced out all that sugar.

salted caramel & fig mini tarts

ingredients:

directions:
  1. prepare the salted caramel sauce and sweet tart dough mini crusts according to their recipes.
  2. once the salted caramel and mini crusts are ready, you're ready to assemble. pour about a teaspoon of the sauce into each cooled mini tart crust. if you need more caramel, add more caramel until it's close to the top. then top it off with a slice of fresh figs. you can even add a dollop of freshly whipped cream too if you like.
  3. that's it. enjoy and happy eating!

makes 24 mini tarts. :)

Monday, August 26, 2013

cream puffs with whipped cream and salted caramel drizzle

Cream Puffs with Whipped Cream + Salted Caramel Drizzle via design. bake. run.

what do you do when you have a quart of heavy whipping cream in the fridge? well, you make everything and anything you can possibly think of that uses whipping cream! okay, i only made two things with it – actually, three things. i used some of them for, what else other than what it's intended for – whipped cream. i also made some salted caramel sauce and used a little bit for a coffee-spiked chocolate ganache filling for some macarons (you can check out my instagram photo of me holding a half-bitten macaron).

so yes, with all that whipping cream, i made up some salted caramel sauce the other night and let it sit in the fridge. i couldn't decide on what else to make until finally opting for some good old cream puffs. you cannot go wrong with cream puffs with whipped cream. i decided i would drizzle some salted caramel sauce on top to touch it up instead of your typical powdered sugar or chocolate ganache glaze/drizzle.

how was it? o.m.g. the best thing ever. i don't care what anyone says, but it is. everything with caramel is just better. it's so good and sticky and light and fluffy and i cannot stop eating it. yes, so. so. good. you have got to make these and you'll know what i'm talking about.

below are the recipes to making your very own delicious cream puffs with whipped cream and salted caramel sauce drizzle. if you prefer pastry cream over whipped cream as the filling, you can certainly make some using this vanilla pastry cream recipe here. seriously, cream puffs are like best thing ever, right?! i think so. yummmmmmmy! :)

Cream Puffs with Whipped Cream + Salted Caramel Drizzle via design. bake. run.
i love making and eating cream puffs. i can seriously eat the whole thing in one sitting. okay, maybe not in one sitting, but you know what i mean. it's really that good.

Cream Puffs with Whipped Cream + Salted Caramel Drizzle via design. bake. run.
the salted caramel drizzle on top brings this cream puff to another level altogether. the sweet and salty sticky drizzle is seriously a yummy added bonus.

cream puffs with whipped cream and salted caramel drizzle

for the pâte à choux pastry:
  • 1/2 cup all purpose flour
  • 1/2 tsp sugar
  • 1/4 tsp salt
  • 1/4 cup (4 tbsp) unsalted butter, cut into pieces
  • 1/2 cup water
  • 2 large eggs, lightly beaten

for the whipped cream filling:
  • 1-1/2 cups heavy whipping cream
  • 1/3 cup sugar

for the salted caramel sauce drizzle:
  • 2/3 cup heavy cream
  • 1/2 teaspoon vanilla extract
  • 1-1/4 cup sugar
  • 1/4 cup water
  • 2 teaspoons sea salt
  • 4 tablespoons unsalted butter

directions:

to make the choux pastry
  1. preheat oven to 400°f (200°c) and place rack in center of oven. line a baking sheet with parchment paper or lightly butter or spray the pan with a nonstick vegetable spray (or use a silpat nonstick baking sheet like i did).
  2. in a bowl sift or whisk together the flour, sugar and salt.
  3. place the butter and water in a heavy saucepan over medium high heat and bring to a boil. (make sure that the butter melts before the water boils to reduce the amount of evaporation.) remove from heat and, with a wooden spoon, add the flour mixture, all at once, and stir until combined. return saucepan to the heat and stir constantly until the dough comes away from the sides of the pan and forms a thick smooth ball (about 1-2 minutes).
  4. transfer the dough to your electric mixer, or use a hand mixer, and beat on low speed to release the steam from the dough (about a minute) – actually, i just do everything in the saucepan, beat the dough, adding the eggs, etc. once the dough is lukewarm start adding the lightly beaten eggs (dough will separate and then come together) and continue to mix until you have a smooth thick paste (dough will fall from a spoon in a thick ribbon).
  5. spoon or pipe 12 small mounds of dough onto the baking sheet, spacing about 2 inches (5 cm) apart. optional: you can gently brush the tops of the dough with a lightly beaten egg if you like. i usually don't.
  6. bake for 15 minutes and then reduce the oven temperature to 350°f (180°c). continue to bake for a further 30 minutes or until the shells are a nice amber color and when split, are almost dry inside. turn the oven off, poke a couple of holes in each puff and, with the oven door slightly ajar, let the shells completely cool (and dry out).

to make the whipped cream filling
  1. combine heavy whipping cream and sugar in a medium bowl.
  2. whip mixture to medium peaks.
  3. this should make enough whipped cream to fill up the puffs

to make the caramel sauce
  1. pour the cream into a small, heavy saucepan. then add in the 1/2 teaspoon vanilla extract. place over medium-high heat and bring to just under a boil, stirring occasionally. reduce the heat to low to keep the cream warm.
  2. in a medium, heavy saucepan, combine the sugar, water, and sea salt. bring to a boil over medium heat, stirring to dissolve the sugar and sea salt. then cook, without stirring, until the mixture is amber colored, 5 to 8 minutes. remove from the heat.
  3. the mixture will continue to cook off the heat and become darker, so make sure to have your cream close by. carefully and slowly add the cream to the sugar syrup. the mixture will boil vigorously at first. let the mixture simmer down, and then whisk until smooth. let cool for about 10 minutes. note: if when you add in the cream and find that not all the sea salt dissolved, don't worry. you can just omit these undissolved pieces (leave them at the bottom of the saucepan) when storing your sauce away.
  4. cut the butter into 1-inch chunks and add them to the caramel one at a time, whisking constantly after each addition. then whisk the caramel periodically as it continues to cool. note: this caramel is a little runny. if you like it thicker, you can 1-2 tablespoons of butter to thicken it up a little bit more.
  5. the caramel will keep in an airtight container in the refrigerator for up to one month.
  6. makes 1-1/2 cups.

*note: use a good-sized pan when preparing this caramel. when the hot cream is added, the caramel will boil furiously at first, increasing dramatically in volume. have ice water nearby in case of burns.

to asssemble/fill the puffs
  1. use the tip of a paring knife to make a small cut perpendicular to the first, creating an X in the side of each puff.
  2. fill a pastry bag fitted with a 1/4-inch plain tip with the whipped cream.
  3. pipe some of the cream through the X into the side of each puff until it starts to ooze back out. repeat to fill all the puffs.
  4. once all the puffs are filled, drizzle some salted caramel sauce over each cream puff. make sure you have your cream puffs sitting on a wire rack with a baking sheet underneath to catch the overflowing caramel sauce.
  5. that's it. enjoy and happy eating! :)

note: if you don't want to use a pastry bag and pipe the cream filling, you can just cut the puffs in half and spoon in the whipped cream. i use this method a lot because i can't be bothered with pastry bags and cleaning up.
Related Posts Plugin for WordPress, Blogger...