Showing posts with label caramel. Show all posts

Wednesday, January 29, 2014

caramel popcorn

Caramel Popcorn via design. bake. run.

i have been eyeing homemade caramel popcorn for the longest time. i think i've had these down for the little kiddies birthday party 2 years ago but never really got around to it. well, i finally made some a couple of weeks ago for m's birthday party. and i have to say, they are so easy to make! why have i not just done it then? i don't know... but what i do know is, once you've got the caramel made (you'll need a candy thermometer for this), the rest is easy peasy. and besides, who says you have to use the popcorn kernels and not regular microwavable popcorn? i just went ahead with the classic microwavable bags of popcorn (because you can't beat an easy cleanup) and these sweet treats still turned out delicious. plus, doing the whole popcorn kernel thing with oil in a pot is just too much work! oh, and this recipe uses apple juice so it's even better. it gives you a nice hint of apple flavor which you cannot beat. and for sure a great way to use up those half gallons or whatever size of apple juice bottle that's been sitting in our fridge for days and days (maybe weeks even?) – because we can't drink it all!

alright, the recipe for this caramel popcorn is below if you'd like to make some yourself. i say go ahead because it's really that good. you'll literally eat half of it in one sitting if you don't stop yourself already. hahaha... that's what m and i did the night i made these. we had to remove ourselves away from the sheet pan while these goodies rest.

okay, enjoy! :)

Caramel Popcorn via design. bake. run.
this recipe is super easy to make. i never thought it was this simple!

Caramel Popcorn via design. bake. run.
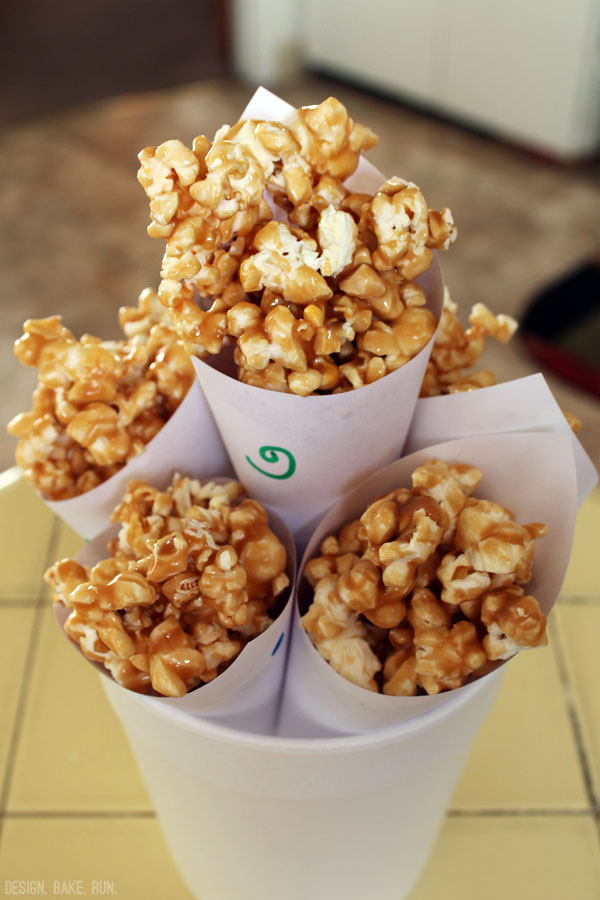
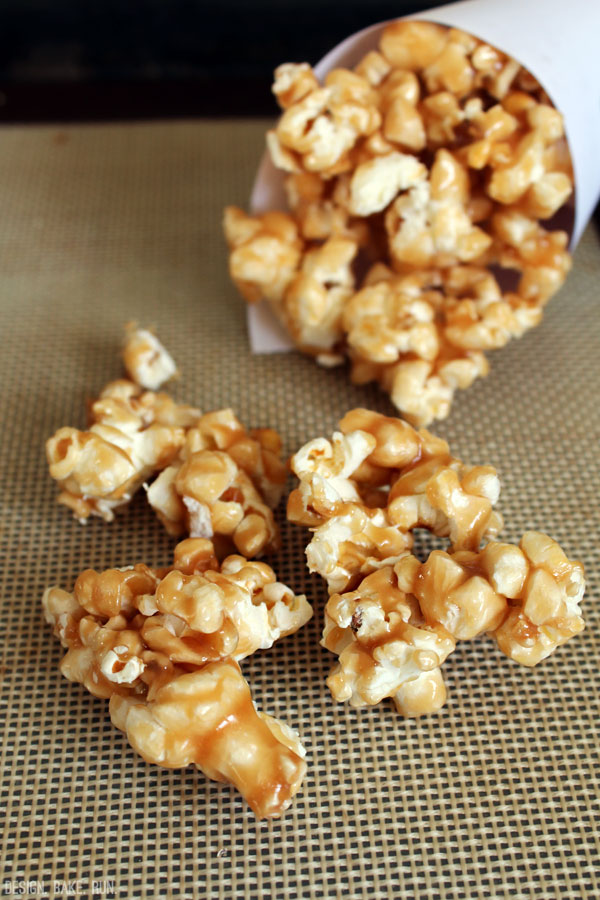
simply made paper cones are a great way to distribute these sticky but super yummy treats. who says you can't have a bouquet of caramel popcorn?

Caramel Popcorn via design. bake. run.
make these sweet stuff for your next birthday party or any occasion. they'll sure to be a hit. these definitely were for m's birthday party.

caramel popcorn
recipe adapted from the food network

ingredients:
  • 2 tablespoons vegetable oil
  • 2/3 cup popcorn kernels (or you can use two bags of microwave popcorn and omit the oil above)
  • 2 cups apple juice
  • 2 cups packed light brown sugar
  • 1/4 cup light corn syrup
  • 12 tablespoons (1 1/2 sticks) unsalted butter, cut into pieces
  • kosher salt

directions:
  1. line 2 baking sheets with parchment paper (or a silpat will do too). if using popcorn kernels, heat the vegetable oil in a pot over medium-high heat. add the popcorn kernels; cover and cook, shaking the pan, until the popping subsides. remove from the heat and let any remaining kernels pop for 30 more seconds. if using microwave popcorn bags, follow the directions on the package. once popcorns are popped, divide the popcorn between the prepared baking sheets, discarding any unpopped kernels.
  2. make the caramel: bring the apple juice, brown sugar and corn syrup to a boil in a large heavy-bottomed saucepan over medium-high heat. cook without stirring until the mixture is deep amber and a candy thermometer registers 280 degrees F, about 30 minutes (the caramel will bubble vigorously toward the end of the cooking time).
  3. stir the butter into the caramel until melted. add 2 teaspoons salt and cook for another minute. remove from the heat. pour the hot caramel over the popcorn mixture and carefully toss with two rubber spatulas. let cool slightly, then separate the mixture into clusters while still warm. let cool completely.

note: i actually pour all my popcorn into a large bowl instead of putting them on the baking sheets. once the caramel was made, i pour those over the popcorn and tossed them while still in the bowl (kind of like making rice krispy treats). but the above method works too. i guess you can pick whichever is easiest. :)

Monday, January 20, 2014

salted caramel chocolate chip cookies

Bourbon Sea Salt Caramel-Filled Chocolate Chip Cookies via design. bake. run.

happy new year! yes, it took a whole 20 days after the new year for this post. i've been busy and lazy (yes, both at the same time) therefore that's why i haven't posted any new recipes or any entries here. plus, i haven't been baking a whole lot. haven't had the effort or energy to since the holidays. and also the fact that i've been trying to cut down on my sweets intake. decided that if i didn't bake, i wouldn't have any around. the only things i've made so far are some macaron cookie samples (testing out shell colors for a baby shower – post and recipe to come later) and your classic, chocolate chip cookies. i made some a few weeks ago. anyway, i've made some again, except for this time i decided i would try to use up those bourbon-sea salt caramels i made during the holidays. yeah, we didn't really eat all that caramel. it was a lot. plus, they didn't quite hold at room temperature. maybe i took them off the heat too quickly or who knows what. but anyway, i still got some pretty tasty caramels out of it.

alright, below's the recipe for these delicious-looking chocolate chip cookies. i made these goodies over the weekend for m's birthday party. and yes, it was a hit with all the cookie and non-cookie lovers. i've been limiting my sweets intake and i couldn't help it. i ate at least 1-1/2 cookies in one sitting. i had to stop myself. so if you're up to baking some cookies or changing up that good ol' chocolate chip cookie recipe a bit, add in some of these bourbon-sea salt caramels (or any soft caramels) to that recipe for a brand new cookie!

Salted Caramel Chocolate Chip Cookies via design. bake. run.
how can you not dig in and eat at least one, if not two, or three or four of these deliciously caramel filled cookies in one sitting? they are ooey gooey good, especially right out of the oven and cooled slightly.

Salted Caramel Chocolate Chip Cookies via design. bake. run.
i love how the caramel makes an appearance once they're baked. depending on how you cover up the caramel with the cookie dough, you'll get some like this and some all covered up. you won't see the caramel until you break into it, a really nice surprise.

bourbon-sea salt caramel-filled chocolate chip cookies

ingredients:
  • 1 stick of butter, softened
  • 1 egg
  • 1 egg yolk
  • 1-3/4 cup flour
  • 3/4 cup sugar
  • 3/4 cup brown sugar
  • 1/2 tsp baking powder
  • 1/2 tsp baking soda
  • pinch of salt
  • 12 oz (or 1 bag) chocolate chips, any kind is fine
  • 18-24 pieces of bourbon-sea salt caramel or any soft caramel of your choice

directions:
  1. preheat oven to 350°F. line baking sheet with parchment paper or silicone sheet.
  2. cream softened butter (or melt butter in microwave safe bowl) and sugar together. then add in the egg. once mixed, add in the baking soda, baking powder, salt and flour. mix until incorporated, then add in the chocolate chips.
  3. scoop out a tablespoon portion (ball-like) and make an indent in the middle and place (or push in) the soft caramel. then spoon out a little bit more dough and cover the caramel. shape the cookie dough into a ball and place it onto the baking sheet. make sure to spread them out at least 2 to 3 inches apart. these cookies will spread so you may just want to put 9 cookies on a sheet versus say a typical 12.
  4. bake for 10-12 minutes until golden but still soft in the center (baking time varies depending on how chewy or crunchy you like your cookies). let the cookies cool down a little bit on the cookie sheet before transfering them onto a cooling rack. after a few minutes, they're ready to eat! best eaten warm when the caramel is still gooey. yum. enjoy. :)

makes 18-24 large cookies. enjoy! :)

Monday, December 23, 2013

12 days of christmas baking - day 11: bourbon-sea salt caramels

12 Days of Christmas Baking - Day 11: Bourbon Sea Salt Caramels via design. bake. run.

i saw this recipe in the holiday issue (i think?) of bon appetit magazine sometime last month. it sounded easy enough so i took a snapshot of the recipe thinking i would make it this holiday season. well, sure enough, i did make it. and the result? some very sweet and tasty treats. instead of your usual heavy cream in caramel, this recipe calls for a can of condensed milk. and yes, it's very sweet. the added sea salt on top really balances out the sweetness and makes it a tad more interesting.

the recipe is pretty straight forward and simple. of course, the thing is, you just gotta make sure you have a candy thermometer handy. you really do need it for these kind of things. they're so worth it, i'm so glad we have one. :) oh, these guys are somewhat soft so i wouldn't let them sit at room temperature too long if you're not eating them all right away. i say you should keep them chill in the fridge and help yourself whenever you want one. or if you're making it for a party or whatever, then sure serve them at room temperature, just keep in mind it would get a little soft and sticky.

below's the recipe should you be interested in making these yourselves. they're really good and you definitely get that hint of bourbon. of course, you can make it alcohol-free too. just use good old vanilla extract in place of the bourbon. enjoy! :)

12 Days of Christmas Baking - Day 11: Bourbon Sea Salt Caramels via design. bake. run.
i love the added bourbon in this caramel recipe. it gives you just the perfect hint of the bourbon and the added sea salt really balances out all that sugar. yum!

bourbon-sea salt caramels
recipe from bon appetit magazine

ingredients:
  • nonstick vegetable oil spray
  • 2 cups sugar
  • 1/2 cup light corn syrup
  • 1 14-oz. can sweetened condensed milk
  • 1/2 cup (1 stick) unsalted butter, cut into small pieces
  • 2 tablespoons bourbon
  • 1/2 teaspoon kosher salt
  • flaky sea salt (such as maldon)

directions:
  1. Lightly coat an 8x8" baking pan with nonstick spray and line with parchment paper, leaving a 2" overhang on 2 sides; spray parchment.
  2. Bring sugar, corn syrup, and 1/4 cup water to a boil in a medium saucepan over medium-high heat, stirring to dissolve sugar. Cook, swirling pan occasionally, until mixture turns a deep amber color, 8–10 minutes.
  3. Remove pan from heat and whisk in sweetened condensed milk and butter (mixture will bubble vigorously) until smooth. Fit pan with candy thermometer and return to medium-low heat. Cook, whisking constantly, until thermometer registers 240°F. Remove from heat and whisk in bourbon and kosher salt. Pour into prepared pan; let cool. Sprinkle caramel with sea salt, cut into 3/4" pieces, and wrap individually in parchment paper.

DO AHEAD: Caramels can be made 2 weeks ahead. Store wrapped tightly in plastic in airtight container at room temperature. Or you can keep it chill in the fridge like me. :)

makes a bunch depending on how you cut it. enjoy. :)

check out last year's day 11 recipe: peppermint bark

Thursday, December 19, 2013

12 days of christmas baking - day 7: caramel-filled chocolate cookies

12 Days of Christmas Baking - Day 7: Caramel-Filled Chocolate Cookies via design. bake. run.

i have been wanting to bake some chocolate cookies with caramel filling after stumbling upon some crazy good-looking photos of these cookies on pinterest. so, finally, here is my take on it! i didn't have any soft caramels lying around the house and didn't feel up to making my own from scratch so i used some kraft caramel bits and heated it in the microwave with a little bit of water to water it down so that it would be soft enough for a filling (but not too liquify like a sauce). the end result? some tasty chocolate cookies, for sure.

so below's the recipe should you want to bake a batch yourself. these cookies are best eaten warm. you definitely cannot pass up warm baked cookies this time of year, especially when they're filled with oozing caramel. yummmm-y! :)

12 Days of Christmas Baking - Day 7: Caramel-Filled Chocolate Cookies via design. bake. run.
these chocolate cookies with caramel filling are best enjoy warm. make sure you only cool the cookies slightly so that the caramel is still oozing out of them when you break into it.

12 Days of Christmas Baking - Day 7: Caramel-Filled Chocolate Cookies via design. bake. run.
soft caramels produce the best results in these caramel-filled chocolate chip cookies.

12 Days of Christmas Baking - Day 7: Caramel-Filled Chocolate Cookies via design. bake. run.
any chocolate and caramel lover would not be able to resist this tasty treat. so go ahead and bake a bunch and give it away as a mini gift this holiday season!

chocolate cookies with caramel filing

ingredients:
  • 1 cup all-purpose flour
  • 1/3 cup cocoa powder
  • 3/4 cup sugar
  • 1/4 cup brown sugar
  • 1/2 tsp baking powder
  • a pinch of salt
  • 1 egg
  • 1/4 cup (1/2 stick) butter, room temperature
  • 12 soft caramels
  • some sea salt (for sprinkling, optional)

directions:
  1. preheat oven to 350°f. line a baking sheet with parchment paper or a silicone mat.
  2. sift the flour, cocoa powder, and baking powder into a medium bowl.
  3. in the bowl of a stand mixer fitted with the paddle attachment (or you can use a medium-size bowl with a handmixer like i do), beat the butter on low speed until smooth, 1 to 2 minutes. add the sugar and mix on low speed until well combined. then mix on medium speed until the mixture gets lighter in color and texture becomes fluffier, about 5 minutes.
  4. with the mixer on medium speed, add the egg and mix until well-incorporated and very smooth, about 30 seconds. then mix on medium speed for 30 more seconds. feel free to scrape down the sides to get all the mixture in.
  5. then add the flour mixture. mix on low speed just until uniform in texture. mix on low until everything is combined.
  6. using a cookie scoop (about 1 tablespoon in size), scoop out 1-1/2 tablespoons and form into a ball. place them on the baking sheet, spacing them at least 2 inches apart. then using your finger or thumb, make an indentation in the center and put in your soft caramel (or you can just lightly squash in the caramel). at this point, you can sprinkle a little bit of sea salt on top of the caramel if you like and cover it up with a little bit of dough to seal it. make sure the caramel isn't visible so that when it bakes it will be contained until you break into it.
  7. bake for 10-12 minutes, until the cookies are slightly firm to the touch and the surface is no longer glossy, rotating the pan halfway through the baking time.
  8. let the cookies cool on the pan for a few minutes before removing. then eat and enjoy! best enjoy warm. of course, you can store them in an airtight container at room temperature for 3 days. or if you don't want to use all the dough at once, the dough can be stored in an airtight container in the refrigerator for up to 5 days.
makes a dozen 3-inch cookies.

check out last year's day 7 recipe: peppermint and coffee nutella french macarons

Monday, December 16, 2013

12 days of christmas baking - day 4: apple cake with buttery caramel sauce

Apple Pecan Cake with Buttery Caramel Sauce via design. bake. run.

okay, here's day 4. again, very late in posting up these holiday recipes this year. i will try very hard this week to post up more recipes as christmas is literally right around the corner. and now that m is back from his 3-week hiatus (actually, more like 2-1/2 weeks because we did meet up with him last week in nyc), i can get in the christmas spirit like i do every year and bake away. you know, things just aren't the same when the usual people aren't around.

alright, enough said. below's the recipe for day 4's christmas baking. it's an apple cake with buttery caramel sauce. i have been in love with simple cakes these last several months so it's no surprise that i also love this recipe. i like how the little chunks of apple gives you a different texture when eating the cake. and that gooey buttery caramel sauce gives you a nice extra sweetness since the cake itself isn't super sweet.

so go ahead and bake yourself a cake today! enjoy and happy baking and eating! :)

Apple Cake via design. bake. run.
i think if you prefer the cake without the buttery caramel sauce, you can definitely omit it. but i personally wouldn't because i love caramel sauce.

Apple Cake with Buttery Caramel Sauce via design. bake. run.
this apple cake is perfect for this time of year. i love the added apple chunks and pecans. and the caramel sauce on top gives you that extra bit of sweetness. delish!

apple cake with buttery caramel sauce
recipe from better homes & garden

ingredients:
  • 2 cups  all-purpose flour
  • 1 teaspoon  baking powder
  • 1/2 teaspoon  salt
  • 1/2 teaspoon  ground nutmeg
  • 1/2 teaspoon  ground cinnamon
  • 1/4 teaspoon  baking soda
  • 1/2 cup  butter, softened
  • 2 cups  sugar
  • 2 eggs
  • 6 cups  coarsely chopped unpeeled cooking apples (about 5 to 6 medium apples)
  • 1 cup  chopped walnuts (i used pecans instead)
  • 1 recipe Buttery Caramel Sauce (recipe below)

directions
  1. Preheat oven to 350 degrees F. Grease a 13x9x2-inch baking pan; set pan aside. In a medium bowl stir together the flour, baking powder, salt, nutmeg, cinnamon, and baking soda; set aside.
  2. In a very large mixing bowl beat butter with an electric mixer on medium to high speed for 30 seconds. Gradually add sugar, about 1/4 cup at a time, beating on medium speed until well combined. Scrape sides of bowl; beat for 2 minutes more. Add eggs one at a time, beating well after each addition. Add flour mixture to butter mixture, beating on low speed just until combined. Fold in apples and walnuts. (Batter will be thick.) Spread batter in prepared baking pan.
  3. Bake in the preheated oven for 45 to 50 minutes or until a toothpick inserted near the center comes out clean. Cool in pan on a wire rack for 45 minutes. Serve warm with Buttery Caramel Sauce. Makes 16 servings.

Notes: Cool cake; cover cake pan with foil and freeze for up to 1 month. Thaw covered cake in the refrigerator overnight. Reheat cake, covered, in a 325 degrees F oven about 30 minutes or until warm. Sauce can be covered and refrigerated for up to 1 week. Reheat in a saucepan over medium heat.

buttery caramel sauce

ingredients:
  • 1/3 cup  butter
  • 1/3 cup  granulated sugar
  • 1/3 cup  packed brown sugar
  • 1/3 cup  whipping cream
  • 1/2 teaspoon  vanilla

directions
In a small saucepan melt butter over medium heat. Stir in sugars and cream. Bring to boiling, stirring constantly. Remove from heat; stir in vanilla. Serve warm. Makes about 1-1/4 cups.

check out last year's day 4 recipe: cranberry apple crumb bars

Monday, August 26, 2013

cream puffs with whipped cream and salted caramel drizzle

Cream Puffs with Whipped Cream + Salted Caramel Drizzle via design. bake. run.

what do you do when you have a quart of heavy whipping cream in the fridge? well, you make everything and anything you can possibly think of that uses whipping cream! okay, i only made two things with it – actually, three things. i used some of them for, what else other than what it's intended for – whipped cream. i also made some salted caramel sauce and used a little bit for a coffee-spiked chocolate ganache filling for some macarons (you can check out my instagram photo of me holding a half-bitten macaron).

so yes, with all that whipping cream, i made up some salted caramel sauce the other night and let it sit in the fridge. i couldn't decide on what else to make until finally opting for some good old cream puffs. you cannot go wrong with cream puffs with whipped cream. i decided i would drizzle some salted caramel sauce on top to touch it up instead of your typical powdered sugar or chocolate ganache glaze/drizzle.

how was it? o.m.g. the best thing ever. i don't care what anyone says, but it is. everything with caramel is just better. it's so good and sticky and light and fluffy and i cannot stop eating it. yes, so. so. good. you have got to make these and you'll know what i'm talking about.

below are the recipes to making your very own delicious cream puffs with whipped cream and salted caramel sauce drizzle. if you prefer pastry cream over whipped cream as the filling, you can certainly make some using this vanilla pastry cream recipe here. seriously, cream puffs are like best thing ever, right?! i think so. yummmmmmmy! :)

Cream Puffs with Whipped Cream + Salted Caramel Drizzle via design. bake. run.
i love making and eating cream puffs. i can seriously eat the whole thing in one sitting. okay, maybe not in one sitting, but you know what i mean. it's really that good.

Cream Puffs with Whipped Cream + Salted Caramel Drizzle via design. bake. run.
the salted caramel drizzle on top brings this cream puff to another level altogether. the sweet and salty sticky drizzle is seriously a yummy added bonus.

cream puffs with whipped cream and salted caramel drizzle

for the pâte à choux pastry:
  • 1/2 cup all purpose flour
  • 1/2 tsp sugar
  • 1/4 tsp salt
  • 1/4 cup (4 tbsp) unsalted butter, cut into pieces
  • 1/2 cup water
  • 2 large eggs, lightly beaten

for the whipped cream filling:
  • 1-1/2 cups heavy whipping cream
  • 1/3 cup sugar

for the salted caramel sauce drizzle:
  • 2/3 cup heavy cream
  • 1/2 teaspoon vanilla extract
  • 1-1/4 cup sugar
  • 1/4 cup water
  • 2 teaspoons sea salt
  • 4 tablespoons unsalted butter

directions:

to make the choux pastry
  1. preheat oven to 400°f (200°c) and place rack in center of oven. line a baking sheet with parchment paper or lightly butter or spray the pan with a nonstick vegetable spray (or use a silpat nonstick baking sheet like i did).
  2. in a bowl sift or whisk together the flour, sugar and salt.
  3. place the butter and water in a heavy saucepan over medium high heat and bring to a boil. (make sure that the butter melts before the water boils to reduce the amount of evaporation.) remove from heat and, with a wooden spoon, add the flour mixture, all at once, and stir until combined. return saucepan to the heat and stir constantly until the dough comes away from the sides of the pan and forms a thick smooth ball (about 1-2 minutes).
  4. transfer the dough to your electric mixer, or use a hand mixer, and beat on low speed to release the steam from the dough (about a minute) – actually, i just do everything in the saucepan, beat the dough, adding the eggs, etc. once the dough is lukewarm start adding the lightly beaten eggs (dough will separate and then come together) and continue to mix until you have a smooth thick paste (dough will fall from a spoon in a thick ribbon).
  5. spoon or pipe 12 small mounds of dough onto the baking sheet, spacing about 2 inches (5 cm) apart. optional: you can gently brush the tops of the dough with a lightly beaten egg if you like. i usually don't.
  6. bake for 15 minutes and then reduce the oven temperature to 350°f (180°c). continue to bake for a further 30 minutes or until the shells are a nice amber color and when split, are almost dry inside. turn the oven off, poke a couple of holes in each puff and, with the oven door slightly ajar, let the shells completely cool (and dry out).

to make the whipped cream filling
  1. combine heavy whipping cream and sugar in a medium bowl.
  2. whip mixture to medium peaks.
  3. this should make enough whipped cream to fill up the puffs

to make the caramel sauce
  1. pour the cream into a small, heavy saucepan. then add in the 1/2 teaspoon vanilla extract. place over medium-high heat and bring to just under a boil, stirring occasionally. reduce the heat to low to keep the cream warm.
  2. in a medium, heavy saucepan, combine the sugar, water, and sea salt. bring to a boil over medium heat, stirring to dissolve the sugar and sea salt. then cook, without stirring, until the mixture is amber colored, 5 to 8 minutes. remove from the heat.
  3. the mixture will continue to cook off the heat and become darker, so make sure to have your cream close by. carefully and slowly add the cream to the sugar syrup. the mixture will boil vigorously at first. let the mixture simmer down, and then whisk until smooth. let cool for about 10 minutes. note: if when you add in the cream and find that not all the sea salt dissolved, don't worry. you can just omit these undissolved pieces (leave them at the bottom of the saucepan) when storing your sauce away.
  4. cut the butter into 1-inch chunks and add them to the caramel one at a time, whisking constantly after each addition. then whisk the caramel periodically as it continues to cool. note: this caramel is a little runny. if you like it thicker, you can 1-2 tablespoons of butter to thicken it up a little bit more.
  5. the caramel will keep in an airtight container in the refrigerator for up to one month.
  6. makes 1-1/2 cups.

*note: use a good-sized pan when preparing this caramel. when the hot cream is added, the caramel will boil furiously at first, increasing dramatically in volume. have ice water nearby in case of burns.

to asssemble/fill the puffs
  1. use the tip of a paring knife to make a small cut perpendicular to the first, creating an X in the side of each puff.
  2. fill a pastry bag fitted with a 1/4-inch plain tip with the whipped cream.
  3. pipe some of the cream through the X into the side of each puff until it starts to ooze back out. repeat to fill all the puffs.
  4. once all the puffs are filled, drizzle some salted caramel sauce over each cream puff. make sure you have your cream puffs sitting on a wire rack with a baking sheet underneath to catch the overflowing caramel sauce.
  5. that's it. enjoy and happy eating! :)

note: if you don't want to use a pastry bag and pipe the cream filling, you can just cut the puffs in half and spoon in the whipped cream. i use this method a lot because i can't be bothered with pastry bags and cleaning up.

Friday, July 12, 2013

vanilla cupcakes with salted caramel buttercream

Mini Vanilla Cupcakes with Salted Caramel Buttercream Frosting via design. bake. run.

i have another wedding baking gig upcoming up sometime this october thanks to one of my coworkers' friend who is getting married. last october i baked a bunch of goodies for the friend who is getting married now's sister. this time around, this sister is asking for the same red velvet cupcakes with cream cheese frosting and vanilla cupcakes with salted caramel buttercream; in addition to a bunch of french macarons as well. those macaron flavors are still to be decided.

anyway, i mentioned i could make all these cupcakes with these flavors. well, as it turns out, i'd never really made salted caramel buttercream frosting before! hehehe oops, i know. but i have made caramel and salted caramel (from scratch) before. so to make sure i could actually do it, i did a test bake last night after my one of two strength training workouts for the week. i used my go-to vanilla cupcake recipe these days and still had some leftover caramel sauce in the fridge i had made not too long ago. long story short, my first attempt of salted caramel buttercream was somewhat successful. why only somewhat? because i'm not sure how much salt you can taste in the "salted" part of the salted caramel buttercream/sauce. i forgot to put the salt in my sauce when i was melting it and threw it in at the last minute while making the buttercream. regardless, i'll make the sauce again and remember to actually put some sea salt in it before making the actual buttercream.

below's the recipe for the salted caramel buttercream. it's quite intensive if you make everything from scratch but if you already have certain items lying around, it's not so bad. actually, it's not that bad. you can do it. i say salted caramel buttercream goes well with any chocolate or vanilla cupcake. so bake yourself some cupcakes today and top it off with this delicious frosting. trust me, it'll be quite the hit. ;)

Mini Vanilla Cupcakes with Salted Caramel Buttercream Frosting via design. bake. run.
i think this salted caramel buttercream is a keeper and goes so well with any cupcakes.

salted caramel buttercream frosting **updated 10/28/13**

ingredients:
  • 1/4 cup salted caramel sauce (recipe below), more for cupcake drizzling if you like
  • 1 stick butter, room temperature
  • 3-4 cups confectioners' sugar
  • milk or cream

directions:
  1. using a hand mixer or a stand mixer, cream together the butter and salted caramel sauce in a good size bowl until incorporated.
  2. then add in the confectioners' sugar and mix until you have the right consistency. if it looks like it's a little thick, add in some milk or cream to thin it out. if it's too thin, you can add in more sugar.
  3. once you have the right buttercream consistency, fill your piping bag and frost away.
  4. makes enough to frost 24-26 mini cupcakes. you can double the recipe if you like for frosting more cupcakes.

**note: i updated the buttercream frosting a tad because i found a better way of making it. of course, adding the caramel with the butter before adding in the sugar was a no-brainer. i don't know why i didn't think of that before. and using more butter to start off so it's more buttery and just delicious all around. :)

salted caramel sauce
adapted from tartine

ingredients:
  • 2/3 cup heavy cream
  • 1/2 teaspoon vanilla extract
  • 1-1/4 cup sugar
  • 1/4 cup water
  • 2 teaspoons sea salt or regular salt
  • 2 tablespoons light corn syrup
  • 3/4 teaspoon lemon juice
  • 4 tablespoons unsalted butter

directions for salted caramel sauce:
  1. Pour the cream into a small, heavy saucepan. Then add in the 1/2 teaspoon vanilla extract. Place over medium-high heat and bring to just under a boil, stirring occasionally. Reduce the heat to low to keep the cream warm.
  2. In a medium, heavy saucepan, combine the sugar, water, sea salt and corn syrup. Bring to a boil over medium heat, stirring to dissolve the sugar. Then cook, without stirring, until the mixture is amber colored, 5 to 8 minutes. Remove from the heat.
  3. The mixture will continue to cook off the heat and become darker, so make sure to have your cream close by. Carefully and slowly add the cream to the sugar syrup. The mixture will boil vigorously at first. Let the mixture simmer down, and then whisk until smooth. Add the lemon juice. Let cool for about 10 minutes.
  4. Cut the butter into 1-inch chunks and add them to the caramel one at a time, whisking constantly after each addition. Then whisk the caramel periodically as it continues to cool.
  5. The caramel will keep in an airtight container in the refrigerator for up to one month.
  6. Makes 1-1/2 cups.

*note: Use a good-sized pan when preparing this caramel. When the hot cream is added, the caramel will boil furiously at first, increasing dramatically in volume. Have ice water nearby in case of burns.

cupcake recipe used: egg-less vanilla cupcakes

Monday, May 27, 2013

tartine's bread pudding

Tartine's Bread Pudding via design. bake. run.

happy memorial day everyone and thank you to all of you who have put your lives out there (and/or still are) to serve and protect our beautiful country of u-s-a!

i love 3-day weekends. nothing particular about it, just the fact that i get one extra "weekend" day or two sundays as m calls it. now, with the weather being gloomy and all today, it was the perfect day to bake something delicious this morning. yesterday during one of my outings, i needed to stop at trader joe's to pick up some of their naan bread for m's chicken tikka masala he's making tonight for dinner. yes, someday we'll make our own naan bread to go with m's indian cooking, just not today. while i was there i noticed that they had some challah bread in stock. usually i always end up going to trader joe's at the end of the day and almost always they are out of challah bread. but nope, not yesterday. actually, that was probably because i went early enough in the day!

anyway, i bought the challah bread. why challah and not brioche? well, that's because they don't sell brioche anymore – i asked a while back and they said they're still trying to work out a deal w/ their bread vendor for brioche breads. i decided that it was finally about time i make tartine's famous bread pudding. and hopefully that it would turn out okay if not as good as the actual one from tartine itself?! well, sure enough i did make it this morning and i have to say, it was delicious! just as good as i remembered it, eating their bread pudding at the bakery. so, so good! i made the entire recipe (minus the making your own brioche bread of course!), from the bread pudding itself to the caramel sauce and even caramelized fruit toppings to add to it. oh, i have to say, it was seriously that good! even m was impressed and he said he doesn't care for bread pudding (hehehe.. that's because he grew up having to so much eat bread pudding as a kid and somewhat despises it these days). well, he said this bread pudding was quite good and if all bread puddings were like this, he wouldn't have a problem eating it. it's sort of like a yummy french toast. very rich and buttery – just yum, period.

below's the recipe if you want to make it yourself. i say it's totally worth a try. someday when i'm up to making bread (i can't be bothered because i don't have enough patient for it, waiting for the dough to rise, etc), i will make my own brioche and make this bread pudding again. otherwise, i'll stick to my store-bought or bakery-bought brioche or challah bread. yes, you can make tartine's brioche bread pudding with challah or croissant, and that's exactly what i did, using challah because brioche wasn't available. it's just as good.

Tartine's Bread Pudding topped with Caramel Sauce & Caramelized Fresh Fruits via design. bake. run.
i had been eyeing this recipe for the longest time ever. and finally, i've made it! too bad no one else in my family likes bread pudding. i may have to share it with my coworkers.

Tartine's Bread Pudding topped with Caramel Sauce & Caramelized Fresh Fruits via design. bake. run.
a close-up of all this yummy goodness.

tartine's bread pudding
recipes from tartine cookbook

bread pudding:
  • 6 brioche slices*, cut 1-inch thick
  • 8 large eggs
  • 3/4 cup sugar
  • 4 cups whole milk
  • 1-1/2 tsp. vanilla
  • 1/2 tsp. salt
caramel sauce (for topping):
  • 2/3 cup heavy cream
  • 1/4 of one vanilla bean
  • 1-1/4 cup sugar
  • 1/4 cup water
  • 1/4 tsp salt
  • 2 tablespoons light corn syrup
  • 3/4 tsp lemon juice
  • 4 tablespoons unsalted butter

directions for bread pudding:
  1. Preheat the oven to 350°f. Butter a 9×5-inch glass loaf dish (i used an 8x8 glass dish and that works fine too!). Arrange the brioche slices on a baking sheet. Place in the oven until lightly toasted, 4 to 10 minutes. Remove from the oven and set aside to cool.
  2. Crack the eggs into a mixing bowl and whisk until blended. Add the sugar and whisk until smooth. Add the milk, vanilla and salt and whisk until fully incorporated. Pour the custard through a fine-mesh sieve.
  3. Place the toasted bread slices in the prepared loaf pan, cutting the slices to fit as needed. Pour the custard evenly over the bread, filling the dish to the top. You may not be able to add all of the custard at this point. Let the mixture sit for 10 minutes, so that the bread can absorb the custard.
  4. Just before baking, top off the dish with more of the custard if the previous addition has been completely absorbed. Cover the dish with aluminum foil, place in the oven, and bake the pudding for about 1 hour. To test for doneness, uncover the dish, slip a knife into the center, and push the bread aside. If the custard is still very liquid, re-cover the dish and return the pudding to the oven for another 10 minutes. If only a little liquid remains, the pudding is ready to come out of the oven. The custard will continue to cook after it is removed from the oven and it will set up as it cools.
  5. Let the pudding cool for about 10 minutes before serving. You can serve the bread pudding by slicing it and removing each slice with an offset spatula, or by scooping it out with a serving spoon.
  6. Serve with fresh or sautéed fruit and caramel sauce (directions below). Makes 6-8 servings.
*note: you can use challah bread (which is what i did) or croissants if you can't find or have brioche available. both alternative bread options should yield a very satisfactory result. :)

directions for caramel sauce:
  1. Pour the cream into a small, heavy saucepan. Split the vanilla bean in half lengthwise and use the tip of a sharp knife to scrape the seeds from the pod halves into the cream. Place over medium-high heat and bring to just under a boil, stirring occasionally. Reduce the heat to low to keep the cream warm.
  2. In a medium, heavy saucepan, combine the sugar, water, salt and corn syrup. Bring to a boil over medium heat, stirring to dissolve the sugar. Then cook, without stirring, until the mixture is amber colored, 5 to 8 minutes. Remove from the heat.
  3. The mixture will continue to cook off the heat and become darker, so make sure to have your cream close by. Carefully and slowly add the cream to the sugar syrup. The mixture will boil vigorously at first. Let the mixture simmer down, and then whisk until smooth. Add the lemon juice. Let cool for about 10 minutes.
  4. Cut the butter into 1-inch chunks and add them to the caramel one at a time, whisking constantly after each addition. Then whisk the caramel periodically as it continues to cool.
  5. The caramel will keep in an airtight container in the refrigerator for up to one month.
  6. Makes 1-1/2 cups.

*note: Use a good-sized pan when preparing this caramel. When the hot cream is added, the caramel will boil furiously at first, increasing dramatically in volume. Have ice water nearby in case of burns.

for photos of the step-by-step, you can visit Jun-blog or Alexandra's Kitchen. they've got great photos. ;)

Wednesday, February 27, 2013

caramel-filled mini cupcakes inspired by rolo chocolate

Rolo Chocolate-Inspired Cupcakes via design. bake. run.

a while back i had some rolo chocolates for the first time ever. i know, right? i have to say, they were quite good and it gave me this idea to make some mini cupcakes with caramel filling. i figure since i do have some caramel bits lying around and the chocolate cupcake recipe i've been making lately is super simple to make, why not. i have to say these cupcakes turned out great! the melted caramel in the middle makes the cake extra moist and that much better, as if it wasn't good on its own already.

below's the recipe should you want to try making some yourself. enjoy and happy eating! :)

Rolo Chocolate-Inspired Cupcakes via design. bake. run.
i absolutely love the caramel filling in these mini cupcakes. it makes for one delicious bite!

Rolo Chocolate-Inspired Mini Cupcakes via design. bake. run.
these are so so good. the cake is nice and moist with the caramel filling. it's a must try if you're a chocolate or caramel (or none of the two even) lover! ;)

rolo chocolate-inspired mini cupcakes

ingredients:

chocolate cupcakes:
1-1/2 cups flour
1 cup granulated sugar
1 tsp baking soda
1 tsp salt
1/3 cup cocoa powder
1/2 cup oil
1 cup water
1 tsp vanilla extract
1 tbsp vinegar

caramel filling:
1/2 bag of kraft caramel bits
2 tablespoons of water

chocolate ganache:
12 oz chocolate, chopped into small pieces
1 cup heavy cream

directions:

for the cake: mix all ingredients together until moist and well blended. put in mini cupcake cups and bake for 15 minutes at 350 degrees F. let cupcakes cool completely before coring the center for the caramel. please core first before pouring in caramel filling.

for the caramel: place the caramel bits with 2 tablespoons of water in a microwaveable bowl and heat it in the microwave for 30-60 seconds at medium power. you can heat it longer if the bits are quite melted after 60 seconds. once it looks like they are melted, stir the caramel quickly until smooth. use immediately. if at any point the caramel looks like it's thickening up, you can reheat it in the microwave for a few seconds to soften it again.

for the ganache: place chocolate pieces in a large bowl. heat heavy cream on medium high until it comes to a boil. remove from heat and immediately pour cream over chocolate and stir until completely mixed and glossy. allow ganache to completely cool and set up. when you are able to spoon the ganache and it can hold its texture, it is ready for piping. pipe/frost and enjoy!

to assemble: pour a generous portion of the caramel filling into the cored cupcakes. top with chocolate ganache frosting. that's it! happy eating! :)

chocolate cake recipe makes 50 mini cupcakes (or 16 regular ones). ganache recipe makes 1-1/2 cups. you can half all of these if you want to make less. i've done it many times halving the recipe.

Thursday, February 14, 2013

happy valentine's day!

Valentine's Day Mini Cupcakes via design. bake. run.

Valentine's Day Sweet Treats via design. bake. run.

i've never really been a fan of valentine's day, but for some odd reason over the last few years i've slowly grown into maybe recognizing it. not a whole lot, just a teeny tiny bit. my thing is, i don't need any fancy flowers or box(es) of chocolates. just say happy valentine's day and that you love me and cannot picture your life without me because i am so awesome and things just wouldn't be as awesome if i wasn't part of it. hahahahaha.. yeah, sure, something like that.

so did my person recognize today's over-commercialized holiday? yup! he got me a nice box of see's candies (i've grown to liking them bit by bit these days as i'm usually the one giving those out during holidays) and some yummy peppered jerky. yes, i love my beef jerky. i say this year's v-day is so far, so good. no complaints here.

well, it's not too late if you haven't done anything today. the day is still young! hey, you can even bake these yummy mini cupcakes and give them away as little gifts or have them at your dinner (party or not) tonight (or any other time is fine too). you can find the recipe for these mini chocolate cupcakes with ganache here. i just topped them off with the ever-so-festive valentine sprinkles. :)

recipe: mini chocolate cupcakes with chocolate ganache frosting

Friday, January 11, 2013

gluten-free chocolate chip cookies

Gluten-Free Chocolate Chip Cookies via design. bake. run.

i never bothered baking any gluten-free goodies until a few years ago. one of my former coworkers can't have any gluten so everything she consumes must be gluten-free. that was when i started testing out random recipes. every time i brought in goodies, i made sure i had a GF version as well. typically, i'd just take the regular recipes and alter them GF. most of the time i had to play around with random flour combinations. i have to say, i don't care for some of those flours. what i've found is that brown rice flour or white rice isn't that bad and can somewhat holds its ground. this chocolate chip cookies recipe here is an example of that. it uses only brown rice flour as the flour and the outcome is actually very good. it's quite simple really, and the cookies turn out great. of course i've had incidences where some of them can turn out too crunchy or just a horrible mess (but that the fun of testing random flour combos). i guess you just have to play around with it until you find the right combination of ingredients.

below's the recipe for these delicious gluten-free cookies should you want to try them out yourself. i love how the brown rice flour gives the cookie that crumbly texture once it hits your mouth. these really are good whether you're GF or not! oh, for half the cookies i turned them into sandwich cookies and added in some salted caramel filling leftover from my brown sugar salted caramel macarons. i say those were quite a treat. it's a giant load of sugary sweetness, but oh man, they were good.

okay, as usual, let me know how yours turn out if you do make these. happy baking and eating! :)

Gluten-Free Chocolate Chip Cookies via design. bake. run.
the salted caramel filling with these gluten-free chocolate chip cookies just made them even better!

Gluten-Free Chocolate Chip Cookies via design. bake. run.
this easy GF cookie recipe is seriously so simple to make and used only brown rice flour!

gluten-free chocolate chip cookies

ingredients:

1/2 stick (4 oz) butter, softened or melted
1/4 cup sugar
1/2 cup brown sugar
1 egg
1/4 teaspoon baking soda
1/4 teaspoon baking powder
pinch of salt
1 cup + 2 tablespoons brown rice flour
3/4 cup semi-sweet chocolate chips

directions:

preheat oven to 350°F. line baking sheet with parchment paper or silicone sheet.

cream softened butter (or melt butter in microwave safe bowl) and sugar together. then add in the egg. once mixed, add in the baking soda, baking powder, salt and flour. mix until incorporated, then add in the chocolate chips.

scoop out a tablespoon portion (ball-like) onto the baking sheet. make sure to spread out them at least 2-inches apart. bake for 9-10 minutes until golden but still soft in the center (baking time varies depending on how chewy or crunchy you like your cookies). transfer hot cookies with a spatula to a rack to cool. after a few minutes, they're ready to eat! enjoy. :)

makes 18-20 cookies or 9-10 sandwich cookies. store cookies in a tightly sealed container for up to 5 days.

Wednesday, January 9, 2013

brown sugar salted caramel macarons

Brown Sugar Salted Caramel French Macarons via design. bake. run.

who doesn't love salted caramel? i know i do!

so i decided to be a tad adventurous with my usual macaron recipe. instead of your good old white sugar, i went for the brown one instead. and what do you know? the brown sugar works just fine too! in fact, they actually give you a nice tint of brown to the shells and that sweet butterscotch-y flavor. it's really good, i must say. the added salted caramel filling is just scrumptious.

below's the recipe should you be interested. let me know how yours turn out if you do make them. happy baking and eating! :)

Brown Sugar Salted Caramel French Macarons via design. bake. run.
the brown sugar substitution give these macarons a nice butterscotch flavor. and to top it off with the salted caramel filling is just divine.

Brown Sugar French Macarons with Salted Caramel via design. bake. run.
these macarons make for the perfect gift, for anyone and any occasion. :)

brown sugar salted caramel french macarons

ingredients:

macaron batter:
1 cup powdered sugar
3/4 cup almond meal
2 large egg whites, at room temperature
5 tablespoons brown sugar, firmly packed

salted caramel filling:
1 bag of kraft caramel bits
2 tablespoons of milk (you can use water too)
1 teaspoon sea salt
1-2 cups powdered sugar (optional, i use this to thicken my caramel a bit)

directions:

to make the macaron batter/shells:
  1. line two baking sheets with parchment paper and have a pastry bag with a plain tip (about 1/2-inch, 2 cm) ready.
  2. sift together the powdered sugar and almond meal so there are no lumps. set aside.
  3. in the bowl of a standing electric mixer (or if you prefer, you can use a bowl and hand mixer), beat the egg whites until they begin to rise and hold their shape. while whipping, beat in the brown sugar until very stiff and firm, about 2 minutes.
  4. carefully fold the dry ingredients, in two batches, into the beaten egg whites with a flexible rubber spatula. when the mixture is just smooth and there are no streaks of egg white, stop folding and scrape the batter into the pastry bag (standing the bag in a tall glass helps if you’re alone).
  5. pipe the batter on the parchment-lined baking sheets in 1.35-inch circles evenly spaced one-inch apart.
  6. rap the baking sheet a few times firmly on the counter top to flatten the macarons. then let it sit for at least 30-60 minutes depending on humidity before baking them in the oven. about 10-15 minutes before baking, preheat oven to 350 degrees F. bake for 15 minutes.
  7. once macaron shells are out of the oven, let them sit for 30-60 seconds before removing the hot baking sheet underneath. let the macarons cool completely before removing them from the parchment paper.

for the salted caramel filling:
  1. put the caramel bits with the milk and sea salt in a microwaveable bowl and microwave for 1-1/2 to 2 minutes (i usually do it in 30 second increments).
  2. once it looks like the bits are melted or soft enough to stir, take it out and stir until everything is fully incorporated.
  3. let it cool until it's thick enough to spread. if it's still too runny, it's not ready yet. at this point, you can add in the powdered sugar to thicken up the mixture so you can use it quicker if you like. otherwise, i say hang out for a bit until it's ready. of course, if you've gone too long and the mixture is too stiff to spread, you can pop it back in the microwave for a few seconds to soften it.

to assemble the macaron cookies:
  1. before assembling these cookies, make sure to pair up all the cookie shells so they are as close as possible in size.
  2. using a knife, spread a good amount of the salted caramel on the inside of the macarons then sandwich them together.
  3. let them stand at least one day (keep them refrigerated) before serving (serve at room temperature), to meld the flavors.

store in airtight container for up to 5 days. makes 20-24 macarons. happy eating because these are really, really, good! :)
Related Posts Plugin for WordPress, Blogger...