Showing posts with label coffee. Show all posts

Wednesday, January 28, 2015

baked goodies perfect for a tea party!

Tea Party Goodies via design. bake. run.

ummm... so, i sort of hosted a mini tea party at work this week. any excuse to bake some yummy baked goods, right? i'm not big on tea or anything, but i'll take all the goodies that come with it. :)

for our initial afternoon tea party kick-off, i settled on some coffee nutella macarons as well as some lemon cream cheese macarons (thanks to all the lemons in my garden), some mini lemon cupcakes with lemon icing, multi-berries scones, jam thumbprints and what better way to top it off then your not-so-typical savory bites, spam musubi. yup, you heard that right. we didn't have cute little tea sandwiches. we opted for spam musubi instead and those were delish! spam musubi is quite a hit with my coworkers and me. we'll take it any time of day, any day of the week, just as we'll take any of the other baked goodies.

anyway, the recipes are below if you'd like to bake any for your tea party or any party or just because. yeah, when you think about it, who needs an excuse to bake? i sometimes just bake because i wanted to. okay, enjoy and happy baking! :)

Mini Lemon Cakes and Multi-Berries Scones via design. bake. run.

multi-berries scones
recipe adapted from smells like home's blueberry scones

ingredients:
  • 8 tbsp (1 stick) unsalted butter, frozen whole
  • 1-1/2 cups fresh or frozen berries (i used a mix of blueberries, blackberries and raspberries)
  • 1/2 cup milk
  • 1/2 cup sour cream
  • 2 cups all-purpose flour, plus more for dusting the work surface
  • 1/2 cup sugar, plus extra for sprinkling
  • 2 tsp baking powder
  • 1/4 tsp baking soda
  • 1/2 tsp salt
  • 1 tsp finely grated lemon zest
  • 1 egg, for egg wash


directions:
  1. adjust an oven rack to middle position and preheat to 425° F. grate the frozen butter on the holes of a large box grater. if using fresh berries, place the berries in the freezer until needed. whisk together the milk and sour cream in a medium bowl; refrigerate until needed. combine the flour, 1/2 cup sugar, baking powder, baking soda, salt and lemon zest in a medium mixing bowl. whisk to combine. add the grated butter to the flour mixture and toss with fingers until thoroughly coated.
  2. add the milk mixture to the dry ingredients and fold with a spatula just until combined. transfer the dough to a generously floured work surface. dust the top of the dough with flour, and knead with well floured hands, 6-8 times, just until the dough holds together in a ragged ball. add small amounts of flour as needed to prevent sticking.
  3. roll the dough into a 12-inch square. fold the dough into thirds like a business letter (a dough scraper really helps with these steps). fold the short ends of the dough into the center in thirds, to form an approximate 4-inch square. transfer the dough to a plate lightly dusted with flour and chill in the freezer for 5 minutes.
  4. return the dough to the floured work surface and roll into an approximately 12-inch square again. sprinkle the berries evenly over the surface of the dough, and gently press down so that they are slightly embedded in the dough surface. using a dough scraper, roll the dough up to form a tight log. lay the log seam side down and press the the log into a 12 by 4-inch rectangle. using a sharp, floured knife, cut the rectangle crosswise into 4 equal rectangles. cut each rectangle diagonally to form 2 triangles. transfer to a parchment lined baking sheet.
  5. brush the tops of the scones with the egg wash and sprinkle lightly with sugar. if freezing ahead of time, flash freeze on the baking sheet for 20 minutes, then wrap individually and store in a freezer bag until needed. bake until the tops and bottoms are golden brown, 18-25 minutes. transfer to a wire rack and let cool at least 10 minutes before serving.


makes 12 scones (or however big/small you cut it)


Baked goodies perfect for any (tea) party! via design. bake. run.

mini eggless lemon cupcakes
recipe adapted from yum'e'licious

ingredients:

for the cupcakes
  • 1/2 cup butter
  • 1/2 cup sugar
  • 1 cup all purpose flour
  • 1 cup buttermilk (or do what i do; add 1 tbsp lemon juice to 1 cup of milk, stir, and let it sit for 5 minutes before using)
  • 1 tsp baking powder
  • 1/2 tsp baking soda
  • 1 tbsp lemon juice
  • zest of 1 medium sized lemon
  • few drops of yellow color, optional


for the lemon icing drizzle
  • 1/4 cup powdered sugar
  • 2 tbsp lemon juice


directions:
  1. if you don't have buttermilk, this is when you mix the lemon juice and milk together and set it aside while you do everything else.
  2. preheat oven to 350°F. then sift the flour, baking powder and the baking soda in a good size bowl and set that aside.
  3. in another bowl, cream the butter and sugar until light and fluffy. then add in 1/3 cup buttermilk and beat again until fluffy. repeat again with another 1/3 cup. then add the lemon zest and lemon juice and mix well. now, if you want to use some yellow food coloring, this is where i add it in.
  4. now add in the dry ingredients and mix well before adding in the remaining buttermilk; mix again until incorporated.
  5. fill the mini cupcake cups to 2/3 full (makes about 20-24) and bake it in the oven for 14-15 minutes. or if you'd rather do a loaf cake instead, pour the batter into a greased loaf tin (9"x5") and bake it for 20-25 minutes or until a toothpick comes out clean.
  6. let the mini cupcakes (or loaf) cool completely before drizzling the icing over. to make the icing, just mix the powdered sugar and lemon juice together. if it's too runny, just add more powdered sugar; and if too thick, add more lemon juice.


makes about 20-24 mini cupcakes or one loaf


French macarons, mini cupcakes, scones, jam thumbprints and spam musubi... perfect treats for any party via design. bake. run.

other goodies you can find recipes for:

Friday, February 21, 2014

blood orange cranberry scones

Blood Orange Cranberry Scones via design. bake. run.

i was in trader joe's the other day and noticed they had bags and bags of blood oranges. well, duh me! it is the season. i've just never bothered to look around for them or noticed them in the past. this time, it was so obvious, i couldn't have missed it if i wanted to. i decided to pick up some up thinking i could bake with it, or at least eat them. we don't typically eat blood oranges in our household, but who's to say why not this time?

knowing i'd bake something with these blood oranges, i decided i'd make some scones. lately i've been treating myself to that morning cup of coffee at starbucks and noticed the cranberry orange scones that they have on displayed. i've yet to try one of theirs, but i figure i know how to bake so i may as well make my own. not having oranges on hand, what better alternative than blood oranges?!

below's the recipe for these blood orange cranberry scones inspired by starbucks cranberry orange scones. how were they? pretty good. i accidentally added too much sugar to the scones but i think the mistake was actually a perfect one. i really think you get the right amount of sweetness with the orange flavor. and the dried cranberries give you something chewy and a tiny bit of tartness when you bite into it. overall a great treat with that morning coffee or afternoon tea. now of course, you can drizzle some glaze on top (i was too lazy and couldn't be bothered) or spread it with jam and butter (or clotted cream) and it would just elevate this scone to the next level. very. good.

Blood Orange Cranberry Scones inspired by Starbucks via design. bake. run.
these blood orange cranberry scones inspired by starbucks are the perfect little treat with any morning coffee or afternoon tea.

Blood Orange Cranberry Scones inspired by Starbucks via design. bake. run.
a little blood orange glaze would go so well with these scones.

blood orange cranberry scones
inspired by starbucks' cranberry orange scones with recipe adapted from here.

scones:
2 cups all-purpose flour
10 teaspoons granulated sugar
1 tablespoon grated orange peel
2 teaspoons baking powder
1/2 teaspoon salt
1/4 teaspoon baking soda
1/3 cup cold butter
1 cup dried cranberries
1/4 cup orange juice
1/4 cup buttermilk
1 egg
1 tablespoon milk
1 tablespoon raw sugar (or regular sugar works fine too), for sprinkling

glaze: (optional)
1/2 cup confectioners' sugar
1 tablespoon blood orange juice

directions:
in a large bowl, combine the flour, sugar, orange peel, baking powder, salt and baking soda. cut in butter until the mixture resembles coarse crumbs; set aside. in a small bowl, combine the cranberries, orange juice, buttermilk and egg. add to flour mixture and stir until a soft dough forms.

on a floured surface, gently knead 6-8 times. pat dough into an 8-in circle. cut into 12 wedges. separate wedges and place on an ungreased baking sheet. note: this is the part where i like to stick the wedges in the freezer for a good 15 minutes or so before i bake it. i've read that by doing this it gives the butter time to harden so when you bake it, it makes the scones a bit more flaky and delicious. and is that true? i guess so. i do this almost every time when i have time to spare, otherwise i just skip this part.

brush with milk; sprinkle with raw sugar. bake at 400 degrees F for 12-15 minutes or until lightly browned. remove to a wire rack to cool.

for the glaze (optional): combine glaze ingredients; drizzle over scones.

if you like, you can even split it, spread some butter and jam and oh my, what a yummy-looking treat! enjoy. :)

makes about 12 wedges (more or less depending on how you cut it).

Tuesday, February 11, 2014

chocolate-cinnamon cupcakes with mocha buttercream frosting

Mini Chocolate-Cinnamon Cupcakes with Mocha Buttercream Frosting via design. bake. run.

is it february already? and valentine's day is around the corner?!! alright, i haven't baked cupcakes in like forever. it's only fitting i make some (mini) chocolate cupcakes again, just in time for valentine's day. yes, i made some last year as well, in addition to the super popular (on pinterest) mini creme brulee cupcakes. those are pretty awesome as well.

to change it up a bit, i decided to add a little cinnamon to the usual (eggless) chocolate cupcake recipe. according to m, the cinnamon didn't come through a whole lot. i guess you could sort of tell it's there, but not really because once it's baked the chocolate and coffee flavors overpower the cinnamon? i don't know. so if you really like cinnamon, i say add in another teaspoon or so. otherwise, the recipe the way it is below will do just fine. and if you're a coffee fan, the mocha frosting is perfection. chocolate and coffee? done.

alright, below's the recipe if you'd like to bake some for this upcoming valentine's day or any day. i say it works for any occasion. so go ahead. they're super simple to make and the end results are always stunning... delish! enjoy and as always, happy baking!

The Perfect Valentine's Day Sweet! Chocolate-Cinnamon Cupcakes with Mocha Buttercream Frosting via design. bake. run.
who doesn't want to get some mini chocolate cupcakes this valentine's day? these are the perfect little gifts. we gave some away to c's teacher as an early valentine's day gift.

Chocolate-Cinnamon Cupcakes with Mocha Buttercream Frosting via design. bake. run.
i love how festive and valentine-y the added heart sprinkles are in these mini cupcakes.

chocolate-cinnamon cupcakes with mocha buttercream frosting

chocolate cupcakes:
1-1/2 cups flour
1 cup granulated sugar
1 tsp baking soda
1 tsp salt
1/3 cup cocoa powder
1 tsp instant coffee
2 tsp ground cinnamon
1/2 cup oil
1 cup water
1 tsp vanilla extract
1 tbsp vinegar

mocha buttercream frosting:
1/2 cup (1 stick) butter, room temperature
3 cups powdered sugar
2 tbsp instant coffee
2 tbsp cocoa powder
1/4 cup milk

directions:
for the cake: mix all ingredients together until moist and well blended. put in mini cupcake cups (1/2 full) and bake for 17-18 minutes at 350 degrees F.

for the mocha buttercream frosting: using a handmixer or in a stand mixer, mix all ingredients together until you've reached the right consistency for buttercream. if it's too thick, add in a little bit more milk. if it's too thin, you can add more powdered sugar. once everything looks good, pipe/frost and enjoy!

chocolate cake recipe makes about 16 regular cupcakes (or 45-50 mini cupcakes). buttercream frosting should make enough to frost all cupcakes (well, at least when i did it).

Thursday, September 26, 2013

sour cream coffee cake with cinnamon streusel topping

Sour Cream Coffee Cake with Cinnamon Streusel Topping via design. bake. run.

a few weeks back we had tacos for dinner. along with the many ingredients in making a yummy taco was sour cream. we had some sour cream leftover sitting in the fridge from the taco dinner and garbage night was fast approaching. so instead of throwing it out, i decided to make the most out of the leftover sour cream. so, what do we have here? you guessed it. nothing more delicious for breakfast than that sour cream coffeecake. i did a quick google search and landed on king arthur flour's website for this very tasty coffee cake. it's so tasty, they called it their "favorite sour cream coffee cake."

the end result? a very tender cake that was the perfect accompaniment to my morning starbucks iced coffee the next morning after i baked it. actually, i had another slice later that same day as an afternoon snack. delicious, all around and for sure a new favorite. i love how the cake is filled and topped with this yummy cinnamon-y streusel. the nuts in the streusel gave it a nice crunch and another dimension to the cake. i didn't have walnuts around so i substituted pecans instead and it was just as good. overall, a very excellent coffee cake. i brought about 3/4 of the cake into work and it was a hit.

now, if you're interested in making this cake, i say why not. it is so good and is perfect for breakfast, afternoon tea or whenever, just because. i know i will for sure be making this coffee cake again and possibly modifying it to see what else this recipe can do. enjoy and happy baking! :)

Sour Cream Coffee Cake with Cinnamon Streusel Topping via design. bake. run.
i never thought i'd be a sucker for breakfast sweets, but since i started baking, i love anything sweet for breakfast. this coffee cake is a perfect treat with my morning coffee.

Sour Cream Coffee Cake with Cinnamon Streusel Topping via design. bake. run.
close-up of the cake. see that layer of cinnamon streusel? yummy!

Sour Cream Coffee Cake with Cinnamon Streusel Topping via design. bake. run.
i must bake this coffee cake for breakfast again. especially with fall here already, it would go perfect with that pumpkin spice latte. oh, that just sounds so good right now.

sour cream coffee cake
recipe from king arthur flour

cake
  • 1/2 cup (4 ounces) butter
  • 1 cup (7 ounces) sugar
  • 2 large eggs
  • 2 cups (8 1/2 ounces) unbleached all-purpose flour
  • 1 teaspoon baking powder
  • 1/4 teaspoon baking soda
  • 1/2 teaspoon salt
  • 1 cup (8 ounces) sour cream or yogurt*

*feel free to use low-fat (NOT nonfat) sour cream or yogurt; if using yogurt, try vanilla or another complementary flavor, if desired.


 topping
  • 1/2 cup (3 1/2 ounces) sugar
  • 2 teaspoons ground cinnamon
  • 2 teaspoons vanilla
  • 1/2 cup (8 ounces) chopped walnuts, optional

directions
cream together the butter or margarine, sugar, and eggs. in a separate bowl, mix together the flour, baking powder, baking soda and salt. add the flour mixture to the butter mixture alternately with the sour cream or yogurt, stirring after each addition.

grease and flour a regular-sized (9 1/2-inch) tube pan or bundt-style pan, or a 9 x 9-inch pan. spread half the batter in the pan, and sprinkle with half the topping mixture. repeat with remaining batter and topping.


bake the coffeecake in a preheated 350°F oven for 25 to 30 minutes, or until the cake tests done. cool it for 10 to 15 minutes, then remove it from the pan. (if you've baked it in a 9 x 9-inch pan, just serve it right from the pan.) place the cake right-side-up (topping up) on a plate to serve.

makes 12 generous servings. enjoy and happy eating! :)

Thursday, August 29, 2013

blueberry cream scones

Blueberry Cream Scones via design. bake. run.

since that first time i baked some scones, i've been a fan of it. i love how it's not too sweet and so if you're not a sweet tooth-kind of person you can have it as is, with a dab of butter or not. or if you've got a sweet tooth (i do most of the time), you can add on some jam and cream. oh it is really good, especially when it's nice and warm soon after it's come out of the oven.

i had some fresh blueberries in the fridge and decided i would finally make some blueberry scones. having a bunch of heavy whipping cream still on hand and very few eggs available, i opted for the cream scones instead because it uses no eggs or butter. the outcome like i've mentioned above is delicious. absolutely the perfect breakfast or afternoon treat. i actually had mine for breakfast. i prepared the scones the night before and had them sit in the fridge overnight. in the morning i preheated my oven and baked these delicious goodies. the house smelled wonderful the other morning when these were in the oven.

if you'd like to have a delicious smelling warm oven in the morning or any time of day, i say why not make some of these scones. again, it uses no eggs or butter so it's perfect for anyone who has an egg allergy. below's the recipe should you be interested. enjoy and as always, happy baking and eating. :)

Blueberry Cream Scones via design. bake. run.
i love how this recipe uses no eggs or butter. it's super easy to make and comes out perfect every time.

Blueberry Cream Scones via design. bake. run.
scones are perfect for any time of day really. i could eat them for breakfast, snack, lunch or yes... even dinner! ;)

blueberry cream scones
recipe adapted from food & wine

ingredients:
  • 2-1/4 cups all-purpose flour
  • 1/4 cup granulated sugar
  • 1 tablespoon baking powder
  • 2 teaspoons finely grated lemon zest
  • 1/2 teaspoon salt
  • 1-1/2 cups heavy cream, plus 2 tablespoons for brushing
  • 2 tablespoons fresh lemon juice
  • 5-6 oz blueberries (i used fresh blueberries, but you can use frozen ones too)
  • raw sugar, for sprinkling

directions:
  1. preheat the oven to 375°f and line a baking sheet with parchment paper (or you can use a silpat like i did).
  2. in a bowl, whisk the flour with the granulated sugar, baking powder, lemon zest and salt. using a wooden spoon, stir in the cream and 2 tablespoons of the lemon juice; fold in the blueberries.
  3. on a lightly floured work surface, gently knead the dough just until it comes together. pat into a 9-inch round, a scant 1/2 inch thick. cut the dough into 8 wedges and arrange them 1 inch apart on the prepared baking sheet.
  4. brush the scones with heavy cream (or you can use milk) and sprinkle it with some raw sugar.
  5. bake the scones for 20 to 25 minutes, until slightly firm and lightly browned on the bottom, pale on top.
  6. let cool for 5 minutes, then transfer to a rack to cool completely.

makes 8. of course, more or less depending on how you cut it. ;)

note: i don't quite agree with the cooling completely part unless you don't plan to eat it right away. generally scones are best eaten warm. they're delicious as is, but you can add butter and/or jam (or clotted cream as they do in england and i swear it's the best thing ever), if you like. to reheat room-temperature scones, place on a baking sheet, tent lightly with foil, and warm in a preheated 350°f oven for about 10 minutes.

Friday, January 4, 2013

chocolate yule log

Chocolate Yule Log via design. bake. run.

i mentioned in one of my last post that every new year's eve we make a yule log to celebrate the new year (okay, more like the hubby who makes the yule log). instead of going out and partying with everyone on new year's eve, we actually prefer to stay in with a movie playing in the background and baking this away. we've done it for the past several years now that it's sort of become a tradition. so why a yule log for new year's eve instead of christmas? well, it's just that with all the baking going on during thanksgiving and christmas, there's just too much goodies and we know we'll never get around to eating it! and we'd really like to eat it because it's THAT good! you can't go wrong with a nice fluffy and soft sponge cake with that sweet creamy mocha whipped filling and the chocolatey mocha frosting on top. it's very good.

below's the recipe should you like to make one yourself come the holidays again. actually, who says you can't have this anytime of the year?! go ahead and make one and let me know how it turns out! happy baking and eating. :)

Chocolate Yule Log via design. bake. run.
our annual new year's eve tradition. bake a yule log instead of partyin' it up. ;)

chocolate yule log
recipe from taste of home

ingredients:

sponge cake:
5 eggs, separated
1 cup sugar, divided
1/2 cup cake flour
1/4 cup baking cocoa
1/4 teaspoon salt
1/2 teaspoon cream of tartar

mocha cream filling:
1 cup heavy whipping cream
1/2 cup confectioners' sugar
1-1/2 teaspoons instant coffee granules

mocha buttercream frosting:
1/3 cup butter, softened
1/3 cup baking cocoa
2 cups confectioners sugar
1-1/2 teaspoons vanilla extract
1 tablespoon brewed coffee
2 to 3 tablespoons 2% milk

directions:
  1. Line a 15-in. x 10-in. x 1-in. baking pan with parchment paper; grease the paper. Place egg whites in a small bowl; let stand at room temperature for 30 minutes.
  2. In a large bowl, beat egg yolks on high until light and fluffy. Gradually add 1/2 cup sugar, beating until thick and lemon-colored. Combine the flour, cocoa and salt; gradually add to egg yolk mixture until blended.
  3. Beat egg whites on medium until foamy. Add cream of tartar; beat until soft peaks form. Gradually add remaining sugar, 1 tablespoon at a time, beating on high until stiff peaks form. Stir a fourth into chocolate mixture. Fold in remaining egg whites until no streaks remain.
  4. Spread batter evenly in prepared pan. Bake at 350° for 12-15 minutes or until cake springs back (do not overbake). Cool for 5 minutes; invert onto a linen towel dusted with confectioners' sugar. Peel off parchment paper. Roll up in the towel, starting with a short side. Cool on a wire rack.
  5. In a large bowl, beat cream until it begins to thicken. Add sugar and coffee granules. Beat until stiff peaks form; chill. Unroll cooled cake; spread filling to within 1/2 in. of edges. Roll up again. Place on serving platter; chill.
  6. In a large bowl, beat frosting ingredients until smooth. Frost cake. Using a fork, make lines resembling tree bark. Makes 12 servings.

nutrition facts: 1 serving (1 slice) equals 341 calories, 15 g fat (8 g saturated fat), 130 mg cholesterol, 136 mg sodium, 49 g carbohydrate, 1 g fiber, 4 g protein.

Tuesday, December 11, 2012

12 days of christmas baking - day 7: peppermint & coffee nutella french macarons

Peppermint & Coffee Nutella French Macarons via design. bake. run.

who doesn't love french macarons? yes, i've finally made some again since that last giant batch of macarons i made for a wedding. i can't believe i haven't made any since then. to go with the whole christmas theme, i decided on the peppermint flavor macarons, sprinkled with peppermint candy on the side. and to add to that, since i personally like to have more than one flavor of macarons whenever i'm making/eating them, i went with (almost) everyone's favorite, the coffee nutella.

i know, i haven't gotten my recipe up for these macarons yet, but again, i promise i will write a blog post soon and post the recipe here as soon as i have it written out. in the meantime, you can browse through these previous posts and get david lebovitz's recipe from one of these posts.

enjoy and happy baking! :)

***UPDATE 12/18/12***

i've finally got the recipe written up. scroll below for the peppermint recipe. for the coffee nutella macaron recipe, please click here. enjoy and let me know how yours turn out if you make them! :)

Peppermint Macarons via design. bake. run.
i love how festive and flavorful these peppermint french macarons are!

Peppermint & Coffee Nutella Macarons via design. bake. run.
these peppermint and coffee nutella macarons really turned out great. so yummy and just the perfect treat for a cold day with warm coffee/tea.

Peppermint & Coffee Nutella French Macarons via design. bake. run.
i absolutely love making and eating french macarons. i really can eat all of these delicious peppermint and coffee nutella macarons. ;)

Peppermint Macarons via design. bake. run.
another shot of the peppermint macarons. yum!

peppermint macarons

ingredients:

macaron batter:

1 cup (100 gr) powdered sugar

3/4 cup almond meal (about 3 ounces or 75 grams)

red gel food coloring (optional)

2 large egg whites, at room temperature

5 tablespoons (65 gr) granulated sugar

peppermint buttercream filling:
1 stick of butter, softened
2 cups powdered sugar
1/2 tbsp peppermint extract
up to 2 tbsp heavy cream or milk
3 candy canes, crushed (optional)

peppermint candy decorations:
6 candy canes, crushed

directions:
to make the macaron shells: Preheat oven to 350º F (180º C).

Line two baking sheets with parchment paper and have a pastry bag with a plain tip (about 1/2-inch, 2 cm) ready.

Sift together the powdered sugar, almond meal and 2 tablespoons of espresso so there are no lumps (usually I just use a fork to break any large lumps). If your almond meal isn't so fine, you can put the ingredients into a blender or food processor to make it finer. Personally, I'd just use the sifter and dump out any remaining crumbs that didn't make it through the sifting process.

In the bowl of a standing electric mixer (or if you prefer, you can use a bowl and hand mixer), beat the egg whites until they begin to rise and hold their shape. While whipping, beat in the granulated sugar until very stiff and firm, about 2 minutes.

Carefully fold the dry ingredients, in two batches, into the beaten egg whites with a flexible rubber spatula. If you want your macaron shells to be red, this is where you'd to add in the food coloring (with the dry ingredients), otherwise, you can just skip it and use the food coloring as paint to paint it on once the cookies are assembled (like I did!). When the mixture is just smooth and there are no streaks of egg white, stop folding and scrape the batter into the pastry bag (standing the bag in a tall glass helps if you’re alone).

Pipe the batter on the parchment-lined baking sheets in 1.35-inch (3.5 cm) circles evenly spaced one-inch (3 cm) apart. Quickly after it's piped, sprinkle a few espresso powder over each shell (this step is optional, personally I do it because I like how they macarons look once they're baked).

Rap the baking sheet a few times firmly on the counter top to flatten the macarons. Then it let sit for at 30-60 minutes (okay, I've done it with just 15 minutes before and they turn out fine, but whatever you do, do not skip this step; even at just 15 minutes) before baking them in the oven, 15-17 minutes. Let cool completely then remove from baking sheet.

to make the peppermint buttercream frosting filling: beat butter for a few minutes with a mixer with the paddle attachment on medium speed (or you can use a hand mixer). add the 2 cups of powdered sugar and turn your mixer on the lowest speed (so the sugar doesn’t blow everywhere) until the sugar has been incorporated with the butter. increase mixer speed to medium and add peppermint extract, and 1 tablespoon of milk/cream and beat for 3 minutes. if your frosting needs a more stiff consistency, add a little more sugar. if your frosting needs to be thinned out, add remaining tablespoon of milk, a little at a time. once you've gotten the right consistency and the buttercream is complete, add in the crushed peppermint candy cane pieces and mix until incorporated. of course, this last part here is optional, you can skip it if you like. i personally like the added crunch when biting into my peppermint macaron, so i do this last step. :)

to assemble: Before assembling these cookies, make sure to pair up all the cookie shells so they are as close as possible in size. Then using a knife, spread a good amount of the peppermint filling on the inside of the macarons then sandwich them together. Sprinkle the crushed peppermint candy cane pieces over the filling portion of the assembled macaron. Or you can roll the cookie on the candy pieces. This last step adds a nice decorated touch to these peppermint macarons. They are so cute and delicious!

Let them stand at least one day (keep them refrigerated) before serving (serve at room temperature), to meld the flavors. Or if you can't wait to dig in and eat, I say wait a few hours, at least! (Shhhh, I've eaten them newly assembled too, and they taste just as yummy! hahahaha). But really, for the best optimal flavor and taste, you must wait at least one day. They really are THAT good and worth the wait!

Store in an airtight container for up to 5 days.

Makes about 16-20 cookies. Enjoy and happy eating! :)

Note: I typically just bake mine for 15 minutes and they turn out fine. But yours may be different as all oven temperatures vary so letting them bake the full 17 minutes may be fine. I say set your timer for 15 minutes and add on from there.

Tuesday, October 16, 2012

brown butter chocolate chip cookies

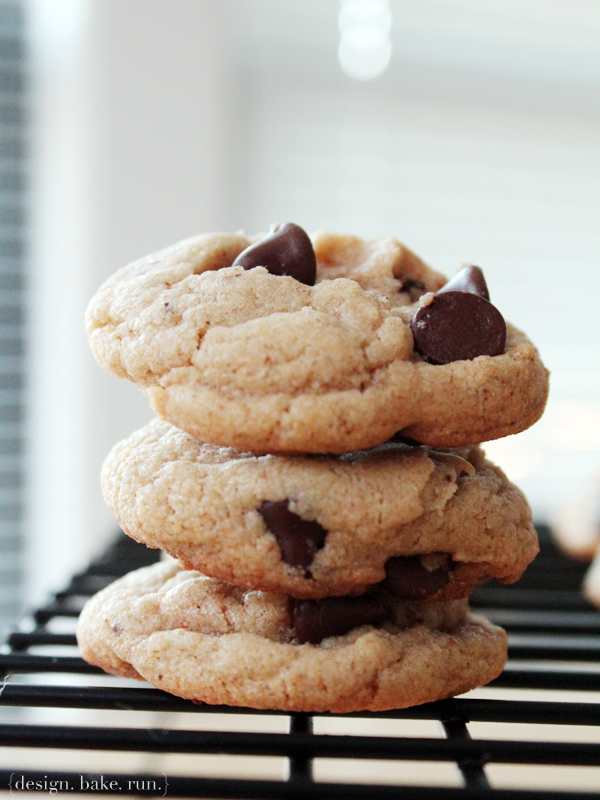
Brown Butter Chocolate Chip Cookies via design. bake. run.

c wanted to make some chocolate chip cookies this past weekend. we haven't made any in a while so i decided, why not?! instead of our typical chocolate chip recipe we usually do (you can find the recipe here), i decided to try a different one. i must say, these brown butter chocolate chip cookies are sooooo good! they are definitely a new favorite and we will be making them again and again.

these are nice and soft and chewy. the smell of the brown butter is just sweet bliss. it's so good, i don't know why i've never even thought to use it in my recipes before.

below's the recipe should you be interested in baking some yourself. trust me, you will not be disappointed. we love love these!

Brown Butter Chocolate Chip Cookies via design. bake. run.
this brown butter chocolate chip cookie recipe was an instant hit!

Brown Butter Chocolate Chip Cookies via design. bake. run.
these brown butter chocolate chip cookies are now one of our new favorites

brown butter chocolate chip cookies
recipe from london bakes

Ingredients:
115g (1 stick) unsalted butter
75g (1/3 cup) unrefined caster/granulated sugar
90g (1/2 cup) light brown soft sugar
1 medium egg
1 tsp vanilla bean paste (or vanilla extract)
175g (1 1/2 cups or 6 oz) whole wheat pastry flour (regular whole wheat or all-purpose flour will do just fine too)
1/2 tsp baking powder
1/4 tsp bicarbonate of soda/baking soda
1/2 tsp salt
1/4 tsp instant coffee
110g (2/3 cup or 4 oz) chocolate chips
Sea salt for scattering on top (optional)

Directions:
  1. Put the butter in a small saucepan over a low heat and cook until it starts to bubble and has turned a lovely golden brown colour. Take off the heat and set aside to cool to room temperature.
  2. In a large bowl, whisk together the flour, baking powder, bicarbonate of soda/baking soda, salt and coffee.
  3. When the butter has cooled, cream it together with the sugars until combined. Add the egg and vanilla and beat again. As this isn't a recipe for a cake, you don't need to keep on beating forever - you just want everything all nicely mixed together. You can do it by hand if you want although I used my electric mixer.
  4. Fold in the dry ingredients, followed by the chocolate chips.
  5. Chill the mixture in the fridge for any time between 30 minutes and 24 hours. I don't have that much patience so my chilling time is normally closer to 30 minutes.
  6. Preheat the oven to 180°C/350°F and prepare a couple of baking sheets with either greaseproof paper or a silicone mat.
  7. Using an ice cream scoop or a cookie scoop, place spoonfuls of the dough on the baking sheet and, if desired, scatter a little sea salt on top.
  8. Bake for 8 - 10 minutes until the edges of the cookies just start to turn golden brown and are firm to the touch.
  9. Allow to cool on the baking tray for 10 minutes before transferring to a wire rack.

Makes 20 cookies. Enjoy!

Thursday, September 6, 2012

more macarons!

i have been baking lately. i've just been too busy or lazy to post up pictures. below are a few macarons i've baked within the last couple of weeks. i think i've got my own little french macaron recipe down now. i know i mentioned before how i use david lebovitz's, but i think from his... i've derived my own little recipe, which is almost foolproof (well, at least the 3-4 times i've made it, it's turned out great!). i cannot wait to make some more macarons. until next time, enjoy the photos below! and yes, i'm still working on my food photo skills. right now they suck. it doesn't help i don't have a fancy camera either. hehehe.. enjoy!

french coffee macarons
coffee macarons with coffee chocolate filling -- these turned out sooooo yummy!

marbled coffee macarons with chocolate ganache

classic vanilla macarons
sometimes, the classic vanilla macaron is best. i love simple things and this is definitely one of them.

homemade baked goods as gifts
my gift packaging isn't quite there yet, but i'm trying. these look so much better than many of my previous ones.

Tuesday, August 21, 2012

french coffee macarons with nutella filling

french coffee macarons with nutella filling -- design. bake. run. blog

french macarons in the making -- design. bake. run. blog

last night i made some cream puffs (more on that later) with pastry cream filling. with the left over egg whites, i decided that i should use up the coffee almond mixture i had made up some time ago (the last time i made french macarons, using pierre herme's recipes) and is now sitting in the freezer waiting to be used. so yes, i went ahead and made some french macarons last night.

the coffee macarons turned out pretty good. but i must say, there is a big difference in how the cookies come out between the weighted dry ingredients vs. the cup measured ones. in the past i've mostly just use david lebovitz french macaron recipe and adapt accordingly to my liking. sometimes they come out okay, sometimes the cookie shells are hollow. these ones from last night was nothing like that. they're a tad more chewy in a good way and there are no hollow shells! plus, for some odd reason the batter was a little more forgiving. it felt like i had folded the batter a million times, but nope, that wasn't reflected in the outcome of the cookies. only one tiny thing i really didn't care about in these ones was how the feet look. i felt like david lebovitz recipe gave me better feet. these ones didn't look as pretty and the cookies came out flatter. they do look and taste the part so i guess it's okay. it's just a matter of my personal preferences.

Thursday, July 5, 2012

a few photos from yesterday's fourth of july

fireworks
mark and i took c to his first ever 4th of july fireworks show last night. he loved it and had so much fun. seeing the excitement and joy on his face was worth the hassle of getting to and from the event.

starbucks coffee
yes, i couldn't help it. starbucks was giving away a free tall coffee in celebration of the fourth of july. a little silly waiting 20 minutes in line for my free coffee, but yes, i was one of them.


hot dogs, fries, coleslaw & potato salad meal
nothing says american better than hot dogs, fries, coleslaw and potato salad! yum. :)

mini cupcake!
of course, another shot of those vanilla cupcakes. this one's a mini actually.

Related Posts Plugin for WordPress, Blogger...